License, Tools and Help tabs
The Advanced Order Export for WooCommerce plugin includes three critical configuration tabs that often work together: the Tools tab for settings migration, the License tab for Pro version activation, and the Help tab for technical support access. While the plugin’s main functionality lives in the Export Now, Profiles, and Scheduled Jobs tabs, these three utility tabs provide essential management capabilities for maintaining Pro installations across multiple environments.
This guide covers every option available on the Tools, License, and Help tabs, explains when and why to use each feature, and provides practical recommendations for common workflows such as migrating settings between staging and production, activating Pro licenses, and accessing developer support resources.
Accessing the Advanced Order Export Tools & License
The Tools, License, and Help tabs are located together within the plugin’s global settings area:
Step‑by‑step access:
- In the WordPress admin sidebar, navigate to WooCommerce → Export Orders.
- Click on the Settings tab.
- Within the Settings page, locate the Tools, License, and Help sub‑tabs at the top of the page.
The Tools tab is available in both the free and Pro versions. The License tab appears only when the Pro version is installed. The Help tab is available in all versions.
The License Tab: Managing Pro Version Activation
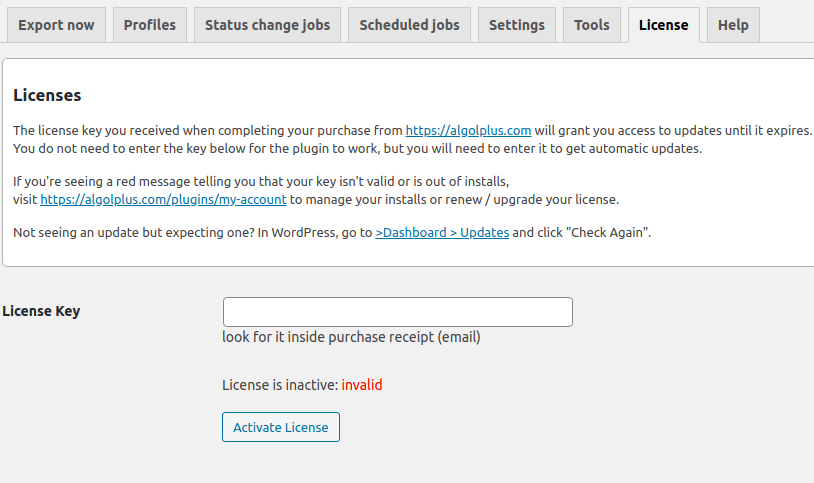
The License tab is where you activate and manage your Pro version license key. This tab appears only when the Advanced Order Export for WooCommerce Pro version is installed and active.
What the License tab provides:
- A field to enter your Pro license key
- An Activate button to unlock Pro features
- Status indicators showing whether the license is active, expired, or invalid
- Links to purchase a new license or manage an existing one
Why license activation matters:
Without an active license, the Pro version reverts to free functionality. To access all Pro features—scheduled exports, multiple destinations, Zapier integration, advanced filtering, and additional file formats—the license must be activated on each site where the Pro version is installed.
Step‑by‑step guide to activating your Pro license:
- Navigate to WooCommerce → Export Orders → Settings → License.
- Locate the license key in the purchase confirmation email received after buying the plugin.
- Enter the key into the License key field.
- Click the Activate button.
- A success message appears, and the license status changes to Active.
If you have problems with the Pro version license:
- Ensure the key is entered exactly as received, including all hyphens.
- Verify that the domain matches the one used during purchase.
- Clear any caching plugins that might interfere.
- Deactivate and reactivate the plugin, then try activating the license again.
- If the license activation continues to fail, you can find a solution in the Pre‑Buy FAQ or contact support.
Important notes about licensing:
- The Pro version license is per site. One license key activates one live (production) site.
- The license can be used on a staging site for testing. If you need to move the license to a new domain, deactivate it on the old site first, then activate it on the new site.
- An expired license stops receiving automatic updates but does not disable Pro features already installed. The plugin continues to function as it did before expiration.
- When upgrading from the free version to Pro, you should deactivate and delete the free version first. Your settings will not be lost during this process.
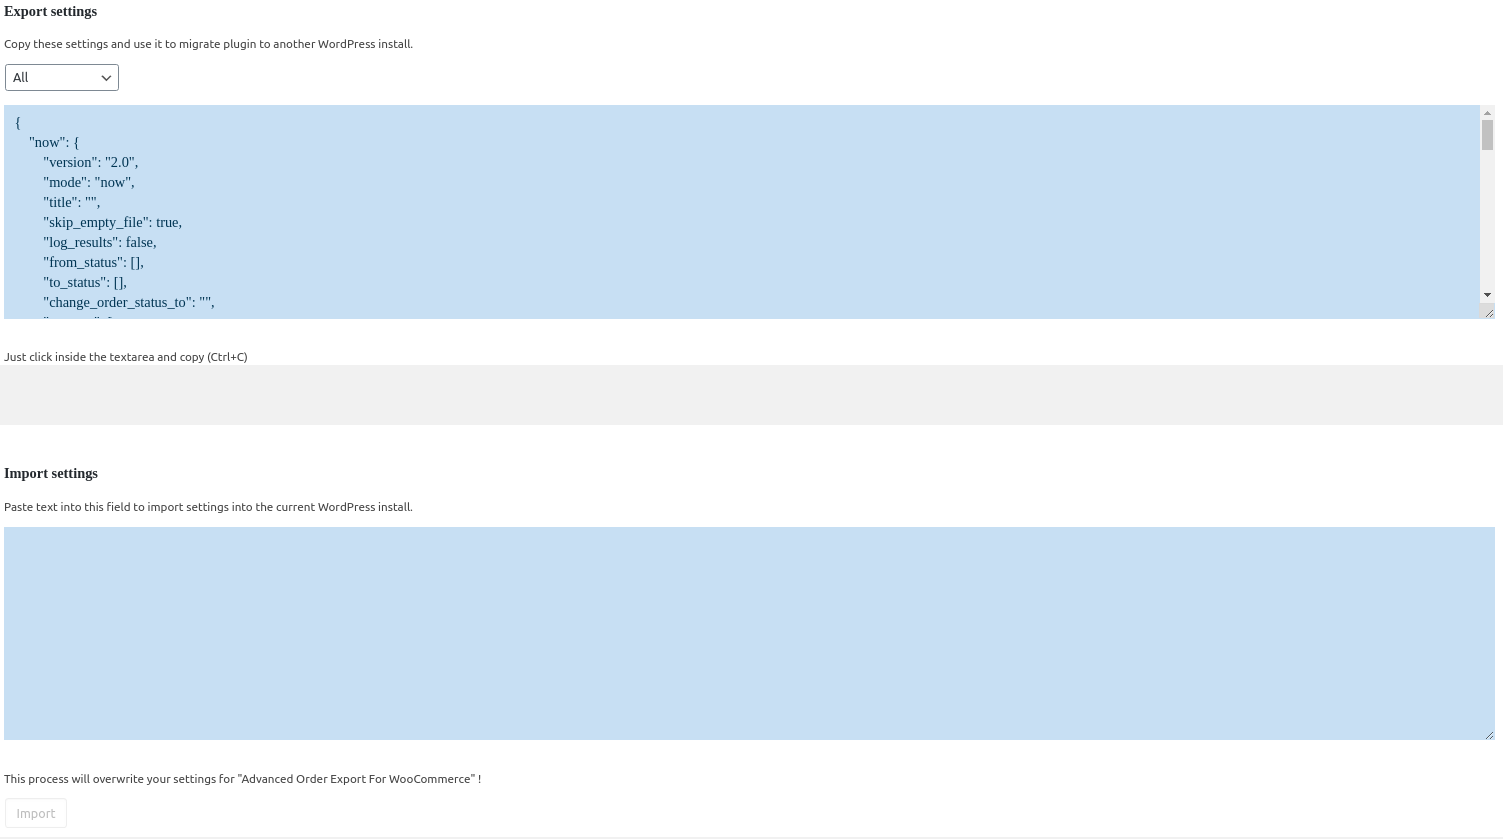
The Tools Tab: Exporting and Importing Plugin Configurations
The Tools tab provides a simple but powerful utility for transferring your entire plugin configuration from one WordPress installation to another. This capability is essential for several common workflows.
What can be exported:
The export includes all plugin‑specific settings, which typically encompass:
- All saved export profiles (including their field selections, filters, and output settings)
- Scheduled jobs configurations (if the Pro version is installed on the target site)
- Status change jobs configurations
- Global settings from the General, PDF, HTML, Interface, and Jobs tabs
- Zapier integration settings (API keys and connections)
- License information (Note: the license key itself is not transferred; you must reactivate the license on the target site)
What does NOT get transferred:
- The plugin’s license key (each site requires its own valid license for Pro features)
- Third‑party integration credentials that are stored outside the plugin’s own settings space
Why this matters:
The export/import functionality saves hours of repetitive configuration work. Instead of manually recreating complex export profiles, scheduled jobs, and filter combinations on a new site, you can transfer everything in seconds using the Tools tab.
| Use Case | Explanation |
|---|---|
| Staging to production migration | Configure and test all export profiles on a staging site, then transfer the working configuration to the live store without re‑entering every setting. |
| Multi‑store management | Maintain several WooCommerce stores with identical export requirements. Configure one store and replicate the settings to all others. |
| Backup before major changes | Export your current plugin settings before making extensive modifications. If something goes wrong, re‑import the saved configuration to restore the previous state. |
| Team collaboration | One team member configures the export profiles, exports the settings, and shares the configuration file with colleagues who need the same setup. |
Step‑by‑Step Guide to Using the Tools Tab
Exporting settings from the source site:
- On the source WordPress installation, navigate to WooCommerce → Export Orders → Settings → Tools.
- Locate the dropdown menu positioned above the export text area.
- Choose which settings to export. The available options generally include:
- All settings – Exports all plugin configurations, including profiles, scheduled jobs, and global settings. This is the recommended choice for most migration scenarios.
- Export profiles only – Exports only the saved export profiles, excluding scheduled jobs and global settings.
- Scheduled jobs only – Exports only the scheduled job configurations.
- After selecting the desired option, the text area below is automatically populated with the exported settings data (typically in a JSON or serialised format).
- Copy all the information from the text area into your clipboard. Select the entire content (Ctrl+A or Cmd+A) and copy it.
Importing settings to the target site:
- On the target WordPress installation, navigate to WooCommerce → Export Orders → Settings → Tools.
- Locate the Import text area.
- Paste the previously copied settings data from your clipboard into the import text area.
- Click the Import button.
Important warning: The import operation overwrites all existing settings of the Advanced Order Export for WooCommerce plugin on the target site. Any export profiles, scheduled jobs, or global settings already present on the target site are replaced entirely. Always export a backup of the target site’s current settings before performing an import if you need to preserve them.
Post‑import steps:
After a successful import, complete the following verification steps:
- Check that all expected export profiles appear in the Export Now and Profiles tabs.
- Verify that scheduled jobs are present (if the Pro version is installed) in the Scheduled Jobs tab.
- Re‑enter the Pro license key on the License tab if the target site uses the Pro version. The license key is not transferred during the export/import process.
- Update destination‑specific credentials such as FTP passwords, email SMTP settings, or HTTP POST authentication details. These credentials often contain site‑specific information that must be reconfigured manually.
- Run a test export on the target site to confirm that all settings were transferred correctly and that the export generates the expected output.
The Help Tab: Accessing Technical Support and Developer Resources

The Help tab is your gateway to technical support and developer documentation for the Advanced Order Export for WooCommerce plugin.
What the Help tab provides:
- A direct link to the support ticket system where you can submit detailed requests
- Links to code snippets for popular third‑party plugins (ACF, Dokan, WPML, etc.)
- Access to developer documentation for extending the plugin via custom PHP code
Why this matters:
The Help tab centralises all support resources, making it easy to find solutions to export‑related issues, customisation guides, and integration instructions without leaving the plugin interface.
Step‑by‑step guide to using the Help tab:
- Navigate to WooCommerce → Export Orders → Settings → Help.
- Review the available links:
- Support ticket system – Click the link to open a new support request form. Before submitting, read the code snippets page or check the developer documentation to study how to extend the plugin.
- When submitting a support ticket, describe your issue as detailed as possible and attach screenshots or screen video recordings. This information is so helpful for the support team to diagnose and resolve your issue quickly.
Best practices for using the Help tab:
- Check existing documentation first – Before opening a support ticket, search the plugin’s knowledge base. Many common questions are already answered.
- Include relevant details – When submitting a ticket, provide your WordPress and WooCommerce versions, PHP version, the exact export settings you are using, and any error messages you have encountered.
- Attach screenshots or video recordings – Visual evidence helps the support team understand the issue faster.
- Use code snippets for customisations – If you need to integrate with another plugin or add a custom field, the code snippets library is the first place to look.