Interface
The Advanced Order Export for WooCommerce plugin includes an Interface settings tab that lets you tailor the plugin’s appearance and behaviour to match your specific workflow. These controls give you fine-grained command over which interface elements are visible, how dates are selected, and how the plugin handles destinations.
This guide covers every option found on the Interface tab, explains when and why you might adjust each setting, and provides practical recommendations for different store configurations.
Accessing the Advanced Order Export Interface Settings
The Interface Settings are located in the plugin’s main configuration area, separate from individual export profile settings.
Step-by-step access:
- In the WordPress admin sidebar, navigate to WooCommerce → Export Orders.
- Click on the Settings tab.
- Within the Settings page, locate and click on the Interface sub-tab.
All changes made in this section are applied globally and persist across different export profiles and user sessions.
Complete Interface Settings Reference
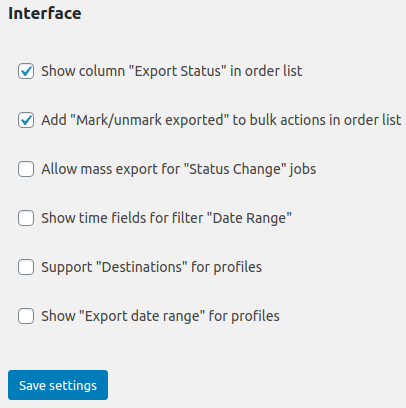
The Interface controls are designed to be self-explanatory, but understanding the exact function of each setting will help you avoid confusion in your daily workflows. All options are presented as simple checkboxes or toggles.
1. Show Column “Export Status” in Order List

What it does: When enabled, this adds a dedicated Export Status column to the main WooCommerce → Orders page, adjacent to the existing order data columns.
Why it matters: This column visually indicates which orders have been exported via plugin profiles and which have not. The status is updated automatically when you export orders while the Mark exported orders option is enabled in your export profile.
Use cases:
| When to enable it | When to keep it disabled |
|---|---|
| Teams need to visually track which orders have already been processed for accounting, dropshipping, or ERP integration. | The Export Status column is considered unnecessary visual clutter. |
| Bulk action exports or scheduled jobs must avoid re‑exporting the same orders repeatedly. | The store relies exclusively on date‑range filtering for export selection. |
| Multiple team members handle exports and need to coordinate their work without overlapping. | The store has a low volume of orders and manual tracking is not required. |
How it works in practice: Once enabled, a new column appears on the Orders page. When you run an export job with Mark exported orders enabled, the plugin updates this column for each exported order. You can also manually update the status using the bulk actions menu (see the plugin’s main documentation for details).
2. Activate Scheduled Jobs
What it does: This is the master on/off switch for all scheduled jobs configured in the Scheduled Jobs tab. When enabled, all scheduled jobs execute according to their defined schedules. When disabled, none of them run, regardless of their individual settings.
Why it matters: This single control provides a powerful safety mechanism. Instead of editing or disabling multiple scheduled jobs one by one, you can pause all automated exports instantly.
When to disable it:
| Use case | Explanation |
|---|---|
| Performing maintenance on the store or its backend systems | Disable scheduled exports temporarily to prevent errors or incomplete data from being sent to external systems. |
| Testing a new export profile | Disable all existing scheduled jobs temporarily while validating a new profile to avoid unwanted overlaps. |
| Troubleshooting | Isolate whether export issues are caused by scheduled jobs or manual exports. |
Important: When the Activate scheduled jobs checkbox is disabled, the plugin stops generatingscheduled exports entirely. However, any previously saved destination actions (such as Zapier hooks or FTP uploads) are not rolled back; they simply do not receive new data.
3. Allow Mass Export for “Status Change Jobs”
What it does: By default, the Export, Export [w/o progressbar] and Export now buttons are hidden on the Status Change Jobs tab. Enabling this option makes those buttons visible, allowing you to run a manual, one‑time export of the status change job as if it were a standard profile.
Why it matters: Status change jobs are designed to run automatically when an order’s state transitions (e.g., from “Pending” to “Completed”). However, during initial configuration or when testing, you may want to manually trigger the export without waiting for a status change. This option gives you that flexibility.
When to enable it:
| Use case | Explanation |
|---|---|
| Testing a new status change job | Run a manual export to verify field selection, formatting, and destination settings before relying on automatic triggers. |
| Backfilling historical data | If the automatic trigger missed some orders due to a misconfiguration, manually run the job to export those rows. |
| Demonstration or training | Show stakeholders how the export will look without needing to simulate a real order status change on a live store. |
4. Show Time Fields for Filter “Date Range”
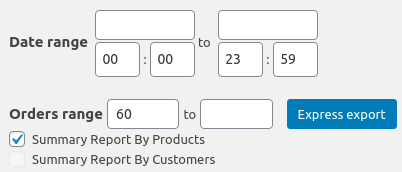
What it does: Adds time selection fields (hours and minutes) to the Date range filter on the Export Now and Scheduled Jobs tabs. With this option enabled, you can specify a precise time window (e.g., from 2025-05-01 14:30 to 2025-05-07 09:15) instead of just full dates.
Why it matters: E‑commerce data often changes minute by minute. For stores that handle real‑time order processing, accounting cutoff times, or hourly inventory updates, the ability to filter by exact timestamps is essential.
When to enable it:
| Use case | Explanation |
|---|---|
| Daily cutoff reports | Export orders only up to a specific hour (e.g., 2:00 PM) for batch processing. |
| Reconciliation with external systems | Match WooCommerce order timestamps exactly with timestamps in payment gateways or ERP logs. |
| High‑volume stores with multiple daily exports | Segment exports more granularly than full days, reducing duplicate or overlapping data. |
Tip: When time fields are visible, the Date range filter changes from a simple date picker to a combined date/time picker.
5. Support “Destinations” in the Profile
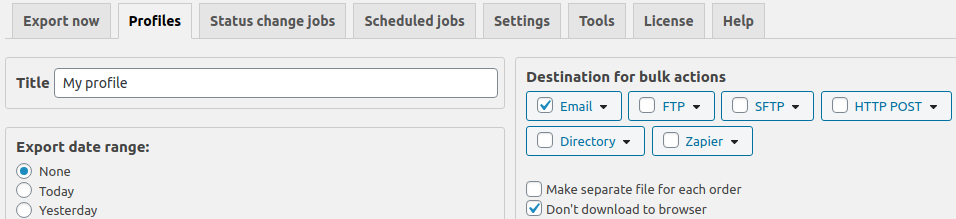
What it does: When enabled, this option adds a Don’t download to browser checkbox to the Destination block of your export profiles. If you select this checkbox and click Export, the generated report is not downloaded to your local computer. Instead, it is sent directly to the destination configured in the profile (e.g., email, FTP, HTTP POST).
Why it matters: This setting is critical for fully automated workflows where the export file is never meant to be saved locally. It prevents accidental file downloads and keeps the admin interface clean.
When this option is most useful:
| Use case | Explanation |
|---|---|
| FTP automation | The export is uploaded directly to an external server; there is no need to download a local copy. |
| Email reports | The export is attached to an email and sent to a recipient; the administrator never needs to open the file. |
| Webhook payloads (HTTP POST) | The export data is sent as a JSON or XML payload to an API; downloading a file would be meaningless. |
How to use it:
- Ensure Support “Destinations” in the profile is enabled on the Interface tab.
- Open any export profile and go to the Destination block.
- Select your desired destination (e.g., Email, FTP, HTTP POST).
- In the same block, check the Don’t download to browser checkbox.
- Click Export. The file will be delivered only to the configured destination.
Interaction note: If no destination is configured or the destination fails (e.g., FTP credentials are incorrect), no file is created or saved. The export will simply not produce output. Always test your destination configuration before relying on this feature for critical workflows.
6. Show “Export Date Range” for Profiles

What it does: Displays the Export date range section inside your export profile. This section allows you to override the global date range for that specific profile, defining exactly which period of orders should be included in that report.
Why it matters: Without this setting, every export profile would always use the date range set in the global Export Now tab or scheduled job settings. Enabling this option decouples the profile from the global date picker, giving you per‑profile precision.
When to enable it:
| Use case | Explanation |
|---|---|
| Monthly report profiles | One profile always exports the previous full month regardless of the current date. |
| Year‑to‑date summary profiles | A profile that always exports orders from January 1st of the current year. |
| Testing profiles | Keep a test profile that always exports only the last 24 hours, while other profiles use different ranges. |
How to use it:
- Enable Show “Export date range” for profiles on the Interface tab.
- Open the target export profile.
- Click the Export date range block to expand it.
- Set your desired custom date range.
- Save the profile. The custom range will be used every time that profile is run, overriding any global date settings.
Best Practices for Advanced Order Export Interface Settings
- Enable the Export Status column for team environments. Visual tracking prevents duplicate exports and provides a clear audit trail of which orders have been processed.
- Disable scheduled jobs during maintenance periods. Use the Activate scheduled jobs master switch as a safety lock before updating plugins, themes, or WordPress core.
- Enable time fields only if needed. For most stores, day‑level granularity is sufficient. Showing time fields adds a small amount of visual complexity. Enable them only when your workflow genuinely requires sub‑day precision.
- Use the “Don’t download to browser” option for headless automation. When exports are fully automated (FTP, HTTP POST, email), enable this option to prevent redundant local file saves and keep admin sessions tidy.
- Create dedicated profiles with custom date ranges. Instead of constantly changing the global date picker, enable Show “Export date range” for profiles and set fixed ranges for recurring reports (e.g., a profile that always exports the previous month).
Summary
| Setting | Purpose | Recommendation |
|---|---|---|
| Show column “Export Status” in order list | Adds a visual export status column to the WooCommerce Orders page. | Enable for team environments and to track which orders have been exported. |
| Activate scheduled jobs | Global master switch for all scheduled export jobs. | Enable to run scheduled exports; disable during maintenance. |
| Allow mass export for “Status Change jobs” | Shows manual export buttons on the Status Change Jobs tab for testing and backfilling. | Enable during development and testing; consider disabling in production. |
| Show time fields for filter “Date Range” | Adds hour/minute selectors to the date range filter. | Enable only when workflows require sub‑day precision. |
| Support “Destinations” in the profile | Adds a “Don’t download to browser” option to the Destination block. | Enable for fully automated workflows (FTP, email, HTTP POST). |
| Show “Export date range” for profiles | Displays a custom date range section inside each export profile. | Enable when different profiles need different fixed date ranges. |