WooCommerce TM Extra Product Options
Selling personalized products? Customer selects age, gender, and custom labels?
The previous code created separate rows per option. This one does something different.
Each option becomes its own column. One product row. Many option columns.
What this code does
Turns TM Extra Product Options into individual columns. Perfect for spreadsheets where each product should appear once.
Example columns: “Age”, “Gender”, “Label1”, etc.
The complete code
You should EDIT and TWEAK code! See below how to get “Element id”.
|
1 2 3 4 5 6 7 8 9 10 11 12 13 14 15 16 17 18 19 20 21 22 23 24 25 26 27 28 29 30 31 32 33 34 35 36 37 38 39 40 41 42 43 44 45 46 47 48 49 50 51 52 53 54 55 56 57 58 59 60 61 62 63 64 65 66 67 68 69 |
// one column for each option class WOE_TM_extra__options_fields { // EDIT list here, use pair 'Export Label'=>['TM Field label', 'TM Field label 2', 'TM Field label N'] var $tm_fields = array( 'Age' =>['Age','Child Age','Children Age'], // 3 fields will be exported as "Age" 'Gender'=>['Gender'], 'Label1'=>['Front Label'], ); function __construct() { add_filter('woe_get_order_product_fields',array($this,'add_product_fields') ); add_filter('woe_get_order_product_item_meta', array($this,'fill_tm_fields') ); } function add_product_fields($fields) { foreach($this->tm_fields as $name=>$names) { $fields['tm_field_'.$name] = array('label'=>$name,'colname'=>$name,'checked'=>1); } return $fields; } //TWEAK output for each field function format_line($tm_field) { return $tm_field['value']; // can use $tm_field['name'], $tm_field['price'] , $tm_field['quantity'] } function fill_tm_fields($item_meta) { // Gather TM values to array $product_fields = array(); $product_fields[] = array(); //Cart Fees if( isset($item_meta["_tmcartfee_data"]) AND is_array($tmfields = maybe_unserialize($item_meta["_tmcartfee_data"][0])) ) { foreach($tmfields[0] as $tm_field) { $element_id = $tm_field['name']; if( !isset($product_fields[$element_id]) ) $product_fields[$element_id] = array(); $product_fields[$element_id][] = $this->format_line($tm_field); } } //Cart Items if( isset($item_meta["_tmcartepo_data"]) AND is_array($tmfields = maybe_unserialize($item_meta["_tmcartepo_data"][0])) ) { foreach($tmfields as $tm_field) { $element_id = $tm_field['name']; if( !isset($product_fields[$element_id]) ) $product_fields[$element_id] = array(); $product_fields[$element_id][] = $this->format_line($tm_field); } } //make list foreach($product_fields as $element_id=>$values) $product_fields[ $element_id ] = join("n", $values); // add to item meta foreach($this->tm_fields as $name=>$element_ids) { //gather all keys $vals = array( ); foreach($element_ids as $element_id) { if( isset($product_fields[$element_id])) $vals[] = trim($product_fields[$element_id]); } // it must be array ! $item_meta['tm_field_'.$name] = array( join("n", $vals) ); } return $item_meta; } } new WOE_TM_extra__options_fields(); |
Setup steps
- Edit the
$tm_fieldsarray to match your actual TM options
Look at your order edit screen. Find the “Extra Product Options” section. Note the exact labels.
In the example image:
- “Front Label” with value “Happy Birthday!”
- “Gender” with value “Male”
- “Age” with value “12”
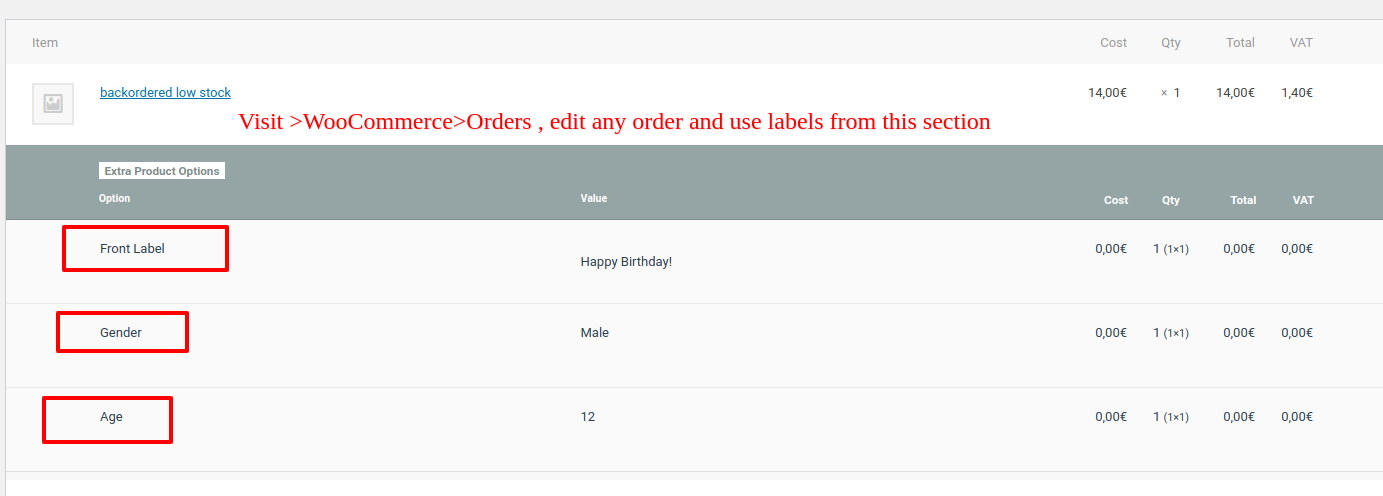
So the array should be:
|
1 2 3 4 5 |
var $tm_fields = array( 'Age' => ['Age'], 'Gender' => ['Gender'], 'Front Label' => ['Front Label'], ); |
- Copy the code into your theme’s
functions.php - Go to Advanced Order Export for WooCommerce
- Create or edit an export profile
- Open Setup Fields → Products
- You’ll see your option columns. Check the ones you need
- Save and test on an order with TM options
What your export looks like
One product row. Multiple option columns.
| Product | Age | Gender | Front Label |
|---|---|---|---|
| Birthday Card | 12 | Male | Happy Birthday! |
Much cleaner than one row per option.
Mapping multiple TM fields to one column
Sometimes different products use different field names. “Age” on one product. “Child Age” on another.
The code handles this. Map both to the same column:
|
1 2 3 |
var $tm_fields = array( 'Age' => ['Age', 'Child Age', 'Children Age'], ); |
All three source fields go into the “Age” column.
Customizing output
Change format_line() to show different data:
Show option name and value:
|
1 2 3 |
function format_line($tm_field) { return $tm_field['name'] . ': ' . $tm_field['value']; } |
Show price too:
|
1 2 3 |
function format_line($tm_field) { return $tm_field['value'] . ' (' . $tm_field['price'] . ')'; } |
When you need this
You sell many customizable products. Each product has 5-10 options.
You prefer one row per product. Not 10 rows per product.
Your spreadsheet needs to be compact. Easy to read.
You compare options across different products in the same row.
Common mistake
The field names must match exactly. “Front Label” won’t match “FrontLabel” or “front label”.
Check your order edit screen. Copy the label exactly as shown. Paste into the array.
Empty columns?
The TM field wasn’t filled for that product. Or the field name doesn’t match.
Add debugging. Temporarily add var_dump($product_fields) inside fill_tm_fields(). See what TM data exists.
Pro tip
Hide TM columns you don’t need. Uncheck them in Setup Fields. Your export stays clean.
Need both row-per-option AND column-per-option? Create two export profiles. Use the previous code for one. This code for the other.
Real talk
TM Extra Product Options stores data in complex arrays. This code flattens them into simple columns.
Your team gets one row per product. All options visible horizontally. No scrolling through duplicate rows.
Perfect for weekly reports. Accounting reviews. Or any situation where compact = better.