The PDF (Portable Document Format) export format in Advanced Order Export for WooCommerceis purpose‑built for a specific set of needs: delivering professional, print‑ready reports that can be shared, archived, or presented to clients and stakeholders. Unlike spreadsheet formats (CSV, XLS) that are designed for data manipulation, PDF is the gold standard for fixed‑layout documentation—exactly what is needed for monthly financial summaries, client order packs, and executive dashboards.
Why PDF is the Go‑To Format for Reports and Documentation
PDF is the preferred format for delivering reports to people who do not need (or should not have) access to the underlying raw data. The key advantages include:
| Use Case | Why PDF is the Right Choice |
|---|---|
| Monthly sales reports for management | A PDF preserves the layout, colours, and formatting exactly as intended, regardless of which device or software the recipient uses. |
| Client order history packs | PDFs can be branded with logos and custom styles, reinforcing your company’s identity while delivering clear order data. |
| Accounting and tax documentation | PDF offers a non‑editable, verifiable format that is widely accepted by auditors and tax authorities. |
| Print‑friendly archive | PDF files print reliably without unexpected page breaks or shifted columns, making them ideal for physical filing. |
| Internal dashboards and summaries | Summary reports (by product or by customer) can be formatted for quick scanning, with totals, subtotals, and visual highlights. |
The PDF format is available in both the free and Pro versions of Advanced Order Export for WooCommerce, making this powerful reporting feature accessible to all users.
Accessing the PDF Format Settings
All PDF‑related options are located in the Output block of an export profile:
- Navigate to WooCommerce → Advanced Order Export.
- Create a new export profile or edit an existing one.
- In the Output block, set Format to PDF.
- The PDF‑specific settings appear below the format selector.
The plugin supports the PDF format alongside CSV, XLS, XML, JSON, TSV, and HTML, giving complete flexibility to choose the right format for each job.
The Complete PDF Options Reference
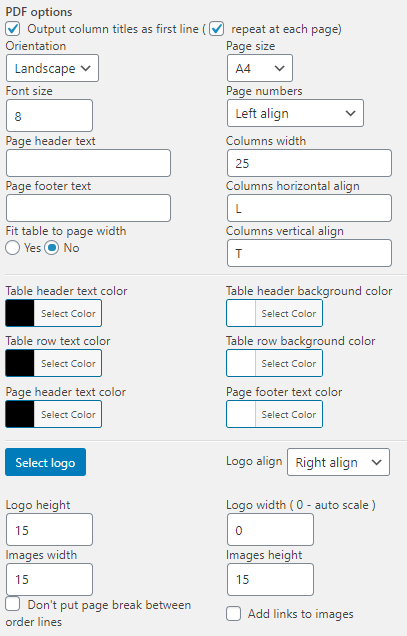
The following settings provide precise control over how the PDF report is generated.
Page Number Alignment
What it does: Controls the horizontal placement of page numbers on each page of the exported PDF. The available options include left, center, and right alignment. The plugin documentation specifically mentions the “Page number – right align” configuration.
Why it matters: Page numbers help recipients navigate multi‑page reports. Right alignment is the conventional choice for most business documents, placing the page number neatly in the margin. Left alignment may be preferred for documents with a left‑heavy layout, while centre alignment is occasionally used for formal reports.
When to use each alignment:
- Right align (recommended) – Standard for most business reports.
- Centre align – Formal reports or documents with a symmetrical design.
- Left align – Documents with binding margins or when page numbers are part of a table of contents.
Page Header Text
What it does: Adds custom text to the header area of every page in the PDF. The plugin documentation shows an example where the header text is set to “First example”.
Why it matters: Headers provide essential context about the report. A well‑crafted header helps recipients quickly identify the document’s purpose, the reporting period, and the department or person who generated it.
What to include in a page header:
- Report title (e.g., “May 2026 Sales Summary”)
- Company name and/or logo
- Date range of the exported data (e.g., “Orders from 2026-05-01 to 2026-05-31”)
- Department or recipient name (e.g., “Accounting Department”)
Pro tip: Combine static text with dynamic placeholders such as
{from_date}and{to_date}(available in the Export Filename field) to create fully automated, self‑documenting headers. For detailed instructions, see the Export Filename guide.
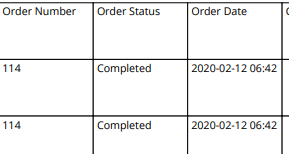
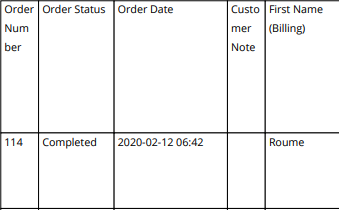
Fit Table to Page Width
What it does: When enabled, this option automatically scales the exported table so that it fits horizontally within the page margins, eliminating the need for horizontal scrolling or awkward column wrapping.
Why it matters: Tables with many columns are a common challenge in PDF exports. Without this setting, a wide table may be truncated or require recipients to zoom and scroll horizontally, which defeats the purpose of a polished, printable report. The plugin documentation explicitly recommends enabling “Fit table to page width – Yes” for most use cases.
When to enable it:
- The export includes 5 or more columns.
- The report will be printed on standard paper sizes (Letter, A4, Legal).
- The primary audience will view the report on screens with limited width (e.g., laptops, tablets).
When to disable it:
- The table is very wide (10+ columns) and scaling would make the text unreadably small.
- The report contains many rows but very few columns.
- Maximum detail is required, and the recipient is comfortable scrolling.
Scaling a very wide table may result in small font sizes. For extremely wide exports, consider reducing the number of columns in the Setup Fields tab or splitting the export into multiple, focused reports.
If the option disabled, set a fixed width for the columns in the report.

If you need to set the width for each column separately, list the values separated by commas. The quantity of the inputted numbers must be equal to the columns’ quantity that you want to set a fixed width.

Page Orientation: Portrait or Landscape
What it does: Determines the orientation of each page in the PDF, either Portrait (taller than wide) or Landscape (wider than tall).
Why it matters: The choice of orientation has a direct impact on how many columns can fit legibly on a page. Landscape mode provides significantly more horizontal space, making it the better choice for most e‑commerce order exports, which typically include a large number of fields.
When to use Portrait:
- The report has 3–4 narrow columns (e.g., Order ID, Date, Total, Status).
- The report will be bound in a physical folder or report cover.
- The report is being integrated into a document with a consistent portrait layout.
When to use Landscape:
- The export includes 5 or more columns.
- The report contains product‑level details (SKU, Quantity, Price, Tax, Shipping, etc.).
- “Fit table to page width” is enabled and the table is wide.
Recommendation: For most order export profiles, start with Landscape orientation. It provides the flexibility to add columns later without sacrificing readability.
Page Size: Letter, A4, A3, and Legal
What it does: Specifies the physical paper size that the PDF is optimised for. The plugin supports standard sizes including Letter, A4, A3, and Legal.
Why it matters: Different regions and use cases favour different paper sizes. North America typically uses Letter (8.5 × 11 inches), while most other countries use A4 (210 × 297 mm). Selecting the correct size ensures that the report prints correctly and that on‑screen scaling behaves predictably.
When to use each size:
| Page Size | Dimensions | Best used for |
|---|---|---|
| Letter | 8.5˝ × 11˝ | North American audiences |
| A4 | 210mm × 297mm | International audiences (most countries) |
| A3 | 297mm × 420mm | Large tables with many columns (double the width of A4) |
| Legal | 8.5˝ × 14˝ | North American documents requiring extra length |
Pro tip: When exporting to A3, the “Fit table to page width” setting becomes particularly effective, allowing very wide tables to be displayed at a readable font size.
Styling: Custom Colours and Logo
What it does: The PDF export format supports advanced visual customisation, including the ability to change colour schemes and add company logos to generated reports.
Why it matters: A professionally styled report with brand colours and logo reinforces your company’s identity and enhances credibility with clients, partners, and internal stakeholders.
Visual customisation options include:
- Changing the colour of text, headers, and table cells.
- Adding a company logo to the header or footer area.
- Applying consistent colour themes across multiple export profiles.
The plugin documentation notes that users can “change the colors in your file and add your logo”. Detailed instructions for these customisations are available in the plugin’s settings panel under the “Other settings” section.
Using PDF with Summary Reports
The PDF format is particularly well‑suited to summary reports, which aggregate order data rather than listing every line item. The plugin supports two types of summary reports:
Summary Report by Products
Selecting “Summary report by products” aggregates all orders by product, showing for each product the total quantity sold, total revenue, and any other selected fields. The documentation notes that when this option is chosen, “All other settings will be saved, except for the fields for export. They will be changed to those appropriate for this type of report”.
Ideal uses:
- Monthly product performance analysis.
- Inventory planning and reorder reports.
- Sales team performance tracking by product category.
Summary Report by Customers
Ticking “Summary report by customers” aggregates order data by customer, showing each customer’s total spend, order count, and other selected fields. As with the product summary, the export fields are automatically adjusted to suit this reporting type.
Ideal uses:
- Customer lifetime value (CLV) analysis.
- Loyalty programme reporting.
- Targeted marketing campaign preparation.
Summary reports in PDF format are also available for JSON and other formats, but PDF is the preferred choice when the report will be presented to non‑technical stakeholders.
Integrating PDF Exports with Scheduled Jobs and Destinations
The PDF format works with every automation feature of Advanced Order Export for WooCommerce.
Scheduled Jobs
PDF exports can be scheduled to run at any interval: hourly, twice daily, daily, weekly, or monthly. For example, to generate a PDF sales report every Monday morning:
- Create an export profile with PDF as the output format.
- Configure all PDF settings as desired.
- Navigate to the Scheduled Jobs tab.
- Choose Weekly and select Monday at 8:00 AM.
- Set the destination to Email (or FTP, Save on server, etc.).
- Save and activate the job.
Each Monday at 8:00 AM, the PDF report is generated and delivered automatically.
Destinations for PDF Exports
| Destination | Use Case |
|---|---|
| Deliver PDF reports directly to management, accounting, or client inboxes. | |
| Save on server | Archive PDFs on the server for long‑term storage and audit trails. |
| FTP / SFTP | Upload PDFs to a shared drive or external partner system for retrieval. |
| HTTP POST | Send PDF data to a webhook or custom integration (less common for PDF). |
| Google Sheets | Not applicable for PDF, but the plugin supports sending other formats to Google Sheets. |
Note: When emailing PDF exports, ensure that the “Append file contents to email body” option (found in the Email destination settings) is turned OFF. Appending binary PDF content to an email body will cause the email to fail.