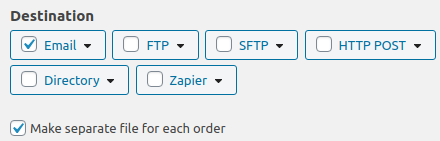
The Destination Block is a dedicated section where you tell the plugin where to send your exported order data.
The “Destination” block has next options:
Email
The Email destination is one of the simplest yet most powerful ways to deliver your order exports. Whether you need to send a daily sales report to your team or provide a fulfillment center with the latest orders, this feature automates the delivery and saves you valuable time.
Choose this type of the destination to have the plugin email the export file to a specified address. This option is great for automatically distributing daily sales reports to your team or sending order confirmations to a fulfillment center.
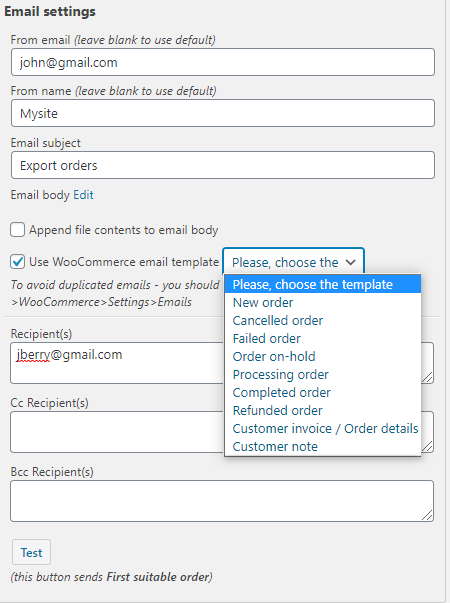
Configure Email Settings
The Email destination includes several configurable fields:
From Email – Enter the email address that will appear as the sender. We recommend using a domain-specific address (e.g., [email protected]) rather than a personal Gmail or Yahoo account, as this significantly improves deliverability. Leave it blank to use the default one.
From Name – Specify the name that recipients will see as the sender. For best results, use your store name or department name (e.g., “YourStore Reports”). Leave it blank to use the default one.
Email Subject – Define the subject line. The plugin supports placeholders to make your subjects dynamic and informative. For example, Order Export {date} gives each email a unique subject line.
Email Body – Craft your message content. To access the rich text editor, click the “Edit” link next to the email body field. This opens a WYSIWYG editor where you can format text, add links, and include dynamic placeholders for a personalized touch.
Configure Recipients
Recipient(s) – Enter the primary email address(es) where the export should be sent. To send to multiple recipients, simply separate each email address with a comma.
Cc Recipient(s) – Add email addresses to receive a carbon copy of the email.
Bcc Recipient(s) – Add email addresses to receive a blind carbon copy; these recipients will not be visible to other recipients.
Additional Email Options
Append file contents to email body – When enabled, the contents of your export file are displayed directly within the email body. Important: If you are using XLS format, this checkbox must be turned OFF. Having it enabled with XLS files will prevent the email from being sent successfully.
Use the WooCommerce email template – Enabling this option wraps your email in your store’s standard WooCommerce email template, maintaining a consistent brand appearance.
Make separate file for each order. This option paired with the option in the “Email” block – “Send separate files in one email”. On the “Status change jobs” tab, the “Send separate files in one email” the option is hidden.
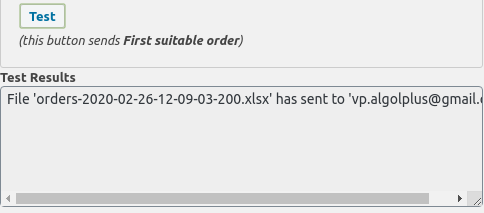
Testing
Before finalizing your configuration, always run a test:
Click the “Test” button.
The plugin will take the first suitable order from your store and send a test email using your current settings.
Save and Schedule
Click Save Settings to store your email configuration.
To automate email delivery, navigate to the Scheduling tab and choose your desired frequency (e.g., daily, weekly, monthly). The plugin will then automatically generate and email the export at your specified intervals.
FTP/SFTP
FTP (File Transfer Protocol) and its secure counterpart SFTP are the backbones of automated business data exchange. The FTP destination in Advanced Order Export for WooCommerce allows you to upload your order export files directly to an external server, eliminating manual downloads and enabling seamless integration with your fulfillment center, ERP system, or accounting software.
For full automation, this is where the magic happens. You can configure the plugin to automatically upload export files to your FTP. This enables seamless integration with external systems, allowing you to feed order data directly into your ERP, accounting software, or a drop-shipper’s system.
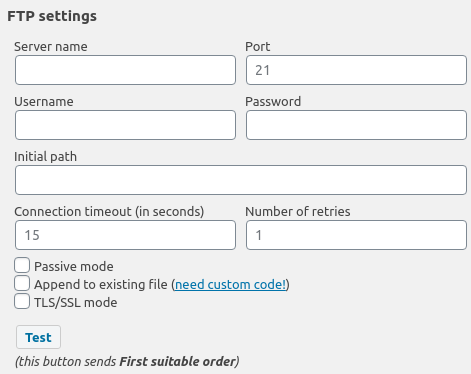
Configure Server Connection Settings
Fill in the following fields with your FTP server credentials:
Server Address – Enter the IP address or hostname of your FTP/SFTP server (e.g., ftp.yourserver.com or 192.168.1.100).
Username – Your FTP/SFTP login username.
Password – Your FTP/SFTP login password.
Port – The FTP/SFTP connection port. The default is 21 for standard FTP. For SFTP, this is typically 22. Check with your server provider if unsure.
Initial Path – The directory on the server where the export file should be uploaded. For example: /exports/orders/. If the path does not exist, the plugin will attempt to create it for you.
Configure Advanced Connection Options
Connection Timeout – Set the maximum time (in seconds) the plugin should wait for the FTP/SFTP connection to be established. The default value is usually sufficient, but you may need to increase it on slower networks.
Number of Retries – Set the maximum quantity the plugin should try to connect the FTP/SFTP server.
Passive Mode – This is the most important advanced setting. If your server is behind a firewall or NAT (common with many hosting providers), you MUST enable Passive Mode. Standard FTP/SFTP requires the server to initiate a data connection back to your client, which firewalls often block. Passive mode reverses this, letting the client start both connections. If you experience connection timeouts or “unable to open data connection” errors, enable Passive Mode as your first troubleshooting step.
TLS / SSL Mode – Enable this option to establish a secure, encrypted connection to your FTP server. This is critical when transferring sensitive customer data like addresses, phone numbers, or payment information. Whenever possible, use SFTP (which is encrypted by default) or FTPS with TLS/SSL enabled to protect your data in transit.
Append to existing file – This option allows you to add new records to an existing file on the FTP server instead of replacing it. Important: This feature requires custom code! Please refer to the “How to append records to existing CSV file at FTP server” article for implementation details and example PHP code.
Test Your Configuration
Before finalizing your setup, always run a thorough test:
Click the “Test” button.
The plugin will attempt to connect to your FTP/SFTP server and upload a test file.
Monitor the “Test Results” field, which displays a detailed log of the connection attempt and file transfer. This log is invaluable for troubleshooting connection issues.
If you see a green success message, your configuration is correct. If you see errors, refer to the troubleshooting section below.
Save and Schedule (Optional)
Click Save Settings to store your FTP/SFTP configuration.
To automate FTP/SFTP uploads, navigate to the Scheduling tab and choose your desired frequency (e.g., hourly, daily, weekly). The plugin will then automatically generate and upload the export file at your specified intervals.
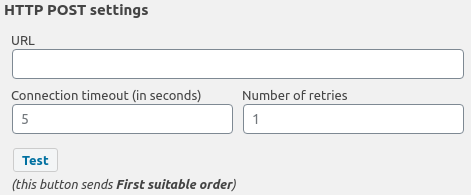
HTTP POST
The HTTP POST destination is one of our most flexible features. It allows you to send your order export data directly to any external API endpoint via an HTTP POST request. Think of it as a webhook that delivers your order data exactly where you need it—whether that’s a custom application, a third-party service, an ERP system, or an automation platform like Zapier or n8n.
This option sends your export file as data in an HTTP POST request. It’s a simpler, yet effective way to push data to a webhook or a legacy application.
Real-time or scheduled delivery – Combine with our scheduling engine to push data on your timeline.
Developer-friendly – Your custom application can instantly consume structured order data (CSV, JSON, XML, or XLS).
Universal integration – Connect WooCommerce to virtually any system that has an API.
Stateless and scalable – HTTP POST works across firewalls, clouds, and serverless environments.
Configure the Endpoint
URL – Enter the full URL of your receiving endpoint. Example: https://api.your-service.com/v1/orders/import
Choose Your Output Format
Before your data is sent, you must configure the export format in the “Output” block (located above the Destination block). For HTTP POST, we strongly recommend using JSON or XML as these are the most commonly accepted formats by REST APIs. While CSV and XLS are also supported, JSON is typically easier for developers to parse on the receiving end.
Save and Test
Click Save Settings to store your configuration.
Always test your endpoint before relying on it for production workflows.
Directory
The Directory destination (or “Save on server”) provides a straightforward way to store your order export files directly on your website’s server. This feature is essential for maintaining local archives of your order data for backup purposes, internal audits, or further processing by other scripts on the same server.
Specify the Saving Path
The most important setting is the saving path. This must be an absolute server path, not a URL.
To find the correct absolute server path for your WordPress installation:
Check your hosting control panel’s file manager (often shows the full path at the top).
Create a simple PHP file with <?php echo __DIR__; ?> and upload it to your site to see the path.
Or ask your hosting provider for the document root path of your website.
Important: The path you enter is the directory where the plugin will save the file, not the file name itself. The file name is configured separately in the “Output” block.
Test Your Configuration
Always run a test before relying on the Directory destination:
Click the “Test” button to perform a test export.
The plugin will attempt to write a test file to the specified directory.
Monitor the “Test Results” field for success or error messages.
A successful test will show a confirmation that the file was written. An error message will indicate issues with file permissions, path existence, or server configuration.
Save and Schedule
Click Save Settings to store your configuration.
To automate file saving, navigate to the Scheduling tab and set your desired frequency (e.g., daily, weekly). The plugin will then automatically generate and save the export file to your specified directory at the scheduled times.
Zapier
The Zapier destination is a bridge between your store’s order data and the entire Zapier ecosystem, enabling you to automatically send exported order information to over 8,000 external applications.
In this video you will find out how to link the Advanced Order Export For WooCommerce account with the Zapier service.