HTML Export Format
HTML Export Format of the Advanced Order Export for WooCommerce: Create Beautiful, Shareable Web Reports from Your Orders
While CSV and XLS are perfect for analysis and system integration, the HTML (HyperText Markup Language)format serves a different, equally vital purpose: creating beautiful, human-readable reports that can be viewed, shared, and printed without any special software.
This guide walks you through every setting in the HTML export format. You’ll learn not just whateach option does, but when and why to use it. We’ll cover how to style your reports, embed images, add custom headers and footers, and even use advanced CSS to craft a polished document that represents your brand. By the end, you’ll be able to generate executive summaries, client order packs, and internal dashboards with just a few clicks.
Export orders, products, coupons, and any custom fields in HTML format directly from your WooCommerce store.
Schedule automated HTML reports for delivery to your team via email or other destinations, keeping everyone in sync without manual work.
Why Choose HTML for Your Exports?
Before we dive into the technical details, let me explain why HTML is such a valuable format in your export toolkit. Unlike CSV or JSON, HTML is designed for human consumption in a web browser. It preserves formatting, supports images, and can be styled to match your brand, all while remaining incredibly easy to share.
Here’s when HTML shines brightest:
| Use Case | Why HTML is Perfect |
|---|---|
| Daily sales reports for your team | Your colleagues can view the report instantly in a browser without needing Excel or any plug‑in. |
| Client order summaries | You can generate a branded, professional pack of a customer’s order history and email it as a link or an attachment. |
| Internal dashboards on a shared drive | An HTML file can be saved to a server or network drive and opened by anyone on the team. |
| Print-friendly documentation | When printed, HTML reports can be structured to paginate cleanly, with repeating headers on every page. |
| Archiving order snapshots | HTML gives you a rich, visual snapshot of an order that includes images and styled text, which is far more useful for auditing than raw data. |
The HTML export format effectively turns your order data into a shareable web page. It’s incredibly easy to distribute, and with the plugin’s scheduling engine, you can automate the entire process—generating fresh HTML reports on a schedule and sending them directly to your team’s inbox.
Accessing the HTML Format Settings
You’ll find all HTML‑related options in the Output block of your export profile.
- Navigate to WooCommerce → Advanced Order Export.
- Create a new export profile or edit an existing one.
- In the Output block, set Format to HTML.
- The HTML‑specific settings will appear below the format selector.
Let’s walk through each of those settings in detail.
The Complete HTML Options Reference
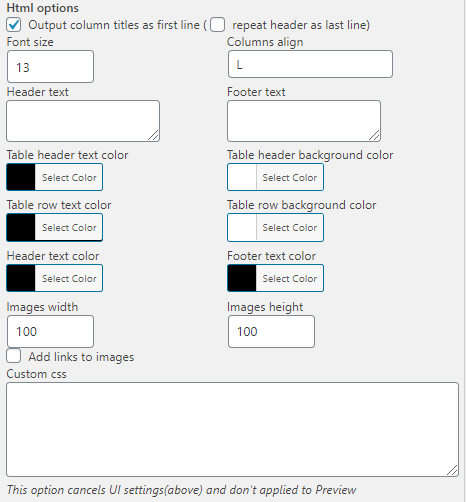
Output Column Titles as First Line
What it does: When you turn on this checkbox, the first line of the exported HTML report will display your column titles (e.g., Order ID, Product SKU, Total Amount).
Why it matters: Column headers are essential for anyone reading the report. They provide immediate context, telling your team exactly what each column of data represents. Without headers, the report becomes a sea of numbers and text that is difficult to interpret.
When to enable it:
- Your team or clients will be viewing the report in a browser.
- You want the report to be self‑documenting.
- You are sharing the report with people who didn’t create it.
When to disable it:
- You are embedding the raw HTML data into another system that supplies its own headers.
Recommendation: For almost all use cases, keep this enabled. It transforms a raw data dump into a professional, readable report.
Repeat on Each Page
What it does: When you turn on this checkbox, the column headers will be repeated at the top of every page when the report is printed or viewed across multiple pages.
Why it matters: If your report contains many rows and spans multiple printed pages, it’s easy for someone to lose track of which column is which. This setting ensures that each page remains self‑contained and readable.
When to enable it:
- The report is likely to be printed or saved as a multi‑page PDF.
- The report will be viewed by people who need to refer to multiple pages.
- You are archiving the report for long‑term reference.
When to disable it:
- The report is consistently short (fewer than 20 rows).
- You are embedding the HTML in a dashboard where scrolling is the norm.
Font Size
What it does: Lets you input a specific font size (in pixels or points) for the text in the HTML report.
Why it matters: Different contexts demand different font sizes. A report intended for on‑screen viewing might use 14px for comfortable reading, while a print‑focused report might use 11pt to maximise space.
When to customize it:
- The default font size feels too small or too large for your audience.
- You need to accommodate accessibility requirements (e.g., larger fonts for visually impaired team members).
- You are embedding the report in a dashboard with specific design constraints.
Pro tip: If you are using Custom CSS (see below), the font size set here may be overridden by your CSS rules. Test both approaches to see which gives you the result you want.
Header and Footer Text
What it does: Allows you to input text that will appear at the top (header) and bottom (footer) of the HTML report.
Why it matters: Headers and footers add context and professionalism to your reports. You can include the report title, the date range of the data, your company name, or even a confidentiality notice.
When to use them:
- Add a header like “Monthly Sales Summary – May 2026” for immediate context.
- Add a footer like “Confidential – For Internal Use Only” for sensitive data.
- Include your company logo or contact information as HTML.
Great for branding and context: This report is for the Accounting Department” adds professional polish.
Column Alignment
What it does: Choose the horizontal alignment for each column in your report: L (left), C (center), or R (right).
Why it matters: Proper alignment improves readability. Numbers are typically aligned to the right, which makes them easier to compare. Text is usually aligned to the left. Center alignment is rarely used but can be helpful for status badges or icons.
How to use it:
- In the field, input a string of alignment codes, one character per column. For example,
LLLLRRLmeans columns 1–4 are left‑aligned, columns 5–6 are right‑aligned, and column 7 is left‑aligned. - If you have more columns than characters, the plugin cycles through the pattern again.
Example: If you have 10 columns and input LR, column 1 will be left, column 2 right, column 3 left, column 4 right, and so on.
Style Block (Color Picker)
What it does: Provides a set of color pickers that let you choose the text and background colors for various report elements.
Why it matters: A touch of colour can transform a bland table into a professional, branded report. You can match the report’s appearance to your company’s style guide or highlight key rows (like totals).
What you can customize:
- Text color for the main body of the report.
- Background color for the overall report.
- Header background and header text color.
- Alternate row colors for improved readability (zebra striping).
Note: If you enable Custom CSS, these UI‑based color settings are cancelled and will not apply to the final report.
Images Width and Height
What it does: Allows you to set the exact dimensions (in pixels) for any product images included in the report.
Why it matters: Product images can vary wildly in size. Resizing them within the HTML ensures a consistent, professional layout without broken or misaligned cells.
When to use it:
- Your export includes product images.
- You want a fixed, uniform size for all images.
- You are embedding the report in a dashboard with limited horizontal space.
Best practice: Start with 100 for both width and height. Adjust based on your report’s layout. Keep in mind that larger images significantly increase the file size of the HTML report.
Add Links to Images
What it does: When this checkbox is turned on, the plugin adds clickable links to the images in the report. Clicking an image will open the full‑sized version, providing a seamless way for your team to view product details.
Why it matters: A small thumbnail in a report is useful for identification, but sometimes your team needs to see the full product image to make a decision (e.g., for quality control or visual confirmation). This option gives you the best of both worlds: a compact report that still offers access to high‑resolution images with a single click.
When to enable it:
- The report will be reviewed by people who need to see product details.
- Your product catalogue relies heavily on visual identification.
- The report is being sent to a fulfillment or QA team.
Custom CSS – Your Most Powerful HTML Customisation Tool
What it does: Allows you to insert your own Cascading Style Sheets (CSS) code to completely redesign the appearance of the exported HTML report.
Why it matters: This is where the HTML format truly breaks free from its preset constraints. With your own CSS, you can change fonts, adjust spacing, add borders, create multi‑column layouts, and even hide or highlight specific data cells based on their values.
Important notes:
- Custom CSS overrides the UI settings. Any style choices you made using the color pickers, font size, or column alignment will be ignored when you provide custom CSS.
- Custom CSS does not apply to Preview mode. You must generate a full export to see the effect of your custom CSS.
- You can set a default CSS template in the plugin’s Settings (Pro version) under the HTML tab. Fill in your default CSS there and save. On the Export Now tab, when you select HTML, the Custom CSS field will be pre‑filled with your default template. This is extremely useful for maintaining consistent company styling across multiple export profiles.
Example CSS (adds a pale green background to rows where the order total exceeds $1000):
|
1 2 3 4 5 6 |
.order-total-high { background-color: #e6f2e6; } .woe-order-row[data-total=">1000"] { background-color: #d4edda; } |
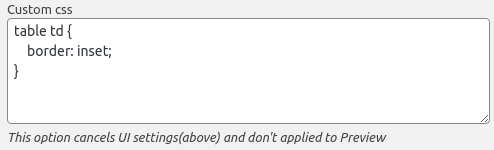
The example of changing the table’s cell borders, which is a common starting point for customisation.
Advanced Tip: Global CSS Templates
Inside the plugin’s Settings → HTML tab (Pro version only), you’ll find the Default HTML CSSfield.
How to use it:
- Go to WooCommerce → Advanced Order Export → Settings → HTML.
- Input your preferred default CSS code into the Default HTML CSS field.
- Click Save Settings.
- Now, every new export profile you create with the HTML format will automatically have this CSS code pre‑loaded into the Custom CSS field.
This is a huge time‑saver for stores that need consistent brand styling across dozens of export profiles.
Scheduling and Destination Integration
The HTML format works seamlessly with all of the plugin’s scheduling and destination features. You can:
- Schedule daily HTML reports to be automatically generated at 9:00 AM every weekday.
- Send HTML reports via email to your entire management team.
- Save HTML reports to your server for long‑term archiving.
- Upload HTML reports to FTP or SFTP to be picked up by external systems.
- Trigger HTML reports via HTTP POST to send the raw HTML data to a webhook.
For example, to create a scheduled HTML report that is emailed daily:
- Create an export profile with HTML as the output format.
- Configure your desired settings (headers, footers, alignment, etc.).
- Set the Destination to Email and add your recipients.
- Go to the Scheduled Jobs tab and choose Daily at 8:00 AM.
- Save and activate the job.
Every morning, your team will receive a beautifully formatted HTML report in their inbox—no server cron configuration required