Zapier
The Advanced Order Export for WooCommerce plugin includes a dedicated Zapier settings tab that manages the bridge between your store and the Zapier automation platform. This integration allows you to send order export data to thousands of external applications—Google Sheets, CRMs, email marketing platforms, Slack, and more—without writing any custom code.
The Advanced Order Export Zapier settings tab is where you generate the API key that authenticates the connection between your WooCommerce site and your Zapier account. This guide covers every option available on the Zapier tab, explains when and why to adjust the timeout setting, and provides a complete troubleshooting reference for common connection issues.
Note: Read this article for setting up integration with the “Zapier” service here.
Accessing the Advanced Order Export Zapier Settings
The Zapier settings are located within the plugin’s global settings area, alongside the General, PDF, HTML, Interface, Jobs, Tools, License, and Help tabs.
Step‑by‑step access:
- In the WordPress admin sidebar, navigate to WooCommerce → Export Orders.
- Click on the Settings tab.
- Within the Settings page, locate and click on the Zapier sub‑tab.
The Zapier tab is available only when the Pro version of the plugin is installed. The free version does not include Zapier integration.
Complete Zapier Settings Reference
The Zapier settings tab contains two configurable options. Both are simple to understand but have significant impact on the reliability of your automated workflows.
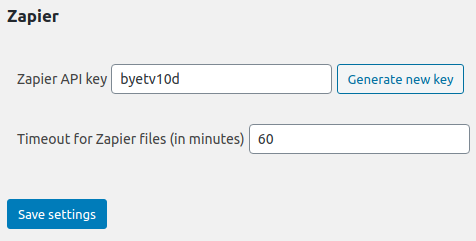
1. Zapier API Key – Generation and Management
What it does:
The Zapier API key is a unique security token that authenticates the connection between your WooCommerce site and your Zapier account. Without a valid API key, Zapier cannot access your exported order data, and your Zaps will fail to trigger.
Why it matters:
The API key acts as a password for the integration. It ensures that only authorised Zapier workflows can access your store’s export data. The key is generated inside the plugin, not within your Zapier account, which means the plugin itself controls the authentication mechanism.
Step‑by‑step guide to generating a Zapier API key:
One of the most common Advanced Order Export Troubleshooting questions concerns missing or invalid API keys. Follow these steps to generate a key correctly:
- Navigate to WooCommerce → Export Orders → Settings → Zapier.
- Locate the Zapier API key field.
- Click the Generate new key button. A random string of characters appears in the field.
- Click the Save Settings button to store the newly generated key in the database.
Important notes about API key management:
- The key is stored in your WordPress database and is not automatically backed up. If you migrate your site, you may need to generate a new key.
- Treat the API key like a password. Keep it confidential and regenerate it if you suspect it has been compromised.
- If you generate a new key, any existing Zapier connection using the old key is immediately invalidated. You must update the key in your Zapier account’s connection settings.
- The API key works across all export profiles. One key authenticates all Zapier‑enabled exports from your site.
2. Timeout for Zapier Files (in minutes)
What it does:
This setting determines how many minutes the generated export file is stored on your server while it waits to be transferred to the Zapier service. After the specified time elapses, the file is automatically deleted from the server.
Why it matters:
When an export job sends data to Zapier, the plugin first generates a temporary file on your server. Zapier then retrieves that file. If Zapier is slow to fetch the file—due to network latency, high server load, or large file size—the timeout setting prevents the file from remaining on your server indefinitely. The default timeout value is typically sufficient for most exports, but large datasets may require a higher value.
How to adjust the timeout setting:
If you are working with big datasets, the default timeout may not be sufficient. The plugin’s troubleshooting documentation explicitly warns: “this gate might not work for big datasets, due server timeout or memory limits”.
- Navigate to WooCommerce → Export Orders → Settings → Zapier.
- Locate the Timeout for Zapier files (in minutes) field.
- Enter a higher value (e.g.,
10or15minutes) if you are exporting large volumes of orders. - Click Save Settings to apply the new timeout value.
When to increase the timeout:
- Large order volumes – Exporting thousands of orders at once increases file size and processing time.
- Slow server response – Shared hosting environments may take longer to generate and serve the export file.
- Network latency – High‑latency connections between your server and Zapier’s infrastructure may require additional time.
- Complex exports – Exports with many custom fields, product images, or complex calculations take longer to generate.
Best practice: Start with the default timeout value. If you notice that Zapier task history shows repeated timeout errors, increase the timeout incrementally (e.g., from
5to10minutes) until the errors stop.
How the Zapier Integration Works
Understanding the flow of data helps you configure the settings correctly and troubleshoot issues more effectively.
The data flow:
- You configure an export profile in the Advanced Order Export for WooCommerce plugin.
- In the Destination block of that profile, you select Zapier as the destination.
- When the export runs (manually, on a schedule, or via a status change job), the plugin generates the export file in the selected format (CSV, XLSX, JSON, etc.).
- The plugin temporarily stores this file on your server.
- Zapier, using the stored API key for authentication, retrieves the file from your server.
- Zapier processes the file according to your Zap configuration and sends the data to your chosen destination (e.g., Google Sheets, Dropbox, CRM).
- After the timeout period expires (or after successful transfer), the temporary file is deleted from your server.
Important warning: The Zapier integration “might not work for big datasets, due server timeout or memory limits”. For very large exports, consider breaking them into smaller date ranges or using an alternative destination such as FTP or HTTP POST.
Advanced Order Export Troubleshooting: Zapier Settings
The following checklist addresses the most common issues related to the Advanced Order Export Zapier settings.
The API key does not authenticate with Zapier
Probable cause: The key was not saved after generation, or the key entered in Zapier does not match the key stored in the plugin.
Solution:
- Return to WooCommerce → Export Orders → Settings → Zapier.
- Generate a new key and click Save Settings.
- In your Zapier account, update the connection settings with the new key.
- Test the connection again.
The Zap runs, but no data is transferred
Probable cause: The export profile is not correctly configured, or the AS MULTIPLE ENTRIESoption is not enabled in the output settings.
Solution:
- Open the export profile being used for the Zapier destination.
- In the Output block (Zapier tab), ensure the parameter “As multiple entries (repeated for each item)” is marked.
- Run a manual export of the profile to verify that data is generated.
- Check that the date range and filters in the profile return at least one order.
Timeout errors appear in Zapier task history
Probable cause: The export file is too large to be generated and transferred within the current timeout period.
Solution:
- Increase the Timeout for Zapier files (in minutes) setting in the Zapier tab.
- Reduce the size of the export by:
- Applying a narrower date range.
- Selecting fewer fields in the Setup Fields section.
- Excluding product images or other large data from the export.
- Consider using an alternative destination (e.g., FTP, HTTP POST) for very large exports.
The generated file contains the wrong data or format
Probable cause: The export profile settings are not aligned with the expectations of the receiving Zap.
Solution:
- Run a manual export from the Export Now tab using the same profile. Open the generated file to verify its contents.
- In Zapier, review the field mapping step of your Zap. Ensure that the fields in your export match the fields Zapier expects.
- If you are using JSON format, enable the “As multiple entries” option to ensure each order is sent as a separate object.
Zapier returns an “Unauthorized” or “Invalid API key” error
Probable cause: The API key stored in the plugin does not match the key stored in Zapier, or the key was regenerated without updating Zapier.
Solution:
- Generate a new API key in the plugin and save it.
- In your Zapier account, disconnect and reconnect the Advanced Order Export for WooCommerce integration.
- When prompted, enter the new API key.
- Test the connection again.
Relationship Between Zapier Settings and Export Profiles
The Zapier settings tab controls global parameters (API key, timeout). Individual export profiles control which data is sent (fields, filters, format) and when it is sent (manual, scheduled, status change).
| Setting Location | Purpose |
|---|---|
| Zapier tab (global) | API key generation, authentication, and file timeout management. |
| Destination block (profile) | Selecting Zapier as the delivery destination for that specific export profile. |
| Output block (profile) | Format selection (CSV, XLSX, JSON, etc.) and the “As multiple entries” setting. |
| Scheduled Jobs tab (profile) | Automating when the export runs (hourly, daily, weekly, etc.). |
To create a fully automated Zapier workflow:
- Configure an export profile with the desired fields, filters, and output format.
- In the Destination block of that profile, select Zapier.
- Ensure the “As multiple entries” option is enabled.
- Navigate to the Scheduled Jobs tab and set a schedule (e.g., Daily at 2:00 AM).
- In Zapier, create a Zap that triggers on New Export from Advanced Order Export for WooCommerce.
- Map the fields from your export to the destination application (e.g., Google Sheets columns).