Jobs
The Advanced Order Export for WooCommerce plugin includes a Jobs settings tab that provides global controls for testing, debugging, and automating your order exports. While individual job configuration happens on the Scheduled Jobs and Status Change Jobs tabs, the Jobs tab offers centralised settings that affect all export jobs. This guide will walk you through each option, explain when to use them, and help you troubleshoot common issues.
Accessing the Advanced Order Export Jobs Settings
The Jobs settings are located in the plugin’s global configuration area, separate from individual export profile settings.
Step-by-step access:
- In the WordPress admin sidebar, navigate to WooCommerce → Export Orders.
- Click on the Settings tab.
- Within the Settings page, locate and click on the Jobs sub-tab.
All changes made in this section are applied globally and affect the behaviour of every export job—both scheduled and manual.
Complete Jobs Settings Reference
The Jobs tab contains four distinct settings that control global job behaviour. Unlike per-profile settings, these options influence how the plugin handles testing, external triggers, and cron execution across all export jobs.
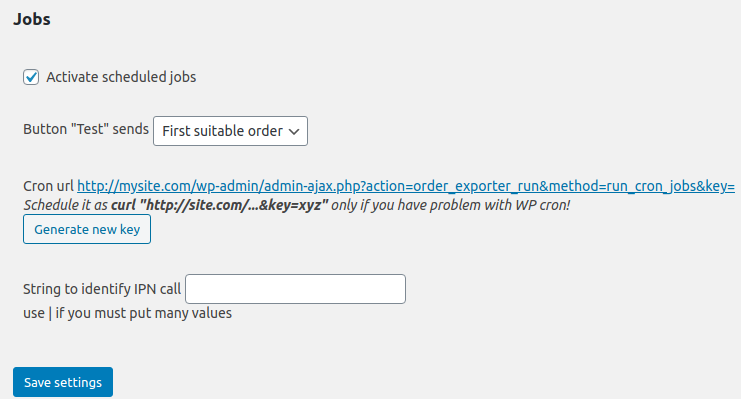
1. Activate Scheduled Jobs
What it does: This is the master on/off switch for all scheduled export jobs. When enabled (checked), all configured scheduled jobs execute according to their defined schedules. When disabled (unchecked), no scheduled job runs—regardless of its individual schedule settings.
Why it matters: This single control provides a powerful safety mechanism. Instead of editing or disabling multiple scheduled jobs one by one, you can pause all automated exports instantly.
When to use this setting:
- During maintenance periods – Disable scheduled exports temporarily to prevent errors or incomplete data from being sent to external systems while you update plugins, themes, or WordPress core.
- When troubleshooting – Isolate whether export issues are caused by scheduled jobs or manual exports by disabling all automated exports and testing manually.
- During initial setup – Keep scheduled jobs inactive while configuring and testing new export profiles, then enable them only after everything is verified.
Important: When the Activate scheduled jobs checkbox is disabled, the plugin stops generatingscheduled exports entirely. However, any previously saved destination actions (such as Zapier hooks or FTP uploads) are not rolled back; they simply do not receive new data.
2. Button “Test” Sends – Choose Test Order Range
What it does: This setting determines which orders are used when you click the Test button in the Destination block of any export profile. It offers two distinct testing modes:
| Setting | Behaviour |
|---|---|
| First suitable order | The plugin selects only the first order that matches your current filters and exports that single order for testing. |
| All matching orders | The plugin exports every order that matches your current filters, respecting limits like the preview batch size. |
Why it matters: The choice between these two modes dramatically changes the purpose of the Test button.
| When to use “First suitable order” | When to use “All matching orders” |
|---|---|
| Checking that the Destination block is correctly configured (email credentials, FTP settings, HTTP POST endpoint). | Verifying that the Setup Fields section contains all the required columns and that the data looks correct across multiple orders. |
| Validating that authentication headers or API keys are working without generating a large export. | Testing complex filters that affect many orders (e.g., product‑based or custom field filters). |
| You only need a sample to confirm that data is reaching the destination. | You need to see how summary reports aggregate data across multiple orders. |
Practical example: Imagine you have created a new export profile that sends orders to an FTP server. You want to test that the FTP connection works and that a file appears on the server. Selecting First suitable order and clicking Test will upload a single order—quick and bandwidth‑efficient. Later, after confirming the destination works, you may want to test how your field selection looks across dozens of orders; switching to All matching orders allows a broader test.
3. Generate Key – External Cron Trigger Authentication
What it does: This feature generates a unique security key that allows you to trigger a specific scheduled export job externally via a URL. The key acts as a password, ensuring that only authorised requests can run your exports.
How to generate and use the key:
- On the Jobs tab, click the Generate new key button. A random string of characters appears in the key field.
- Click Save settings to store the generated key.
- Open the Scheduled Jobs tab and edit the job you want to trigger externally.
- Remove any existing schedule from the job (set it to “No schedule” or an empty value).
- Note the Job ID (visible in the URL when editing the job, e.g.,
schedule_id=123). - Construct the trigger URL using the following template:
|
1 |
https://{yoursite.com}/wp-admin/admin-ajax.php?action=order_exporter_run&method=run_one_scheduled_job&schedule={JOB_ID}&key={YOUR_KEY} |
Replace {yoursite.com} with your actual domain, {JOB_ID} with the numeric job ID, and {YOUR_KEY} with the generated key.
- Open the constructed URL in a browser, or call it via
curl,wget, or a server cron job. A confirmation message indicates successful execution.
Why this matters: The standard WordPress cron system relies on site visitors to trigger scheduled tasks. For stores with low traffic, this can lead to inconsistent execution. By generating a key and using an external cron job (a proper system cron), you gain precise control over when exports run, independent of website visitors.
When to use an external cron with this key:
| Use case | Explanation |
|---|---|
| High‑volume or time‑sensitive integrations | The ERP system expects data at exactly 2:00 AM every day, without delay. |
| Low‑traffic stores | Without consistent visitors, WP‑Cron may not run for hours or days. |
| Server monitoring | You want to log exactly when each export job starts and finishes from a centralised cron management tool. |
Security note: Treat the generated key like a password. Keep it confidential and regenerate it if you suspect it has been compromised.
4. String to Identify IPN Call
What it does: This parameter allows you to specify a unique string that the plugin uses to identify an Instant Payment Notification (IPN) call. IPNs are callbacks sent by payment gateways when an order’s payment status changes (e.g., from “Pending” to “Completed”).
Why it matters: Some non‑standard payment gateways or custom integration scripts send IPN requests that contain identifying parameters. By providing a unique string here, you help the plugin distinguish legitimate IPN callbacks from other web traffic, ensuring that status change jobs trigger correctly.
When to use this setting:
- The store uses a non‑standard payment gateway that requires a specific identifier in its IPN payload.
- The store uses a custom‑built payment integration that communicates via IPN‑style webhooks.
- The plugin’s status change jobs are not triggering reliably, and the payment gateway expects a handshake identifier.
Most stores will not need to change this setting. The default value works with standard WooCommerce payment gateways. Only adjust it when instructed by a payment gateway’s documentation or a developer.
Advanced Order Export Troubleshooting: Job Settings
The Jobs tab settings can resolve several common problems.
Scheduled jobs are not running
Step‑by‑step checklist:
- Verify the master switch – Go to WooCommerce → Export Orders → Settings → Jobs and ensure Activate scheduled jobs is checked.
- Check the individual job’s schedule – In the Scheduled Jobs tab, confirm that the job has an active schedule (e.g., Daily, Weekly) and that the Next run time is in the future.
- Investigate WordPress cron – If the master switch is on but jobs still do not run, the WordPress cron system may be failing. Use the Generate key method and set up a real server cron job as described above.
- Enable logging – In the job’s Schedule block, mark the Log results checkbox. After the job runs (or should have run), return to the job editor and click View Logs to see what happened.
The “Test” button sends too many orders
- Check the “Button Test sends” setting – If you have selected All matching orders and your filters return hundreds of orders, the test may take a long time. Switch to First suitable order for quick destination validation.
- Narrow the date range – Even with “All matching orders”, the test respects your export profile’s filters. Apply a short date range (e.g., “Last 24 hours”) to reduce the test volume.
The external cron URL returns an error
- Verify the key – Return to the Jobs tab, regenerate the key, save settings, and update the URL.
- Check the Job ID – Ensure the numeric ID in the URL matches an actual scheduled job. The ID is visible in the URL when editing the job.
- Confirm the job has no schedule – For external triggering, the job must have an empty schedule. Remove any frequency setting from the job.
Best Practices for Advanced Order Export Jobs Settings
- Test destinations before enabling the master switch – When setting up a new scheduled export, leave Activate scheduled jobs disabled until you have successfully tested the destination (email, FTP, HTTP POST) using the Test button with First suitable order.
- Use external cron for critical time‑sensitive exports – If your store has low traffic, rely on a real server cron job with the generated key rather than WP‑Cron. This ensures exports run exactly when needed, without delays.
- Keep the generated key secure – Store the key in a password manager. Regenerate it periodically, especially after team members with access to the plugin leave the organisation.
- Choose the test order range intentionally – Use First suitable order for destination debugging and All matching orders for content validation. Switching between these modes appropriately saves time and server resources.
- Document custom IPN strings – If you configure a non‑standard String to identify IPN call, document it for future reference. Include the reason for the custom string and the payment gateway that requires it.
Summary
The Advanced Order Export Jobs Settings tab provides four essential global controls:
| Setting | Purpose | When to Use |
|---|---|---|
| Activate scheduled jobs | Master switch for all automated exports | Enable for production; disable during maintenance or troubleshooting |
| Button “Test” sends – Choose test order range | Controls whether the Test button exports one order or all filtered orders | Use “First suitable order” for destination testing; “All matching orders” for content validation |
| Generate key | Creates a security key for external cron triggering | Use when WP‑Cron is unreliable or you need precise execution timing |
| String to identify IPN call | Helps the plugin recognise IPN callbacks from non‑standard payment gateways | Use only when instructed by a payment gateway’s documentation |