XML
The XML (eXtensible Markup Language) export format in Advanced Order Export for WooCommerce is the definitive choice for machine‑readable data exchange between systems. Unlike row‑and‑column formats such as CSV or XLS, XML is designed to represent complex hierarchical data structures – orders can contain products, products can contain options, and everything can be nested in a way that reflects real‑world relationships.
For store owners integrating with ERP systems (SAP, Oracle, Microsoft Dynamics), accounting platforms, or legacy enterprise applications, XML is often a strict requirement. This guide explains every XML setting, shows when and why to use each option, and provides practical examples for real‑world integrations.
Why XML is the Go‑To Format for System Integrations
XML uses nested tags to organise data into a tree structure, which makes it far more expressive than flat formats. Each XML document has exactly one root element, and everything else is nested inside it, producing a clean, self‑describing hierarchy. [4†L4-L10]
| Use Case | Why XML is the Right Choice |
|---|---|
| ERP integration (SAP, Oracle, Microsoft Dynamics) | Most ERPs natively import XML data feeds with custom schemas. |
| Accounting system imports | Tax authorities and financial platforms often specify rigid XML structures for submissions. |
| Multi‑level hierarchical data | Orders containing products, products containing variations – XML handles this nesting naturally. |
| Legacy system compatibility | Many older enterprise systems support XML as their primary – or only – structured input format. |
| Schema validation | XML can be validated against an XSD (XML Schema Definition) before processing, catching errors early. |
| Human‑readable debugging | Unlike binary formats, raw XML opens in any text editor or browser, making integration problems easier to diagnose. |
XML in the free version: The free version of Advanced Order Export for WooCommerce fully supports XML exports, making this powerful feature accessible to all users. [0†L18-L20]
Accessing the XML Format Settings
All XML options are located in the Output block of an export profile:
- Navigate to WooCommerce → Advanced Order Export.
- Create a new export profile or edit an existing one.
- In the Output block, set Format to XML.
- The XML‑specific settings – labelled Key XML Settings – appear below the format selector.
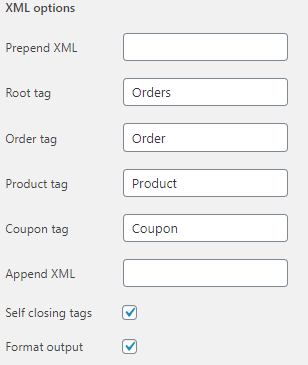
The Complete XML Options Reference
These settings give full control over the structure and appearance of the exported XML document.
Prepend XML
What it does: Accepts free‑form text that is inserted at the very beginning of the exported XML file – before the root tag and before any other content. [4†L2-L4]
Why it matters: The most common use is to add an XML declaration (also called a processing instruction). The declaration specifies the XML version and character encoding and should always be included – without it, strict XML parsers may reject the file.
When to use it:
- Always include an XML declaration for reliability:
<?xml version="1.0" encoding="UTF-8"?> - Add custom processing instructions or comments that must appear before the root element.
- As shown in the plugin’s troubleshooting documentation, Prepend XML can also be used to create a root tag with custom attributes by entering
<Orders version="1.0">while keeping the Root Tag field empty. [6†L6-L8] - Do not use for data that belongs inside the document – that belongs in the tag‑specific fields.
Best practice: Always prepend
<?xml version="1.0" encoding="UTF-8"?>as the first line of every XML export.
Root Tag
What it does: Specifies the name of the single, top‑level element that encloses every order in the export. This tag wraps the entire document and must be unique across the file. [4†L4-L5]
Why it matters: Every well‑formed XML document needs exactly one root element. The root tag defines the document’s identity and serves as the container for all child elements. Using a meaningful root tag makes the file self‑documenting and aligns with many integration specifications.
When to customise it:
- Tailor it to the recipient system’s schema (e.g.,
<SalesOrderExport>for an ERP import). - Apply a consistent naming convention across multiple export profiles.
- To create a root tag with custom attributes (such as
version="1.0"), leave this field emptyand instead use Prepend XML and Append XML. [6†L6-L8]
Example: If an ERP expects the document to start with <OrderFeed>, enter OrderFeed in this field. The plugin will generate <OrderFeed> as the opening tag and </OrderFeed> as the closing tag at the end of the file.
Order Tag
What it does: Specifies the name of the XML element that wraps each individual order within the export. Each order becomes a separate block containing all order‑level details. [4†L5-L6]
Why it matters: The Order Tag distinguishes one order from another inside a single XML file. A clear and descriptive tag name helps integrators understand the document structure.
When to customise it:
- Use the tag expected by the receiving system (e.g.,
<Order>,<SalesOrder>,<Transaction>). - Align with custom XSD schemas.
- The default is fine if no specific requirement exists.
Product Tag
What it does: Specifies the name of the XML element that wraps each product line item inside an order. When an order contains multiple products, each product appears as a separate block enclosed by this tag. [4†L6]
Why it matters: The Product Tag creates the hierarchy: Root → Order → Product. This makes it easy for the receiving system to iterate over products within each order.
When to customise it:
- Match the receiving system’s schema (e.g.,
<LineItem>,<OrderProduct>,<Item>). - Improve semantic clarity for custom integrations.
Coupon Tag
What it does: Specifies the name of the XML element that wraps each coupon applied to an order. If an order uses multiple coupons, each appears as a separate block within the order. [4†L6-L7]
Why it matters: Coupons represent promotional data that may need to be tracked separately from products. A dedicated Coupon Tag keeps the structure clean and meaningful.
When to customise it:
- Tailor it to what the receiving system expects (e.g.,
<DiscountCode>,<Promotion>,<Coupon>). - Use a descriptive name for better readability in reports.
Append XML
What it does: Accepts free‑form text that is inserted at the very end of the exported XML file – after the closing root tag and after all order data. [4†L7-L8]
Why it matters: Some integrations require trailing comments, processing instructions, or documentation footnotes that should not interfere with the main document.
When to use it:
- Add a comment for auditing, e.g.,
<!-- Generated by Advanced Order Export for WooCommerce -->. - Include a timestamp, checksum, or version stamp after the closing root tag.
- Do not place any data that belongs inside the document – use the tag‑specific fields instead.
Self Closing Tags


What it does: When this checkbox is turned on, any XML element that has no content (an empty field) is rendered as a self‑closing tag (e.g., <CustomerNote/>). When turned off, empty elements are rendered as separate opening and closing tags (e.g., <CustomerNote></CustomerNote>). [4†L8-L9]
Why it matters: Self‑closing tags produce more compact XML files, which is beneficial for large exports. However, some strict XML parsers or legacy systems expect the expanded form.
When to enable it:
- File size and compactness are a concern.
- The receiving system explicitly supports self‑closing tags.
When to disable it:
- The receiving system fails to parse self‑closing tags correctly.
- The XML must conform to a schema that requires explicit opening and closing tags for all elements.
Format Output
What it does: When this checkbox is turned on, the exported XML is pretty‑printed with indents and line breaks. When turned off, the XML is rendered as a single, continuous string without extra whitespace. [4†L9-L11]
Why it matters: Pretty‑printed XML is essential for human debugging and manual inspection. Minified XML produces smaller files and improves performance for large exports.
When to enable it:
- The file will be reviewed by humans for troubleshooting or validation.
- Readability is the priority.
When to disable it:
- The export is very large (thousands of orders) – minified XML can be 10‑30% smaller.
- The file is being transmitted over a slow network.
- The receiving system ingests the XML automatically and does not need formatting.
| Before | After |
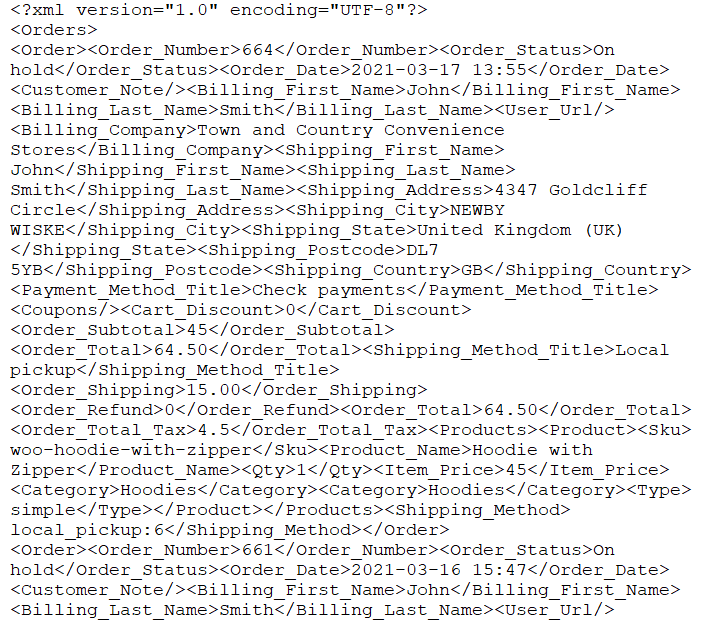 |  |
Using XML with Scheduled Jobs, Bulk Actions, and Destinations
The XML format works with every automation feature in Advanced Order Export for WooCommerce.
Scheduled Jobs
XML exports can be scheduled hourly, twice daily, daily, weekly, or monthly. To create a nightly XML feed for an ERP:
- Create an export profile with XML as the output format.
- Configure the XML settings as required.
- Go to the Scheduled Jobs tab and choose Daily at 2:00 AM.
- Set the destination to FTP (most common) or HTTP POST for direct API delivery.
- Save and activate.
Each morning, the XML file is generated and delivered without any manual intervention.
Bulk Actions Export
For one‑off exports of specific orders, a full profile is not needed:
- Go to WooCommerce → Orders.
- Select the required orders.
- Open the Bulk Actions dropdown.
- Choose Export as XML. [7†L7-L10]
Destinations for XML Exports
| Destination | Use Case |
|---|---|
| FTP / SFTP | Most common for ERP and accounting integrations. |
| Suitable for small exports or manual review. | |
| Save on server | Archive XML files locally for audit trails. |
| HTTP POST | Send XML directly to an API endpoint. |
Note: When emailing XML exports, ensure the “Append file contents to email body” option in the Email destination settings is turned OFF.
Advanced Customisation: Creating a Custom XML Addon
Some integrations require a fundamentally different XML structure – for example, a particular namespace, deeply nested elements, or a non‑standard field order. Advanced Order Export for WooCommerce provides the Custom XML Sample Addon for these scenarios.
How it works:
- Download the
woe-custom-xml.zipaddon from the plugin documentation. - Install and activate it via Plugins → Add New → Upload Plugin.
- Activate the custom format by checking the “Activate Custom Format” box at the bottom of the export profile.
- The “Custom XML Format” option appears in the Output Type dropdown.
- Modify the addon’s PHP files (via SFTP/FTP) to define the exact XML structure required.
This approach is ideal for:
- XML with custom namespaces.
- Rearranging field order beyond the Setup Fields tab.
- Adding processing instructions or comments.
- Conforming to a strict external XSD schema.
The custom addon is a separate plugin, so modifications are not overwritten when the main plugin is updated.
Summary Reports and XML
XML exports work with standard line‑item exports but are not available for Summary Reports. For summary‑by‑products or summary‑by‑customers, choose CSV, XLS, JSON, PDF, or HTML instead.
Best Practices for XML Exports in Advanced Order Export for WooCommerce
- Always include an XML declaration. Use the Prepend XML field to add
<?xml version="1.0" encoding="UTF-8"?>. - Test with a small date range first. Use the Preview button to verify tag names and structure before running a full export.
- Match tag names to the receiving system’s schema. Customise Root Tag, Order Tag, Product Tag, and Coupon Tag to align with integration requirements.
- Disable formatting for large exports. Turn off Format Output when exporting thousands of orders. The reduction in file size is significant.
- Use self‑closing tags unless the system requires expanded form. Self‑closing tags produce cleaner, more compact XML.
- Prefer FTP for large-scale exports. Email is convenient but can be unreliable for large files. FTP/SFTP is the industry standard.