JSON
While CSV and XLS formats are perfect for spreadsheets export through Advanced Order Export for WooCommerce, JSON (JavaScript Object Notation) is the universal language of web APIs, JavaScript applications, and modern data pipelines.
This guide covers every JSON setting available in the plugin, explains when and why to use each option, and shows you how to integrate your JSON exports with external systems. Whether you’re feeding order data into a custom dashboard, syncing with a headless commerce frontend, or building an automated workflow with other services, you’ll find everything you need here.
- Export orders, products, coupons, and custom fields in JSON format directly from WooCommerce.
- Structure your data for maximum compatibility with REST APIs, JavaScript frameworks, and third‑party services.
- Automate delivery with scheduled exports and all available destinations (Email, FTP, SFTP, HTTP POST, etc.).
Let’s consider in more detail:
Why JSON is the Go‑To Format for Integrations
JSON has become the de facto standard for web APIs, and for good reason. It’s lightweight, language‑agnostic, and structured in a way that both humans and machines can read and write with ease.
| Use Case | Why JSON is the Right Choice |
|---|---|
| REST API integration | JSON is the native format for almost every modern API. Your receiving endpoint will parse it effortlessly. |
| Custom JavaScript dashboard | JSON can be consumed directly by JavaScript without any transformation or parsing libraries. |
| Headless WooCommerce | If you’re decoupling your frontend from WordPress, JSON is the natural format for exchanging order data. |
| Mobile app backend | JSON’s lightweight structure makes it perfect for mobile apps that need to display order history or process new orders. |
| Webhook delivery | When using the HTTP POST destination, JSON is the most common format for webhook payloads. |
| Server‑to‑server communication | JSON is language‑agnostic, so your Python, Node.js, or PHP backend can all consume the same export. |
The plugin also supports XML, which is another structured format often required for legacy enterprise integrations. However, for modern web APIs and JavaScript environments, JSON is almost always the better choice.
Accessing the JSON Format Settings
You’ll find all JSON‑related options in the Output block of your export profile.
- Navigate to WooCommerce → Advanced Order Export.
- Create a new export profile or edit an existing one.
- In the Output block, set Format to JSON.
- The JSON‑specific settings will appear below the format selector.
The Complete JSON Options Reference
Let’s walk through each JSON setting. While JSON appears simple on the surface, these options give you fine‑grained control over how your data is serialised.
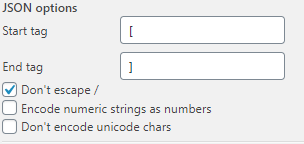
Start Tag and End Tag
What it does: Allows you to define text that will be placed before the start of your JSON data (the Start Tag) and after the end of your JSON data (the End Tag).
Why it matters: This resolves a specific but common integration requirement. Some APIs or older systems expect JSON data to be wrapped in a function call—a format known as JSONP (JSON with Padding). By setting a Start Tag of callbackFunction( and an End Tag of ), your export becomes valid JSONP that can be executed in a browser context. This is rare for modern REST APIs but essential for certain legacy integrations.
When to use it:
- Your receiving system expects JSONP format.
- You need to wrap the JSON output in a JavaScript function call.
- For standard REST API consumption, leave both fields empty.
Example:
- Start Tag:
myCallback( - End Tag:
)
This produces output like:
myCallback([{"order_id": 123}, {"order_id": 124}])
Don’t Escape Slashes


What it does: When this checkbox is turned on, the JSON encoder will not add backslashes before forward slashes (/) in your data. By default, JSON encoding escapes forward slashes as \/.
Why it matters: Escaping slashes is technically correct JSON behaviour, but some APIs or custom parsers may not expect it. The most common example occurs with URLs. A product image URL like https://yourstore.com/image.jpg would be encoded as https:\/\/yourstore.com\/image.jpgby default. Enabling this option leaves the slashes untouched, which some receiving systems find easier to work with.
When to enable it:
- Your receiving system rejects JSON with escaped slashes.
- You want the JSON output to be more human‑readable.
- Your API strictly follows the JSON specification (it should handle escaped slashes correctly).
Recommendation: Disable this unless you encounter a specific problem. Proper JSON parsers handle both escaped and unescaped slashes.
Encode Numeric Strings as Numbers


What it does: Converts string fields that contain only numeric characters into actual JSON number types (int or float).
Why it matters: By default, the plugin exports almost all data—including telephone numbers, postcodes, and order totals—as JSON strings, wrapped in double quotes. Some APIs, however, expect numeric fields to be actual JSON numbers, without quotes. For example, suppose you have a custom field customer_score with the value 85. With this option disabled, it appears as "85" in JSON; with it enabled, it appears as 85.
How the plugin determines what to convert: The plugin checks each field’s original value (as stored in the database). If that value contains only digits—with no letters, spaces, or special characters—it is treated as numeric. Fields like billing_phone are default text fields, but if they contain only numbers, the plugin can convert them to a JSON number when this option is enabled.
When to enable it:
- The receiving API expects numeric values to be unquoted numbers.
- You are using the JSON output in calculations within JavaScript.
- You have numeric identifiers (like order IDs) that should remain strings for the receiving system.
Important: Phone numbers and postcodes, even when numeric, are frequently best kept as strings to preserve leading zeros (e.g.,
"01234"). Enable this judiciously.
Don’t Encode Unicode Characters
What it does: Prevents the JSON encoder from converting Unicode characters (such as emojis or accented letters) into escaped \uXXXX format. With this option disabled (default), characters like 🚀 would become \uD83D\uDE80. With it enabled, they remain in their original form as 🚀.
Why it matters: The JSON specification allows both raw Unicode characters and escaped representations. Escaping ensures that any JSON parser, even those built on older systems, can handle the text correctly. However, escaped characters are far less human‑readable, and some modern APIs prefer raw Unicode.
When to enable it:
- The receiving system handles raw Unicode correctly (most modern APIs do).
- You want your JSON files to remain human‑readable for debugging.
- Your server environment correctly handles UTF‑8 encoding.
When to disable it:
- The receiving system is old or has known issues with raw Unicode.
- You are transmitting JSON to a system that explicitly requires escaped Unicode.
Best practice: Start with this option enabled (so Unicode characters remain raw). If the receiving system has problems, disable it to fall back to escaped characters.
Using JSON with Scheduled Jobs and Destinations
The JSON format works seamlessly with all of the plugin’s automation features.
Scheduled Jobs
You can schedule JSON exports to run at any interval: hourly, twice daily, daily, weekly, or monthly. For example, to generate a JSON order feed for your frontend dashboard every hour:
- Create an export profile with JSON as the output format.
- Configure your desired fields and settings.
- Navigate to the Scheduled Jobs tab.
- Choose Hourly as the schedule.
- Set the destination to HTTP POST or FTP, depending on where your dashboard expects the data.
Destinations for JSON Exports
| Destination | Use Case |
|---|---|
| HTTP POST | Send JSON payload directly to an API endpoint. This is the most common destination for JSON exports, as many APIs natively accept JSON data. |
| Deliver JSON reports to your development team for manual inspection or import scripts. | |
| FTP / SFTP | Upload JSON files to a server where an automated process picks them up for ingestion. |
| Save on server | Archive JSON exports locally for later retrieval. |
| Google Sheets | While less common for JSON, you can still send JSON data to a Google Sheet via our integration. |
JSON with HTTP POST – A Perfect Pairing
The HTTP POST destination is the natural companion to JSON exports. When you select JSON as your format and HTTP POST as your destination, the plugin sends a Content-Type: application/json header by default. This tells the receiving API exactly how to parse the request body.
For example, if you have a custom endpoint at https://your-api.com/orders/import, you can configure:
- Output Format: JSON
- HTTP POST URL:
https://your-api.com/orders/import - Trigger: Scheduled hourly or via a status change job
Every time the export runs, the plugin sends the JSON data directly to your API, ready for processing.
Developer Customisation: Beyond the Standard JSON Output
While the built‑in JSON options cover most scenarios, I recognise that some integrations demand complete control over the JSON structure. The plugin provides two powerful avenues for advanced customisation.
Option 1: The wc_order_export_http_args Hook (HTTP POST Only)
If you are using the HTTP POST destination and need to modify the JSON payload before it is sent, you can use the wc_order_export_http_args filter. This hook allows you to customise the entire HTTP request, including the JSON body, headers, and timeout.
This hook fires for every order when you are exporting multiple orders via HTTP POST. You can inspect each order individually (using WC_Order_Export_Engine::$order_id) and tailor the JSON payload accordingly.
Option 2: The Sample JSON Addon – Your Standalone Custom Format
For complete, filesystem‑level control over the JSON output—independent of the HTTP POST destination—you can use the Custom JSON Addon provided in our developer documentation. This is a standalone plugin that creates a new output format option in your export profile called “Custom JSON Format”.
How it works:
- Download the
woe-custom-json.zipfile from our documentation page. - Install and activate it via Plugins → Add New → Upload Plugin.
- Open your export profile, scroll to the bottom of the page, and check the “Activate Custom Format” checkbox.
- The “Custom JSON Format” option will now appear in your Output Type dropdown.
- Edit the addon’s files (via SFTP/FTP) to define your own JSON structure. The main logic is located in
class-woe-custom-format.php.
Because the Sample Addon is a separate plugin, your customisations are not overwritten when you update the main Advanced Order Export plugin.
This approach is ideal when:
- You need a JSON structure that is fundamentally different from the default.
- You want to version‑control your custom format separately.
- You are comfortable editing PHP files and working with WordPress hooks.
For more details, refer to our Sample Addons documentation.