Allow customers to choose between discounts (PRO)
The Allow Customers to Choose Between Discounts feature enables shoppers to actively select the discount they want to apply from a set of competing Exclusive pricing rules directly on the product page. Instead of the plugin silently applying the single “best” rule behind the scenes, customers see all available offers presented as selectable options and can pick the one that suits them most.
This is especially useful when you have multiple Exclusive rules targeting the same product — for example, a bulk deal and a percentage discount — and you want to give customers full visibility and control over how they save.
What are Exclusive rules?
Exclusive rules are pricing rules configured with the Exclusive priority mode. When multiple Exclusive rules match a product, only one of them is applied at a time. This feature surfaces that selection process to the customer. Read more about Exclusive rule’s type.
How It Works
When this feature is enabled and a product is covered by two or more active Exclusive rules, a Special Offers Available widget appears on the product page between the product description and the Add to Cart button. The widget lists each applicable discount as a radio-button option, showing the rule’s name and a short description of what it does.
The customer selects their preferred offer and then adjusts the quantity and clicks Add to cart as usual. The chosen discount is applied at that point.
Example from the product page (see screenshot):
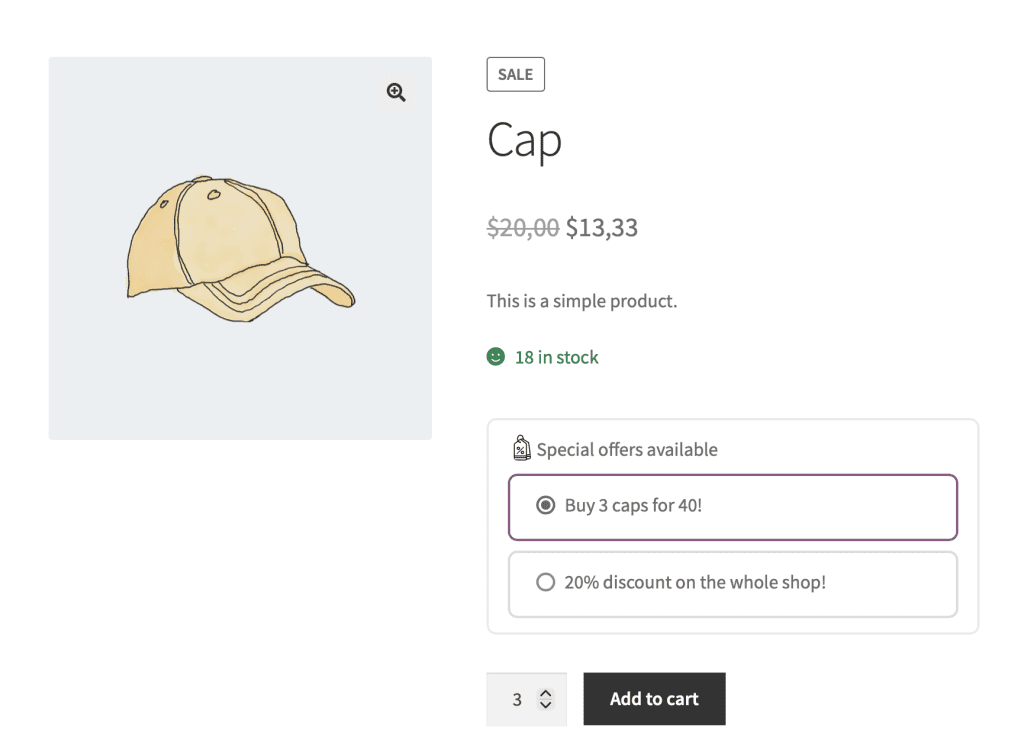
Special Offers Available
- Buy 3 caps for 40! — Buy 3 Caps for the price of 40. Add 3 to your cart to activate.
- 20% on the whole shop — Apply a flat 20% discount on this item immediately.
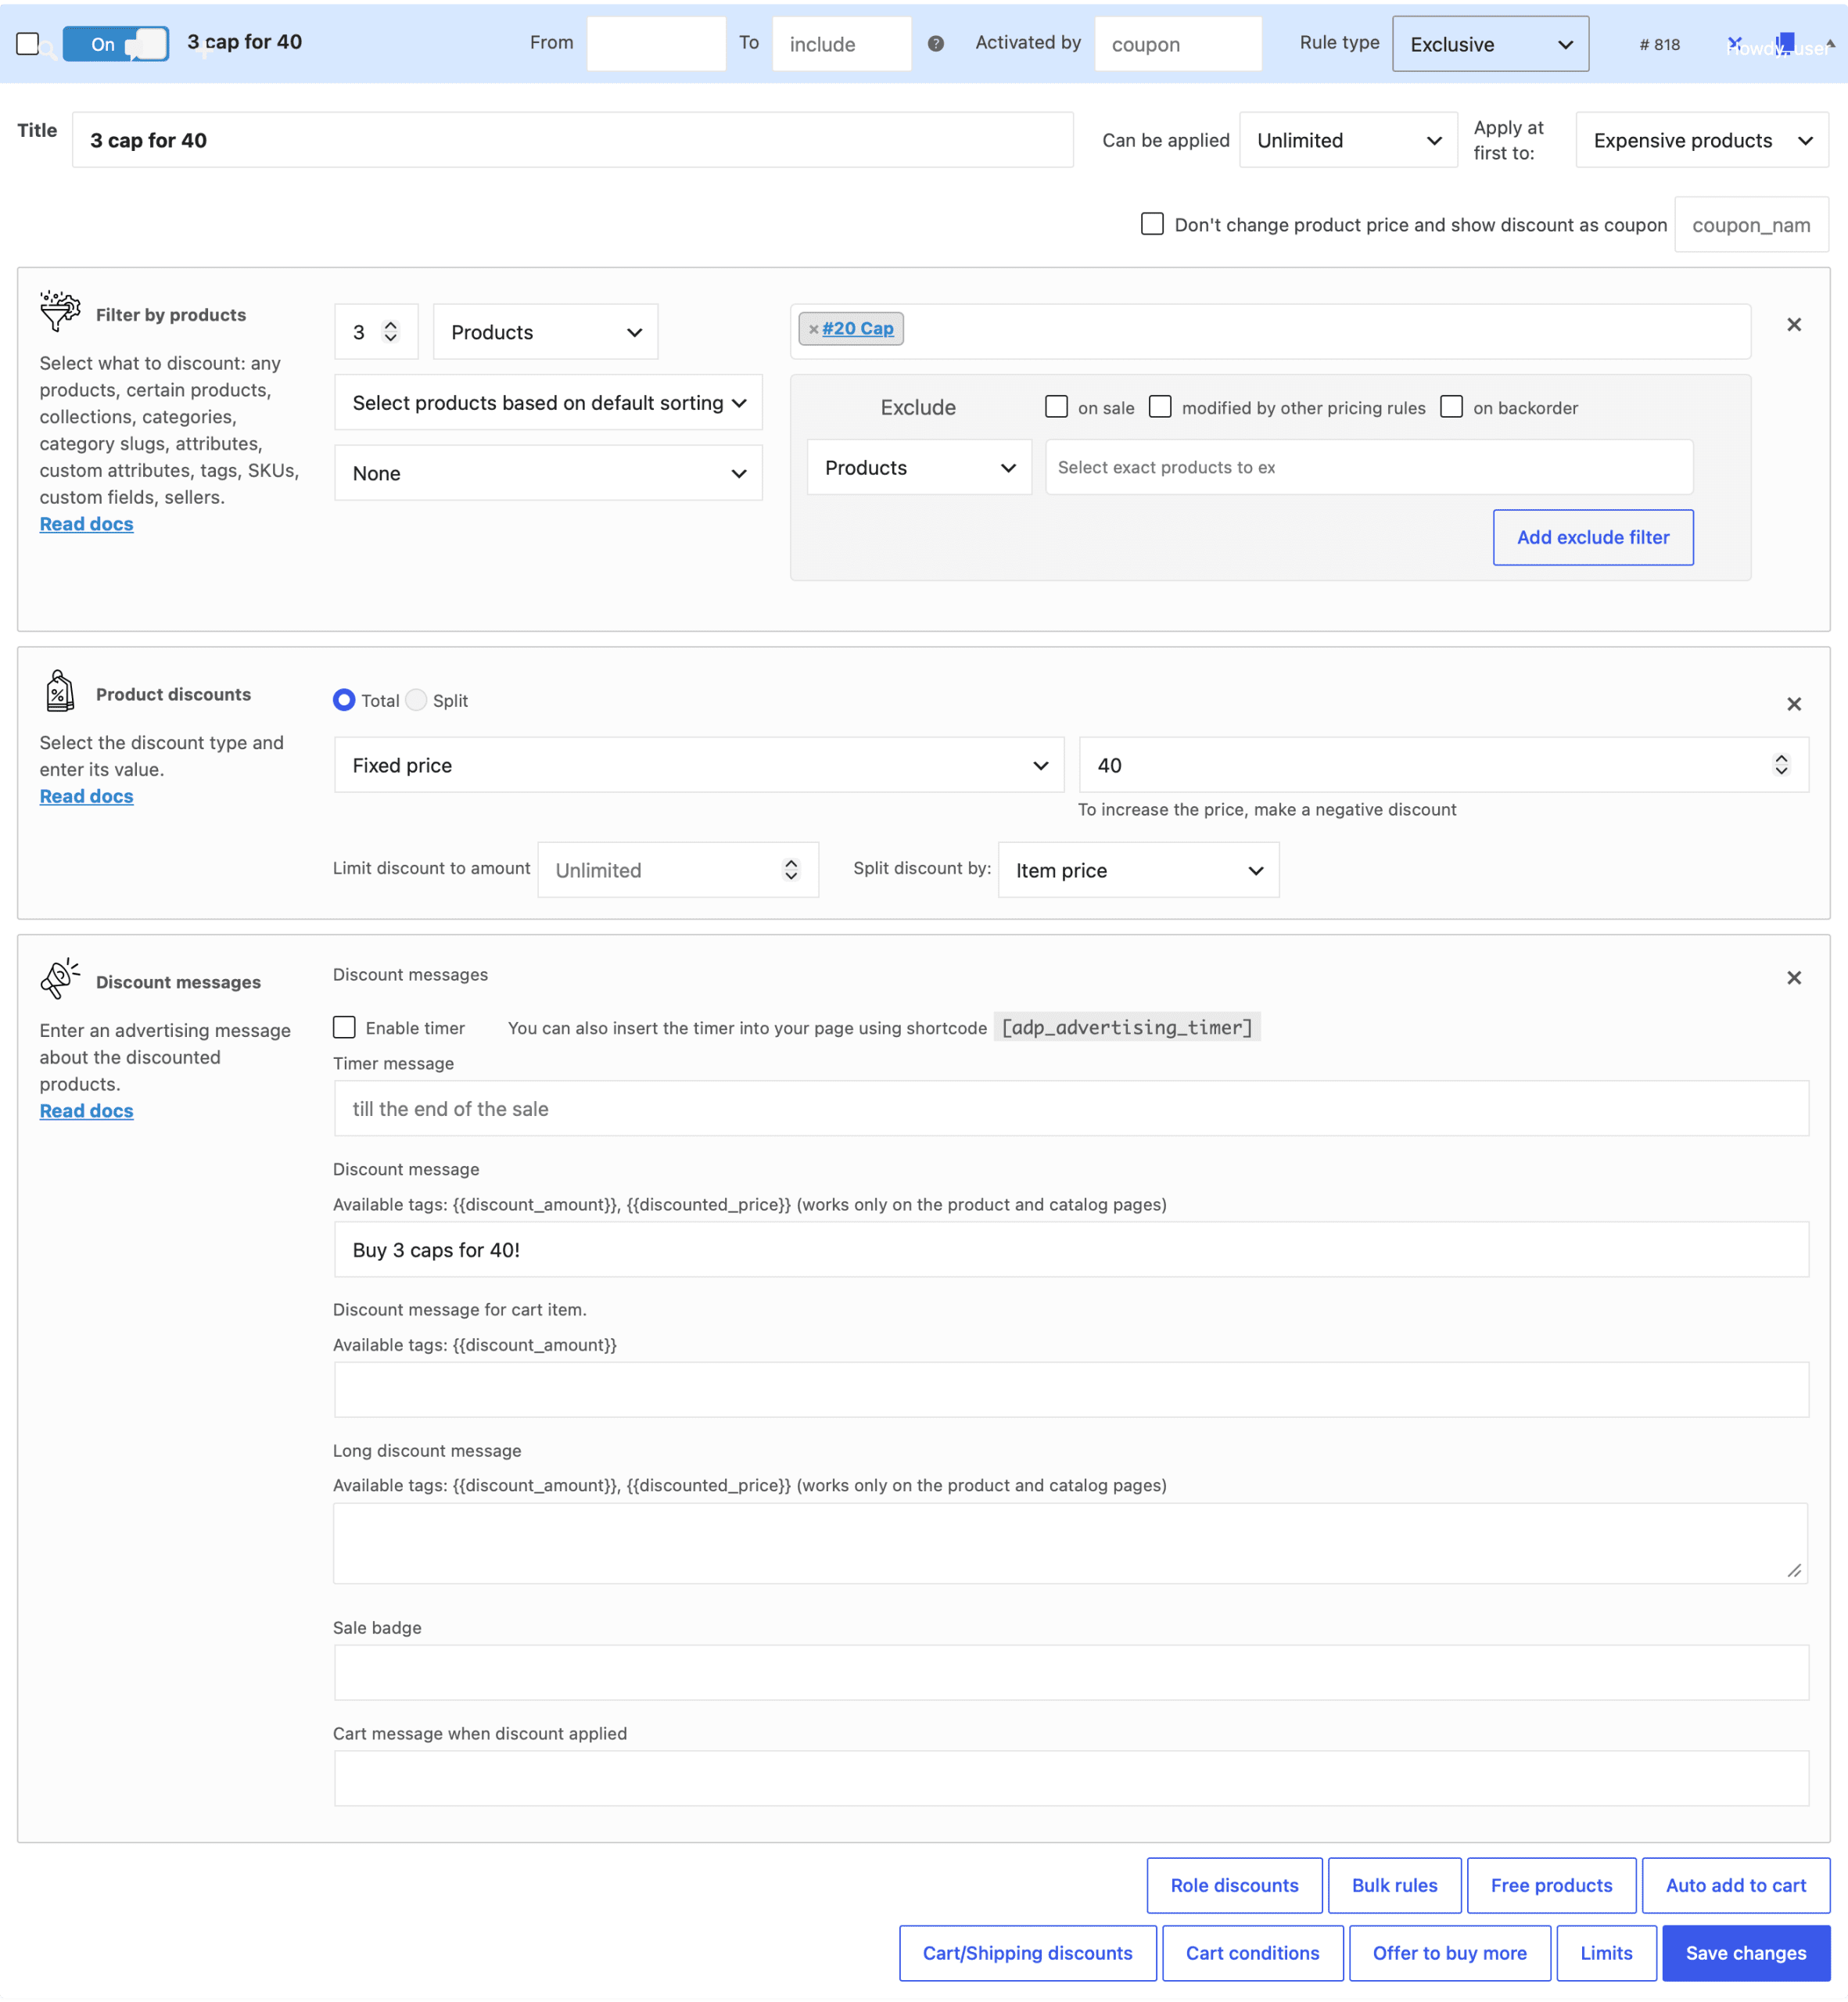
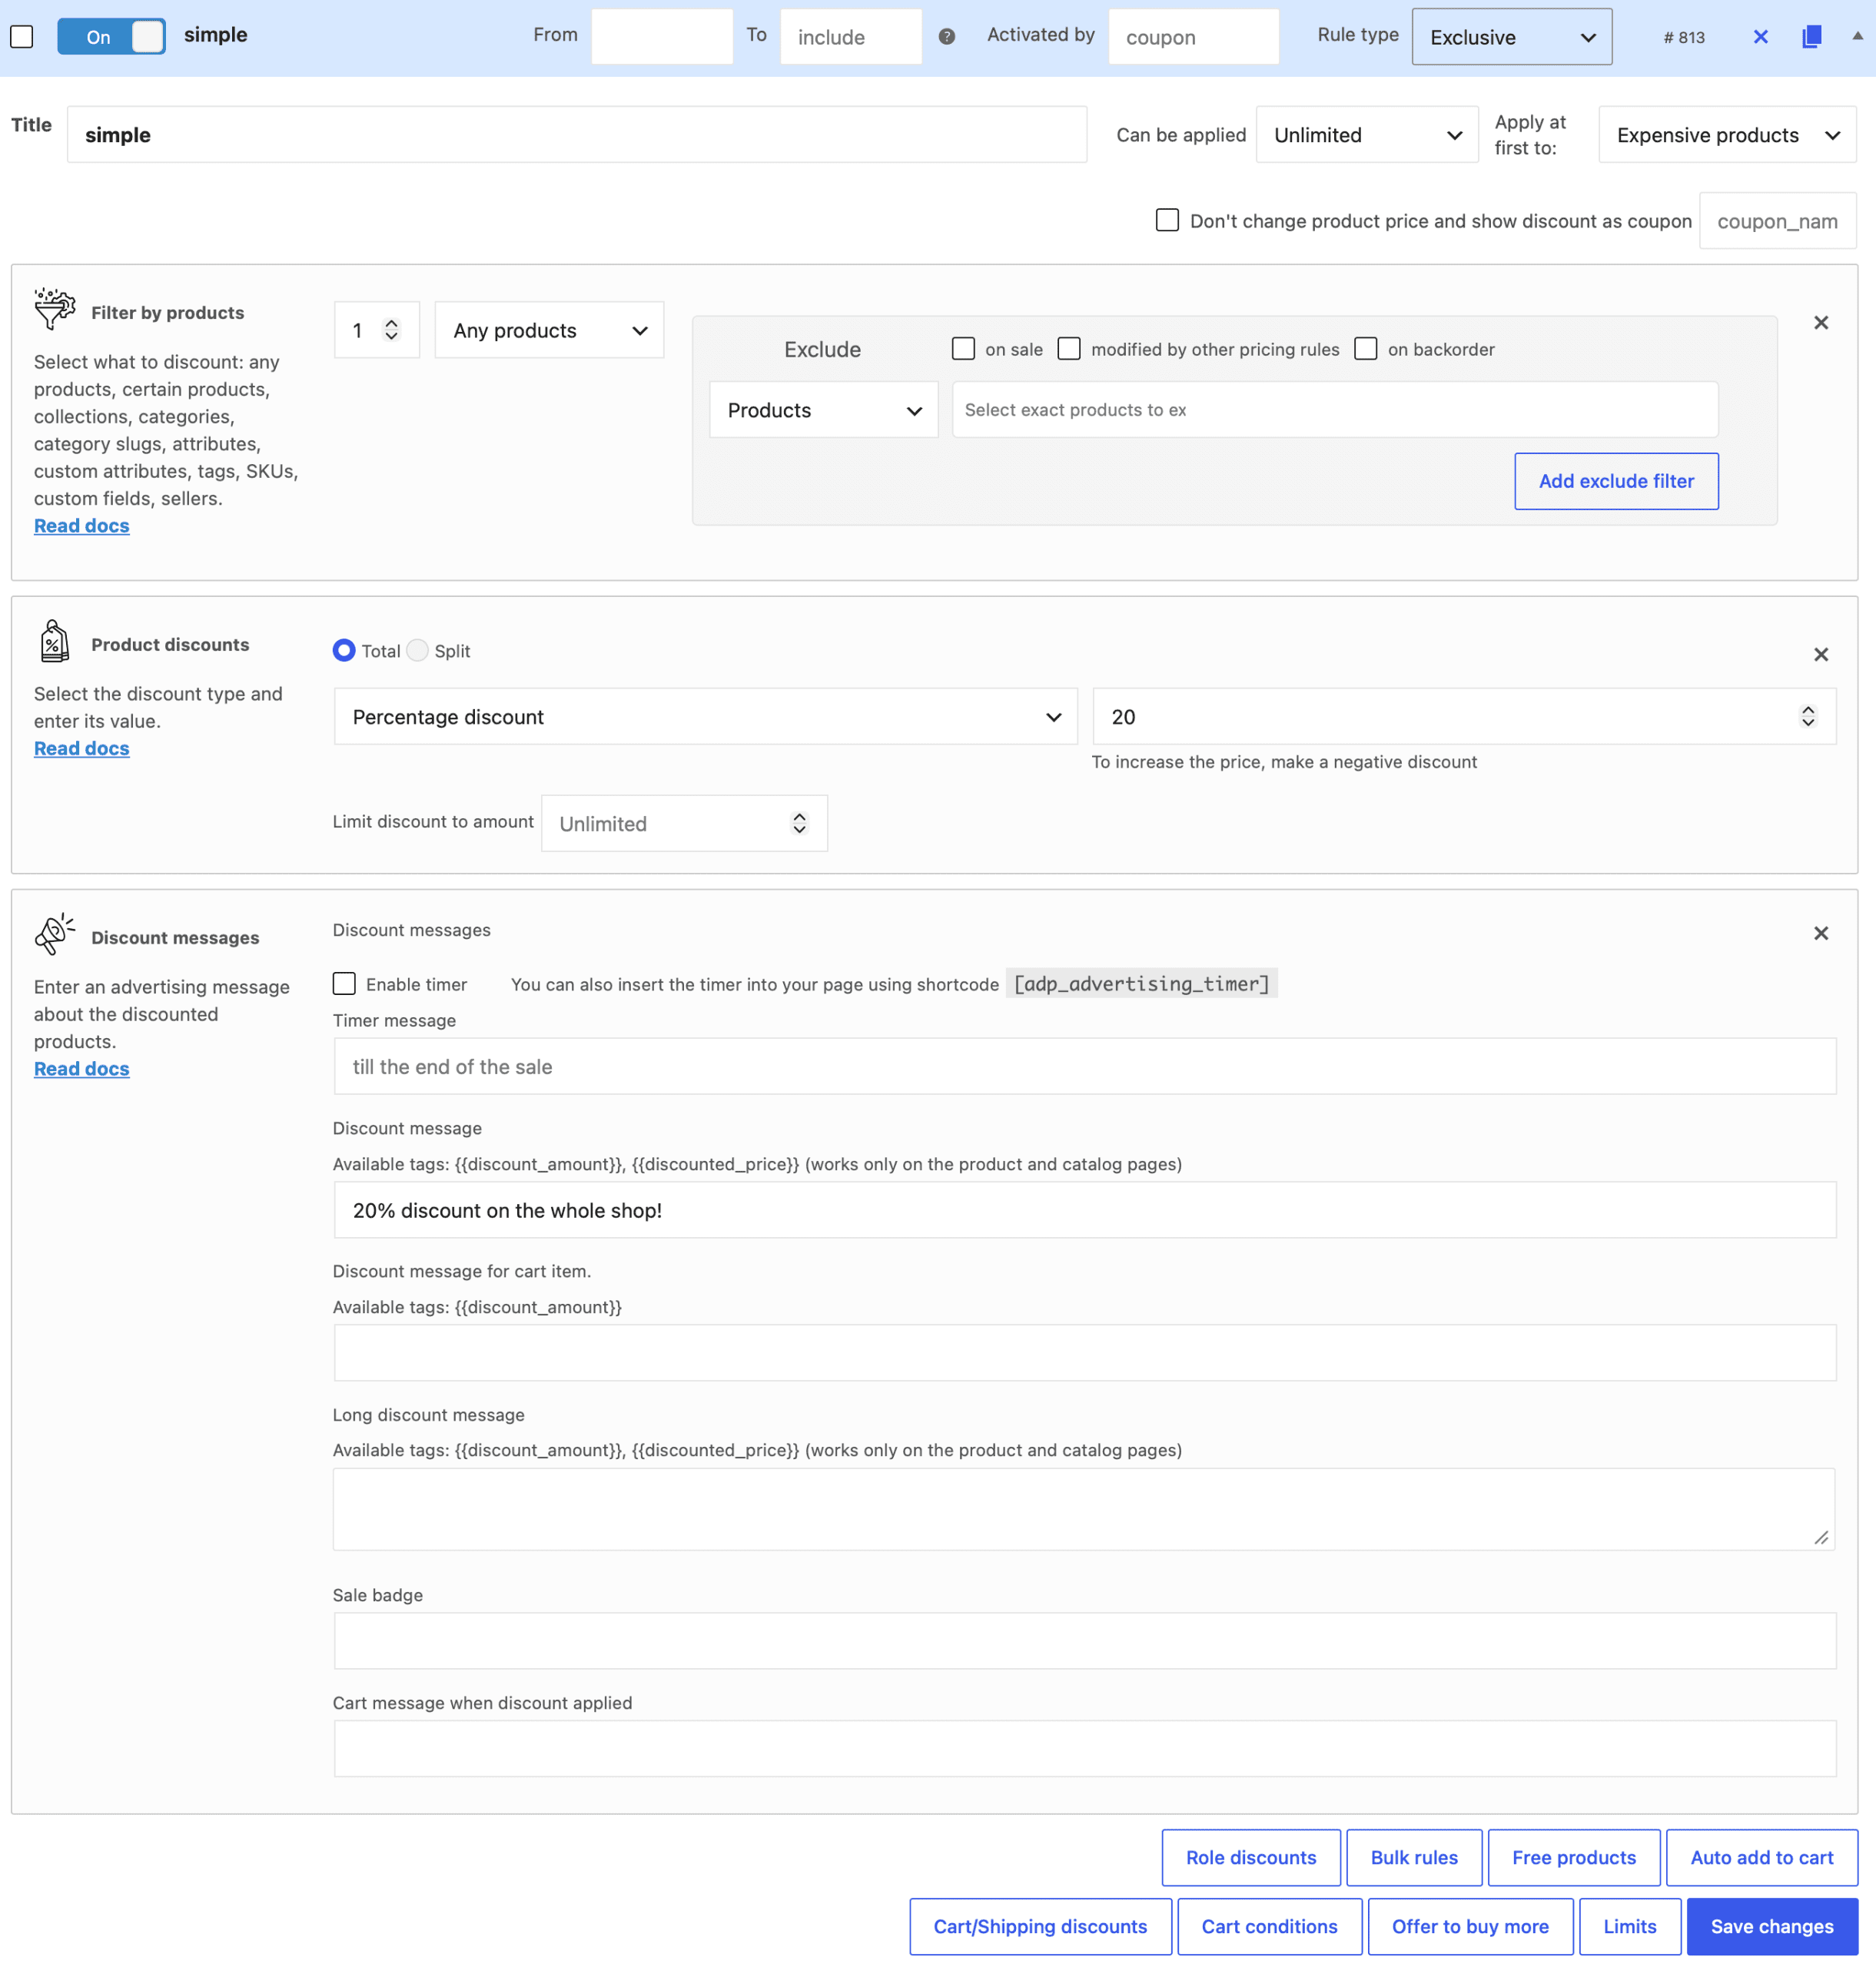
In this example the “3 for 40” deal is pre-selected (because it is the most profitable option at a quantity of 3), while the customer can switch to the flat 20% discount if they prefer. The example of the rules are below:
Requirements
- Advanced Dynamic Pricing for WooCommerce PRO plan or higher.
- At least two active Exclusive rules that apply to the same product or product category.
- Enabled the option Pricing rules > Settings > Product page > Allow customers to choose between discounts
- Each Exclusive rule must have a Rule Name and optionally a Customer-facing description filled in (see Customizer options below).
Setting Up the Feature
Step 1 — Confirm your rules are Exclusive
- Go to WooCommerce → Dynamic Pricing and open each rule you want to include.
- In the Priority / Conflict section, make sure the rule’s mode is set to Exclusive.
- Save the rule.
Repeat for every rule you want to appear as a selectable option.
Step 2 — Enable the feature globally
- Navigate to WooCommerce → Dynamic Pricing → Settings.
- Open the Product Page tab (or the Discount Selection section, depending on your plugin version).
- Find the toggle Allow customers to choose between discounts and switch it On.
- Click Save Settings.
Once enabled, the widget will automatically appear on any product page where two or more active Exclusive rules compete.
Step 3 — Configure individual rule labels (recommended)
For each Exclusive rule you want to surface in the widget:
- Open the rule editor.
- Fill in the Rule Name field — this becomes the bold heading shown in the widget (e.g., “3=2” or “20% on the product”).
- Fill in the Customer Description field — this is the supporting line shown beneath the name (e.g., “Buy 3 items for the price of 2. Add 3 to your cart to activate.”).
- Save the rule.
Tip: Keep rule names short and benefit-focused. Customers scan these options quickly, so clarity wins over detail.
Important — Where the offer title comes from:
The title displayed for each option in the widget is taken from the Discount Message text field inside the rule’s Advertising section. If a rule has no Advertising section configured, or the Discount Message field is left empty, the widget falls back to displaying the rule’s Name instead. To ensure customers see a clear, customer-friendly label rather than an internal rule name, it is strongly recommended to fill in the Discount Message in the Advertising section of every Exclusive rule you intend to expose in the widget.
Customizer Options
The widget’s appearance can be tailored through the WordPress Customizer. To access the settings, go to Appearance → Customize → WooCommerce → Dynamic Pricing — Discount Selector.
1. Offer Block Title
Type: Text field
Default: Special offers available
Sets the heading displayed at the top of the discount selection widget on the product page. Edit this field to match your store’s tone or language.
2. Offer Block Title Font Style
Type: Font style toggle buttons + color picker
Default color: #6d6d6d
Controls the typographic style of the Offer Block Title. The toggle buttons let you apply Bold, Italic, and Underline formatting independently or in combination. The color picker sets the title text color.
3. Offer Block Style
Type: 2 color pickers
Controls the appearance of the outer widget container that wraps all discount options.
| Sub-option | Default |
|---|---|
| Background color | Transparent |
| Border color | #00000014 (semi-transparent black) |
4. Offer Block Position
Type: Drop-down
Default: Above Add to cart button
Determines where the discount selection widget is placed relative to the Add to Cart button on the product page.
| Value | Description |
|---|---|
| Above Add to cart button (default) | The widget appears directly above the quantity selector and the Add to Cart button. |
| Below Add to cart button | The widget is placed beneath the Add to Cart button. |
5. Discount Block Style
Type: 4 color pickers
Controls the visual style of the individual discount option cards — both in their default (unselected) state and when a customer has actively chosen one.
| Sub-option | Description | Default |
|---|---|---|
| Background | Card background in the unselected state. | Transparent |
| Border | Card border in the unselected state. | #00000014 (semi-transparent black) |
| Chosen discount background | Card background when the option is selected. | Transparent |
| Chosen discount border | Card border when the option is selected. | #96588a (purple) |
Tip: The default chosen border color matches the standard WooCommerce purple accent. Change it to your brand color to keep the selection highlight on-brand.
6. Discount Name Title Style
Type: Font style toggle buttons + color picker
Default color: #6d6d6d
Controls the typographic style of the discount rule name displayed as the bold heading inside each option card (e.g., “3=2” or “20% on the product”). Toggle buttons allow Bold, Italic, and Underline formatting; the color picker sets the text color.
7. Discount Description Text Style
Type: Font style toggle buttons + color picker
Default color: #6d6d6d
Controls the typographic style of the supporting description line inside each option card (e.g., “Buy 3 items for the price of 2. Add 3 to your cart to activate.”). Toggle buttons allow Bold, Italic, and Underline formatting; the color picker sets the text color.