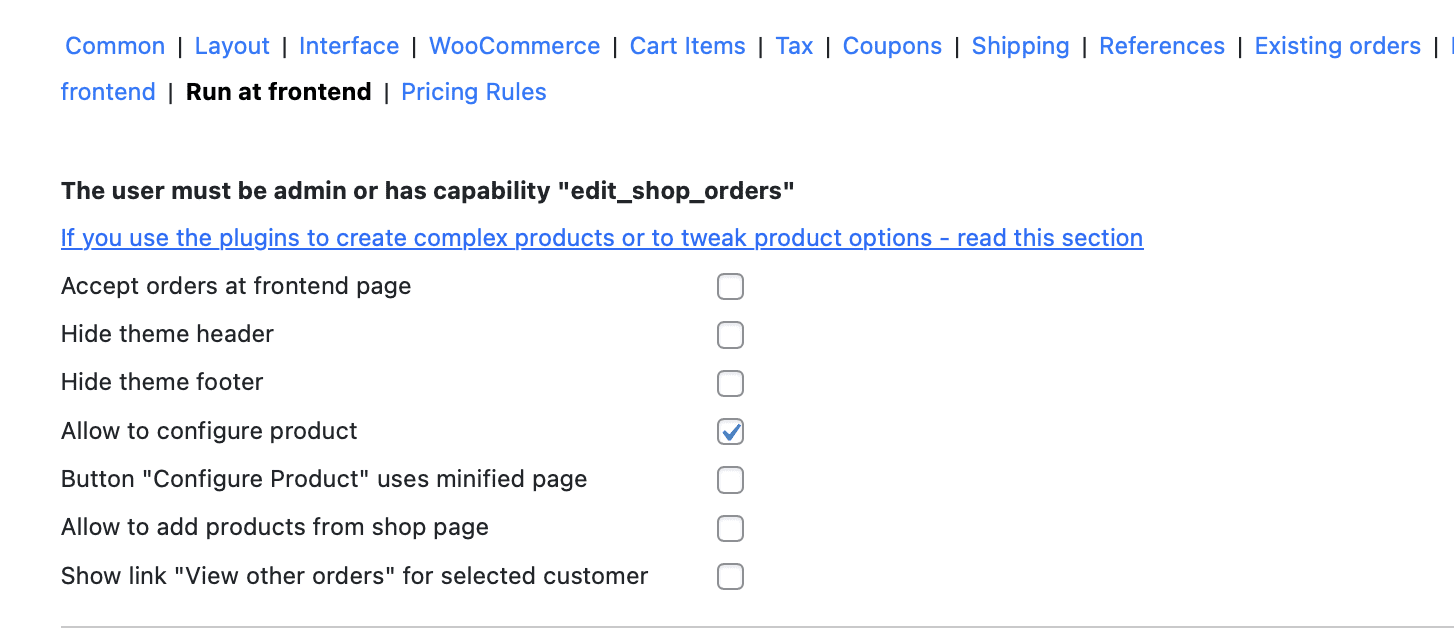
Run at Frontend [pro]
The Phone Orders for WooCommerce plugin normally operates inside the WordPress admin area. Agents require access to /wp-admin to create orders. The Run at Frontend tab solves this limitation. It lets you create a separate frontend page where your agents can place manual orders without seeing the WordPress dashboard. This guide explains every setting in the Run at Frontendtab, how to configure the frontend page, and how to manage permissions for your agents.
This feature is available only in the Pro version of Phone Orders for WooCommerce.
1. Accessing the Run at Frontend Tab
Step‑by‑step instructions
- Log into your WordPress admin dashboard.
- Go to WooCommerce → Phone Orders → Settings.
- Click the Run at Frontend tab.
All settings described in this guide are located on this page.
2. Why Use Frontend Mode
The default phone order interface runs inside the WordPress admin area. Agents must log in to /wp-admin and have the appropriate capabilities. This creates several potential drawbacks:
- Agents can accidentally access other admin areas (settings, plugins, user management).
- You must grant your agents WordPress admin access, which carries security risks.
- The admin interface may feel cluttered or intimidating for agents whose only task is taking orders.
Frontend mode solves these problems by moving the order creation interface outside the admin area. Agents can work from a clean, dedicated page that contains only the phone order form. You control exactly what they see.
3. Prerequisites
Before configuring frontend mode, complete the following steps.
Step 1: Set up a dedicated user role for phone agents
Do not give your agents the Administrator role. Instead, create a custom role with minimal capabilities.
- Install and activate the free User Role Editor plugin.
- Create a new role (e.g., “Phone Operator”).
- Add the following capabilities to this role:
edit_shop_orders– Allows the user to view and edit orders.manage_woocommerce_phone_orders– A custom capability that the plugin uses to grant access to the phone order interface.
- Click Update to save the new role.
Step 2: Assign the new role to your phone agents
- Go to Users → All Users.
- Edit each phone agent’s user profile.
- Under Role, select the new role (e.g., “Phone Operator”).
- Click Update User.
Now your agents have permission to use the phone order interface but cannot access other admin areas.
4. Enabling Frontend Mode
Step‑by‑step instructions
- Go to Phone Orders → Settings → Run at Frontend.
- Mark the checkbox Accept orders at frontend page.
- (Optional) Adjust the Frontend page url field (see Section 5).
- Click Save settings.
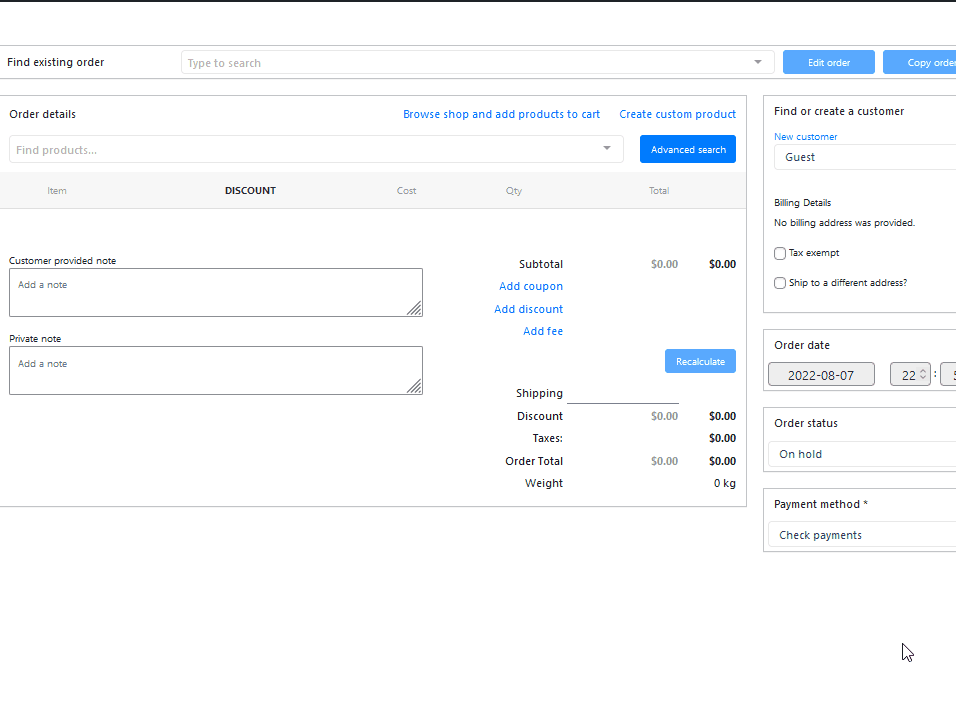
After you save, the plugin automatically creates a new page on your site. The page contains the full phone order interface, including the customer search, product search, cart, and order creation tools.
5. Customising the Frontend Page URL
By default, the plugin creates the frontend page with the URL slug phone-orders-frontend-page. Your agents can access the page at:
text
https://yourstore.com/phone-orders-frontend-page
You can change this URL to something more memorable or brand‑appropriate.
Step‑by‑step instructions
- In the Run at Frontend tab, locate the Frontend page url field.
- Enter a custom slug (e.g.,
take-orders,agent-dashboard,new-order). - Click Save settings.
The plugin updates the page URL automatically. Your agents must use the new address.
6. Hiding the Theme Header and Footer
Your theme displays its header and footer on every page, including the frontend order page. For phone agents, these elements are unnecessary and may distract from the order creation form. You can hide them completely.
Step‑by‑step instructions
- In the Run at Frontend tab, locate the Hide theme header checkbox.
- Mark this checkbox to remove the theme’s header from the frontend page.
- Locate the Hide theme footer checkbox.
- Mark this checkbox to remove the theme’s footer from the frontend page.
- Click Save settings.
After you enable these options, the frontend page displays only the phone order form. This creates a cleaner, more focused environment for your agents.
Note: These options affect only the dedicated frontend page. Your theme’s header and footer remain visible everywhere else on your site.
7. Configuring the Product Configuration Popup
Some third‑party plugins add custom fields or options to the product page. For example, a product add‑ons plugin may display extra checkboxes or text fields that the customer must fill in. The phone agent normally cannot access these options because the phone order interface uses a streamlined product search, not the full product page.
The Allow to configure product setting solves this problem.
What it does
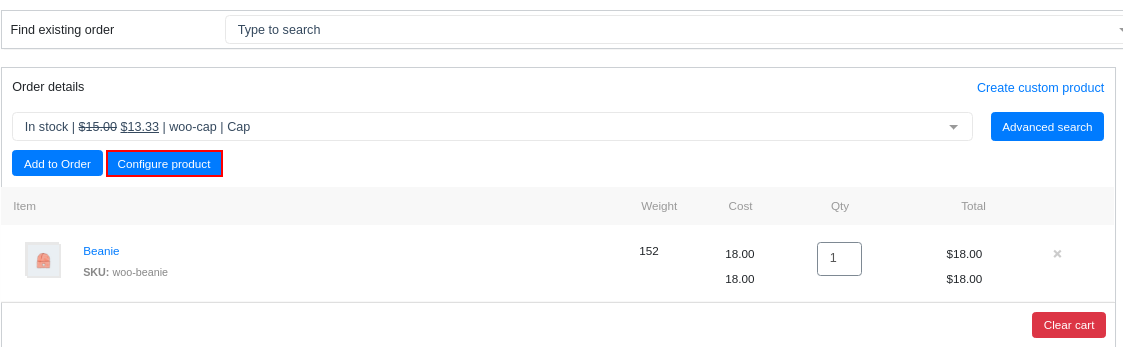
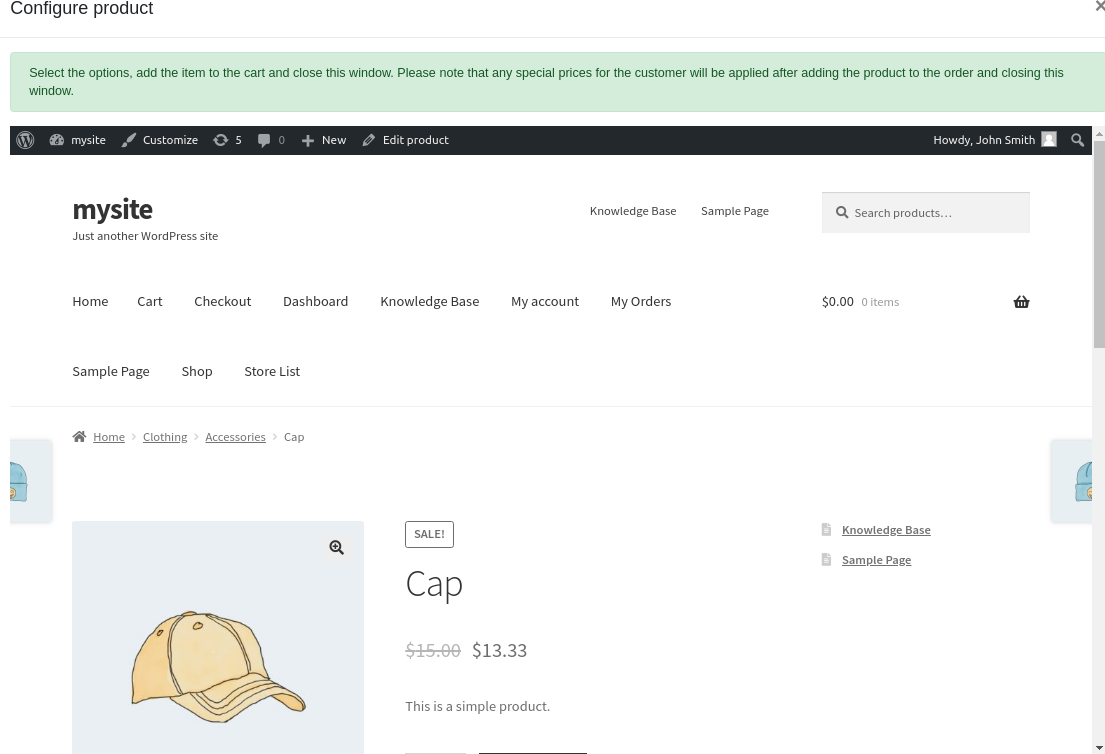
When you enable this option, the plugin adds a Configure Product button to the frontend page. The agent can click this button next to any product in the cart. The plugin then opens the full product page in a separate popup window. The product page includes all custom fields, add‑ons, and configuration options added by other plugins. The agent fills in the required information, and the plugin updates the cart with the configured product.
Step‑by‑step instructions
- In the Run at Frontend tab, mark the Allow to configure product checkbox.
- Click Save settings.
- Go to the frontend page (
https://yourstore.com/phone-orders-frontend-page). - Add a product to the order.
- Select the product in the cart and click the Configure Product button.
The product page opens in a modal window. The agent makes the necessary selections and confirms them. The plugin then updates the cart with the fully configured product.

When to use this setting
- Your store uses product add‑ons plugins (e.g., WooCommerce Product Add‑Ons, Extra Product Options).
- Your store uses product bundles or kits that require variation selection.
- Your products have custom meta fields that customers must fill in (e.g., engraving text, gift messages).
8. Allowing Product Browsing from the Shop Page
In the standard phone order interface, agents search for products by typing the name or SKU. Some agents prefer to browse the catalogue visually, especially when they do not know the exact product name.
The Allow to add products from shop page setting adds a Browse shop and add products to cartlink above the product search bar.
What it does
The agent clicks the link, and the shop page opens in a new tab or popup (depending on your configuration). The agent can browse the catalogue, view product images, and click Add to cart for any product. The product is automatically added to the phone order.
Step‑by‑step instructions
- In the Run at Frontend tab, mark the Allow to add products from shop page checkbox.
- Click Save settings.
- Go to the frontend page.
- Click the Browse shop and add products to cart link above the product search bar.
The shop page opens, and the agent can browse and add products normally.
When to use this setting
- Your store has a small catalogue, and agents prefer visual browsing.
- Products have distinctive images that help agents identify them faster than searching by name.
- Agents are new to the store and have not memorised product names or SKUs.
9. How Agents Use the Frontend Page
Once you configure the Run at Frontend settings, your phone agents can use the frontend page exactly as they would use the admin version.
Step‑by‑step agent workflow
- The agent logs into your WordPress site with their user account (the one assigned the Phone Operator role).
- The agent navigates to the frontend page, for example
https://yourstore.com/phone-orders-frontend-page. - The agent uses the Find or create a customer search to locate the customer.
- The agent adds products using the product search, the Configure Product button (if enabled), or the Browse shop link (if enabled).
- The agent adjusts quantities, applies discounts, and adds notes as needed.
- The agent clicks Create order to finalise the order.
The frontend page works exactly like the admin version. The only difference is the location – the agent never sees the WordPress dashboard.
10. Security Considerations
Frontend mode does not bypass WordPress authentication. Agents must still log in to your WordPress site. However, you can restrict their access using the custom role you created.
Best practices
- Create a dedicated Phone Operator role with only
edit_shop_ordersandmanage_woocommerce_phone_orderscapabilities. - Do not give agents the Administrator or Shop Manager roles.
- Use a plugin like User Role Editor to fine‑tune capabilities.
- Regularly review the list of users with the Phone Operator role.
Note: Even with frontend mode, agents must log in to WordPress. The page itself is not publicly accessible.
11. Troubleshooting Common Issues
| Symptom | Likely Cause | Solution |
|---|---|---|
| The frontend page does not load, or shows a 404 error. | The plugin did not create the page automatically, or the page was deleted. | Go to Phone Orders → Settings → Run at Frontend, uncheck Accept orders at frontend page, save, then re‑enable it. The plugin recreates the page. |
| Agents see a “You do not have sufficient permissions” message. | The agent’s role lacks the required capabilities. | Assign the edit_shop_ordersand manage_woocommerce_phone_orderscapabilities to the agent’s role. |
| The product search works, but the cart does not update. | A JavaScript conflict with another plugin or the active theme. | Temporarily switch to a default WordPress theme (e.g., Storefront) and deactivate other plugins one by one to isolate the conflict. |
| The Configure Product button does not appear. | The Allow to configure productsetting is not enabled. | Mark the checkbox in the Run at Frontend tab and save. |
| The Browse shop link does not open the shop page correctly. | The shop page URL may be customised or blocked. | Ensure the shop page is published and accessible. Check that your theme does not restrict access to the shop page. |
| The frontend page displays the theme header and footer even though you disabled them. | Your theme may use a non‑standard method to render headers and footers. | Contact your theme developer or submit a support request. |
| Products added via the shop page do not appear in the cart. | The session or cart cookie is not being shared correctly. | Ensure the shop page and the frontend page use the same domain and that your server does not block cross‑page session data. |