Discount [pro]

The Phone Orders for WooCommerce plugin allows you to apply discounts directly during manual order creation. These discounts are not tied to pre‑existing coupon codes; instead, they are free‑form reductions that agents can add to any order at the moment of creation. The Discount settings tab (available exclusively in the Pro version) gives you precise control over how these manual discounts appear and behave.
This guide covers every setting found on the Discount tab, explains what each option does, and shows you how to configure the interface for the fastest possible discounting workflow.
Hide “Add discount” Option
- What it does: Removes the Add discount button completely from the phone order cart interface.
- Why it matters: Some stores manage all discounts through automated pricing rules or coupon codes and do not want agents applying manual discounts at all. Hiding the button prevents confusion and keeps the interface clean.
- When to use it: Enable this checkbox if your business does not use manual discounts or if you want to restrict all discounting to other methods (e.g., pre‑created coupon codes, role‑based pricing).
Coupon Name (Used by Manual Discount)
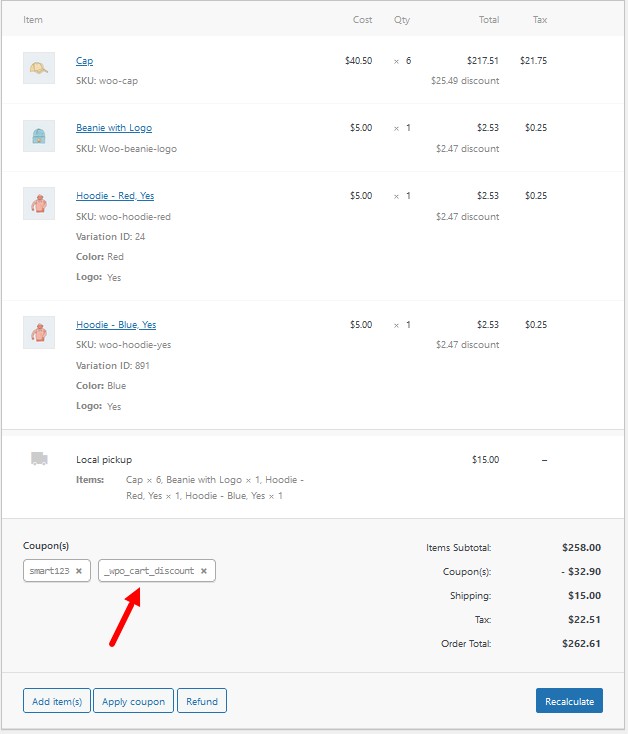
- What it does: Sets a default name that appears in the order for manual discounts. This name is stored as a coupon line item in the order and appears on invoices and in order reports.
- Why it matters: When an agent applies a manual discount, the discount line item needs a label. Instead of leaving it blank or forcing the agent to type a name every time, this setting provides a consistent default (e.g., “Agent Discount”, “Manual Adjustment”, “Courtesy Credit”).
- How to use it: Enter any text you prefer into the field. The default value is typically “Discount”. This name will be used automatically whenever an agent adds a manual discount, unless the agent chooses to override it (see the next setting).
Allow to Edit Coupon Name
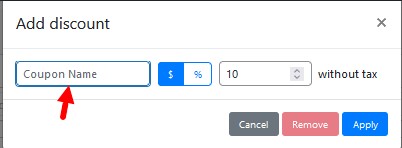
- What it does: When enabled, the agent can change the discount name inside the Add discountpop‑up window. When disabled, the default name from the Coupon name setting is used and cannot be changed.
- Why it matters: Some orders require a specific discount description for accounting or reporting purposes. For example, an agent might want to label a discount as “Birthday Discount” or “Customer Loyalty Credit” to provide context. Enabling this option gives agents the flexibility to customise the name on a per‑order basis.
- When to use it: Enable this option if your agents need to provide descriptive discount names for different scenarios. Disable it if you always use the same default name and want to keep the interface simpler.
Default Discount Type
- What it does: Allows you to set whether the default manual discount is a fixed amount (e.g., €10 off) or a percentage (e.g., 10% off).
- Why it matters: When an agent clicks Add discount, a pop‑up window appears asking for the discount amount and type. If you always use the same discount type, forcing the agent to select it every time slows down order entry. Setting a default type removes that extra step.
- How to configure it:
- Fixed amount – Select this option if most of your manual discounts are set amounts (e.g., €5 off, €20 off).
- Percentage – Select this option if most of your manual discounts are percentage‑based (e.g., 10% off, 15% off).
- Check the box to activate the default type. When the box is checked, the discount type dropdown is hidden, and the chosen type is used automatically. When the box is unchecked, the agent must select the type manually each time.
- When to use this setting: Enable the default type and check the box if your store consistently uses one discount type. Leave it unchecked if you frequently switch between fixed and percentage discounts.
Best practice: For most stores, setting a default discount type (e.g., percentage) and enabling the Hide fixed/percentage discount type dropdown option (found in the Coupons settings tab) creates the fastest workflow. Agents simply enter a number, and the plugin knows whether it is a fixed amount or a percentage.
Using Manual Discounts During a Phone Order
Once the settings are configured, agents can apply manual discounts directly from the Order Details block.
Step‑by‑step to add a manual discount:
- After adding products to the cart, locate the Add discount button in the Order Details block (if the Hide “Add discount” option is not enabled).
- Click the button to open the discount pop‑up window.
- Select the discount type (fixed amount or percentage) – unless you have set a default type and hidden the dropdown.
- Enter the discount amount in the specified field.
- (Optional) If the Allow to edit coupon name setting is enabled, you can change the discount name.
- Click Apply.
- Click the Recalculate button to refresh all totals, including taxes and the final order amount.
Important note: When you use the manual discount feature, the discount is stored as a coupon line item in the order. This means it appears in the order totals as a discount and can be reported on, even though it is not tied to a pre‑existing coupon code.
8. Summary of Discount Settings
| Setting | Purpose | When to Enable / Adjust |
|---|---|---|
| Hide “Add discount” option | Removes the Add discount button from the phone order cart entirely. | Enable if your store does not use manual discounts or if you want to restrict all discounting to other methods. |
| Coupon name (used by manual discount) | Sets a default name that appears in the order for manual discounts. | Always set a meaningful default (e.g., “Agent Discount”). This ensures discounts are clearly identified in reports. |
| Allow to edit coupon name | Allows the agent to change the discount name inside the Add discount pop‑up. | Enable if agents need to provide descriptive discount names for different scenarios. Disable for a simpler, faster workflow. |
| Default discount type | Sets whether the default manual discount is a fixed amount or a percentage. | Set to the type most frequently used. Check the box to activate the default and hide the type dropdown (in combination with the Coupons tab setting). |