Efficient customer management is the foundation of successful phone‑order processing. When a customer calls, the store agent needs to quickly locate the existing customer record or create a new one without interrupting the conversation. The Phone Orders for WooCommerce plugin provides a dedicated Find or create a customer block that consolidates all customer‑related operations into a single, easy‑to‑use interface.
This guide covers every aspect of customer management in the plugin: searching for existing customers, creating new customer profiles, editing billing information, handling special shipping addresses, leveraging Pro‑version features such as tax exemption and order history, and configuring advanced global customer settings.
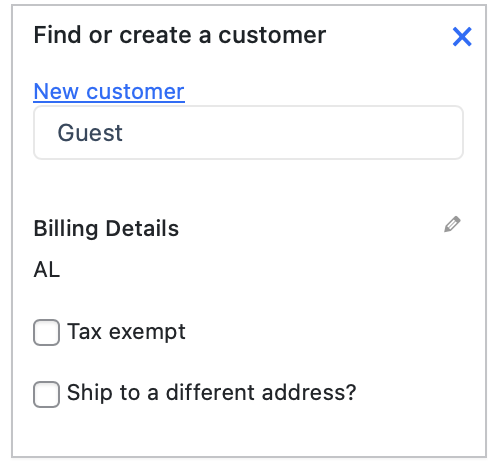
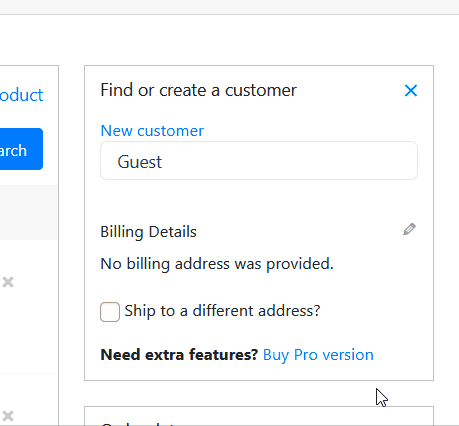
The Find or Create a Customer Block – Your Central Hub
The Find or create a customer block is the first section an agent sees when opening the Phone Orders interface. It serves as the central control point for all customer operations and must be completed before any products can be added to an order – an order can only be created when a customer is specified.
The block contains the following components:
A Search bar for finding existing customers.
A New customer link that opens a pop‑up window for creating a customer profile.
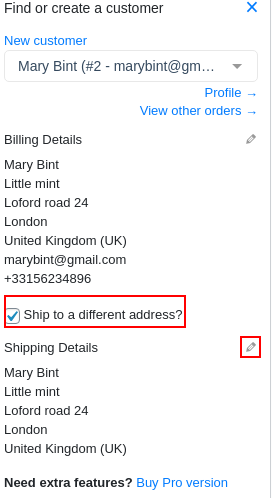
Billing details showing the customer’s current address information, with the ability to edit it.
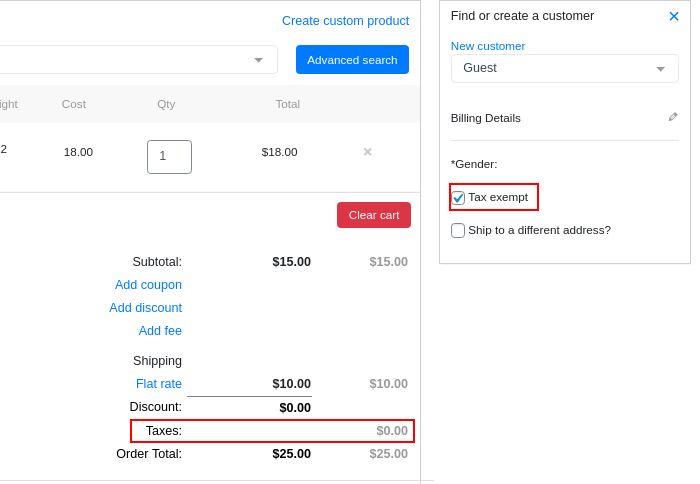
A Tax exempt checkbox (Pro version only) to disable taxation for a specific order.
A Ship to a different address? checkbox for entering an alternative shipping destination.
Searching for an Existing Customer
When a regular customer calls to place an order, the agent should start by locating their existing customer profile. The plugin supports searching by multiple criteria, making it easy to find a customer even when not all details are known.
The agent can find a customer by any of the following fields:
First or second name – Useful when the customer gives their name over the phone.
Login – The WordPress username (if known).
Phone number – Critical for identifying repeat customers by their phone number; useful in busy call centers where orders may be identified by the customer’s phone number.
Email address – A reliable way to match a customer.
User ID – For system‑level identification (generally used by developers).
How to search: The agent starts typing any of the above information into the search field. The plugin returns matching results in real time. Once the correct customer appears, the agent selects it, and the billing information is automatically populated in the block.
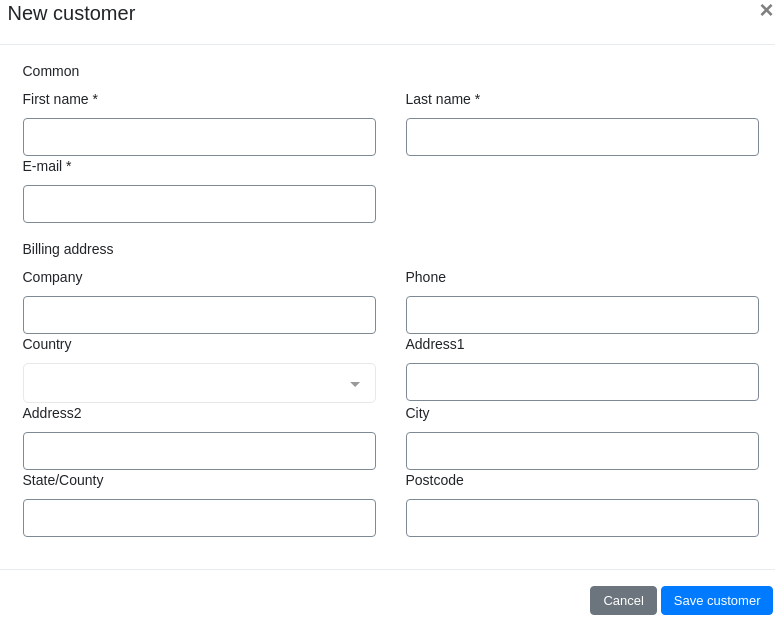
Creating a New Customer
If the customer is new – or if the agent cannot find them in the existing database – a new customer profile can be created directly from the order screen without leaving the current page.
Step‑by‑step instructions:
Click the New customer button located in the Find or create a customer block.
A pop‑up window opens, containing fields for the customer’s personal and address information.
Fill in the required fields (first name, last name, email address, phone number, etc.).
Click the Save customer button.
The new customer is immediately available for the current order. Their profile is saved in the WordPress user database and will appear in future searches.
Pro tip: The plugin administrator can configure which fields are required or hidden when creating a new customer. This is done in the Customers tab of the plugin’s Settings page (Pro version).
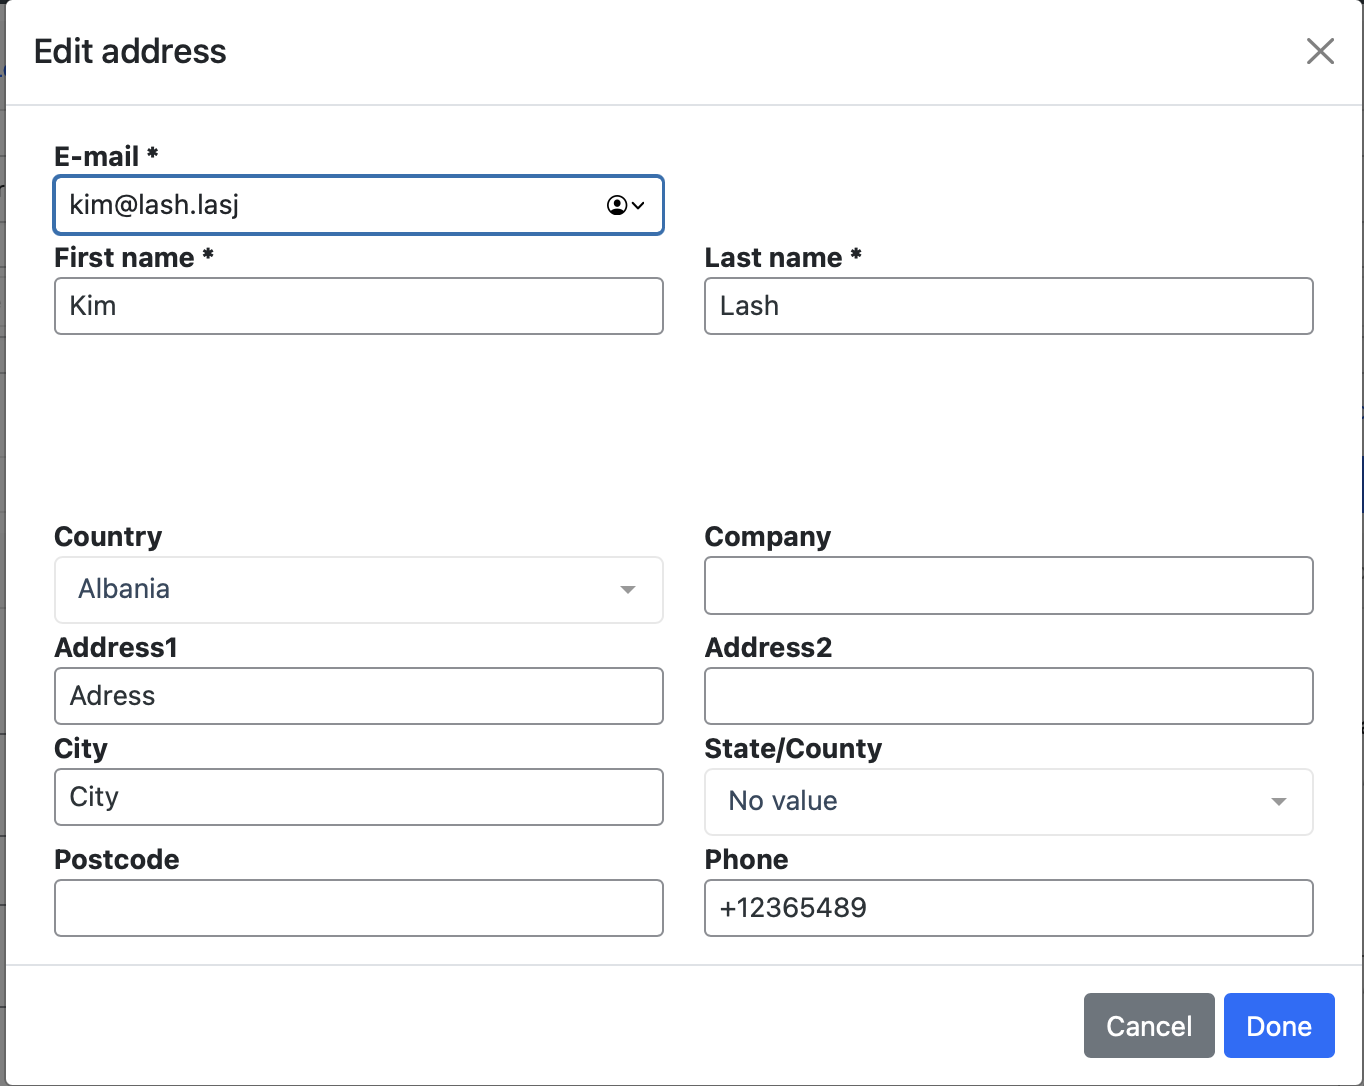
Understanding the Billing Details Block
Once a customer is selected (either by searching for an existing one or creating a new one), the Billing Details block displays the customer’s current billing information. This includes fields such as:
First name and last name.
Company name (if provided).
Address line 1 and address line 2.
City, state, postcode, and country.
Phone number and email address.
Editing billing information:
Click the pencil icon next to the Billing Details heading.
Edit any of the address fields as needed (for example, if the customer has moved since their last order).
Click the Done button.
After clicking Done, the user’s billing information is updated across the customer’s profile and will be used for this order and future orders.
Power‑user tip: With the Pro version, when the Automatically update customer’s profile on order creation setting is enabled (in Settings → Customers), any changes made to billing or address information are saved to the customer’s profile automatically – but only after clicking the Save to customer button.
Shipping to a Different Address
Sometimes the customer wants the order delivered to an address that is different from the billing address – for example, a gift sent to a friend, or a delivery to a work address.
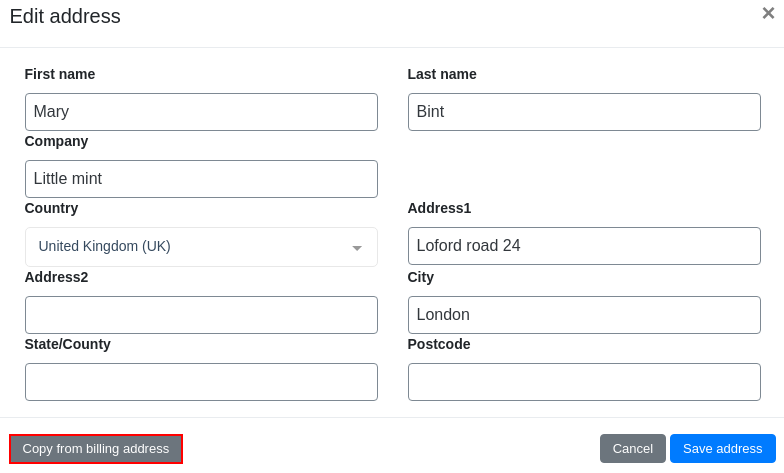
How to handle a separate shipping address:
Select the Ship to a different address? checkbox in the Find or create a customer block.
Click the pencil icon that appears next to the shipping address section.
Fill in the required shipping address fields (recipient name, street address, city, postcode, etc.).
Use the Copy from billing address button if the shipping address is identical to the billing address, and then only minor adjustments are needed.
Click the Save address button.
The shipping address is now associated with this order only and is stored separately from the customer’s permanent billing address.
Pro Version Customer Features
Phone Orders for WooCommerce – Pro adds several advanced customer management features that are not available in the free version.
Tax Exempt (PRO)
In certain situations, an order may be tax‑exempt – for example, when selling to a wholesale customer, a tax‑exempt organisation, or a customer located in a jurisdiction with no sales tax.
How to apply tax exemption:
Select the Tax exempt checkbox in the Find or create a customer block.
When this checkbox is selected, no taxes are calculated or applied to the current order. The setting applies only to the current order and does not alter the customer’s tax status globally. It is a Pro‑version exclusive feature.
Order History (PRO)
When an agent is on the phone with a repeat customer, seeing the customer’s past orders can be invaluable – for reordering, resolving issues, or making product recommendations.
How to use order history:
Select a customer in the Find or create a customer block.
Click the Order History link.
A list of the customer’s previous orders appears, showing order numbers, dates, totals, and statuses. The agent can use this information to assist the customer without toggling between different screens.
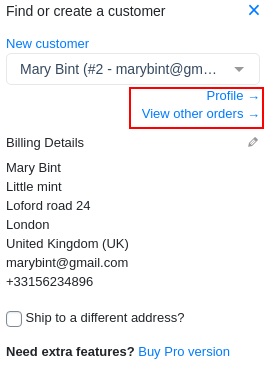
Access to the Customer’s Profile and Other Orders
From the customer selection area, the agent can also:
Click Profile to view the full WordPress user profile of the customer.
Click View other orders to see all orders associated with that customer.
These shortcuts give the agent full visibility without leaving the order creation interface.
Have questions?
Please submit a support request. We're always happy to help!