Add custom fields to order or customer popups
Phone Orders lets you add custom fields to the order creation popup and the customer creation popup directly from the plugin’s settings. This guide explains how to define custom fields, which field types are supported, and how the entered information saves to the order.
How to Define Custom Fields
Step 1: Go to Phone Orders → Settings in your WordPress admin.
Step 2: Find the section labelled Add custom fields to order or Add custom fields to customer.
Step 3: In the text area, enter each custom field on a separate line using the following format:
|
1 |
Label|field_name|type|value1|value2|value3 |
| Parameter | Description |
|---|---|
Label | The human‑readable text that appears next to the input field. |
field_name | The internal meta key that saves to the database. Use only lowercase letters, numbers, and underscores. |
type | The HTML input type. Supported values: text, select, checkbox, radio, hidden, date, time. |
value1, value2, value3 | For select or radio fields, list the available options. For text, date, or time, these values are ignored. |
Step 4: Click Save settings.
Example Custom Fields
The following example defines two custom fields:
|
1 2 |
Gender|gender|radio|Male|Female Delivery Date|delivery_date|date |
What this does:
- Gender appears as a pair of radio buttons (Male/Female). The plugin saves the selected value as order meta with the key
gender. - Delivery Date appears as a date picker. The plugin saves the chosen date as order meta with the key
delivery_date.
Other samples:
|
1 2 3 4 5 6 7 |
End Date|end_date|date Pickup at|pickup_time|time Gold member|gold_member|hidden|YES *Gender|gender|radio|male=Male|female=Female Preference|communication|checkbox|Phone|Email Preference phone number|phone|text|8-800- Extra raincoat|rain|select|Yes|No|Unknown |
3. Supported Field Types
| Type | Description |
|---|---|
text | A standard single‑line text input. |
select | A dropdown menu. Provide the options as value1, value2, etc. |
checkbox | A single checkbox. The label appears next to the box. |
radio | A set of radio buttons. Provide the options as value1, value2, etc. |
hidden | A hidden input field (useful for passing default values). |
date | A date picker (uses the browser’s native date input). |
time | A time picker (uses the browser’s native time input). |
Note: For
selectandradiofields, the first option in the list is pre‑selected by default. Forcheckboxfields, the field value is1(checked) or0(unchecked).
4. Where the Fields Appear
- Order popup: When the agent clicks the Create order button, the custom fields appear in a popup window before the order finalises.
- Customer popup: When the agent clicks the New customer button, the custom fields appear in the customer creation form.
The entered information saves as order meta (for order fields) or user meta (for customer fields). You can view the saved data on the WooCommerce → Orders edit screen or the Users profile page.
5. Making a Field Required
To make a custom field mandatory, add * before the whole line. For example:
*Gender|gender|radio|male=Male|female=Female
The agent cannot save the order or create the customer without providing a value for this field.
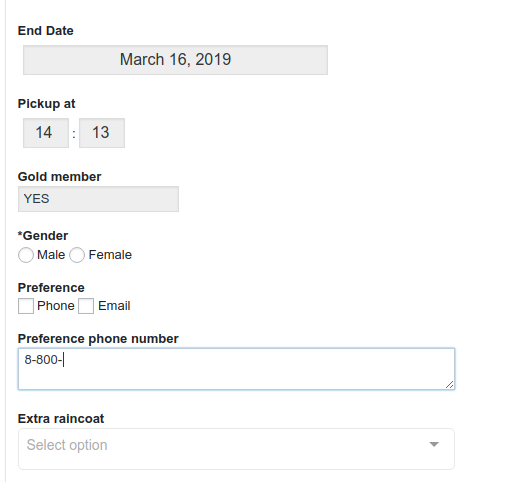
6. Practical Use Cases
| Use Case | Configuration |
|---|---|
| Capture a gift message | Gift Message|gift_message|text |
| Select a delivery speed | Delivery Speed|delivery_speed|select|Standard|Express|Next Day |
| Customer age verification | Age verification|age_verified|checkbox |
| Preferred contact time | Contact Time|contact_time|time |