Common
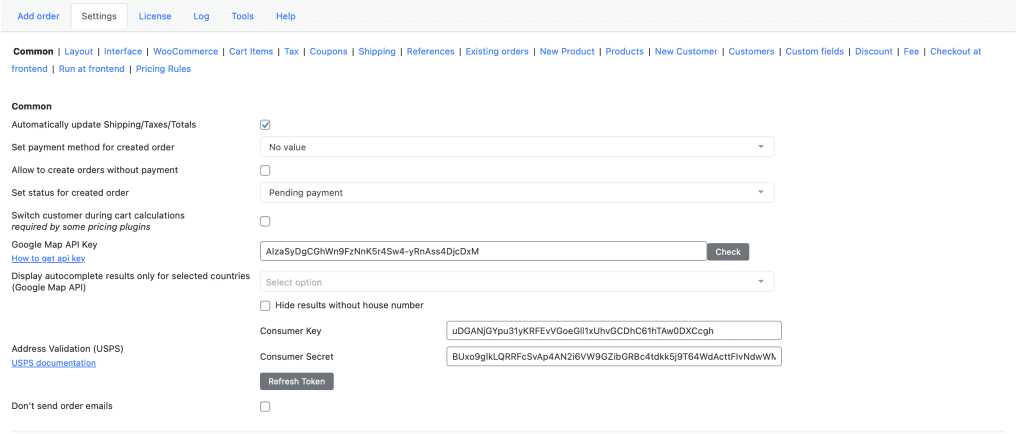
The Common settings tab in the Pro version of Phone Orders for WooCommerce contains the essential global configuration options that affect how the plugin behaves. These settings determine how prices recalculate, which payment methods and order statuses apply to manual orders, how address autocomplete works, and how the plugin integrates with external services such as Google Maps and USPS. This guide explains each option in the Common tab, when to use it, and how to configure it for your specific workflow.
Note: The Common settings tab is available in both the free and Pro versions of Phone Orders for WooCommerce. However, some features (such as the ability to choose a payment method for the created order) are exclusive to the Pro version.
1. Accessing the Common Settings Tab
Step‑by‑step instructions:
- Log into your WordPress admin dashboard.
- Go to WooCommerce → Phone Orders → Settings.
- Click the Common tab.
All settings described in this guide are located on this page.
2. Automatically Update Shipping/Taxes/Totals
What it does:
This parameter controls whether the plugin automatically recalculates the order total, shipping costs, and taxes after any change. When you turn on this option, the plugin recalculates all amounts instantly every time the agent adds or removes a product, changes a quantity, or modifies the customer’s address. When you turn off this option, the agent must click the Recalculate button manually to refresh the totals.
Why it matters:
Automatic recalculation speeds up the order process by eliminating the need for an extra click. However, for stores with very complex tax rules or many products, automatic recalculation may cause a slight performance delay.
When to use it:
- Enable this option (recommended for most stores) – Your agents do not need to remember to click Recalculate, which reduces errors and speeds up call handling.
- Disable this option – You want to give agents full control over when totals recalculate, or you are troubleshooting a performance issue.
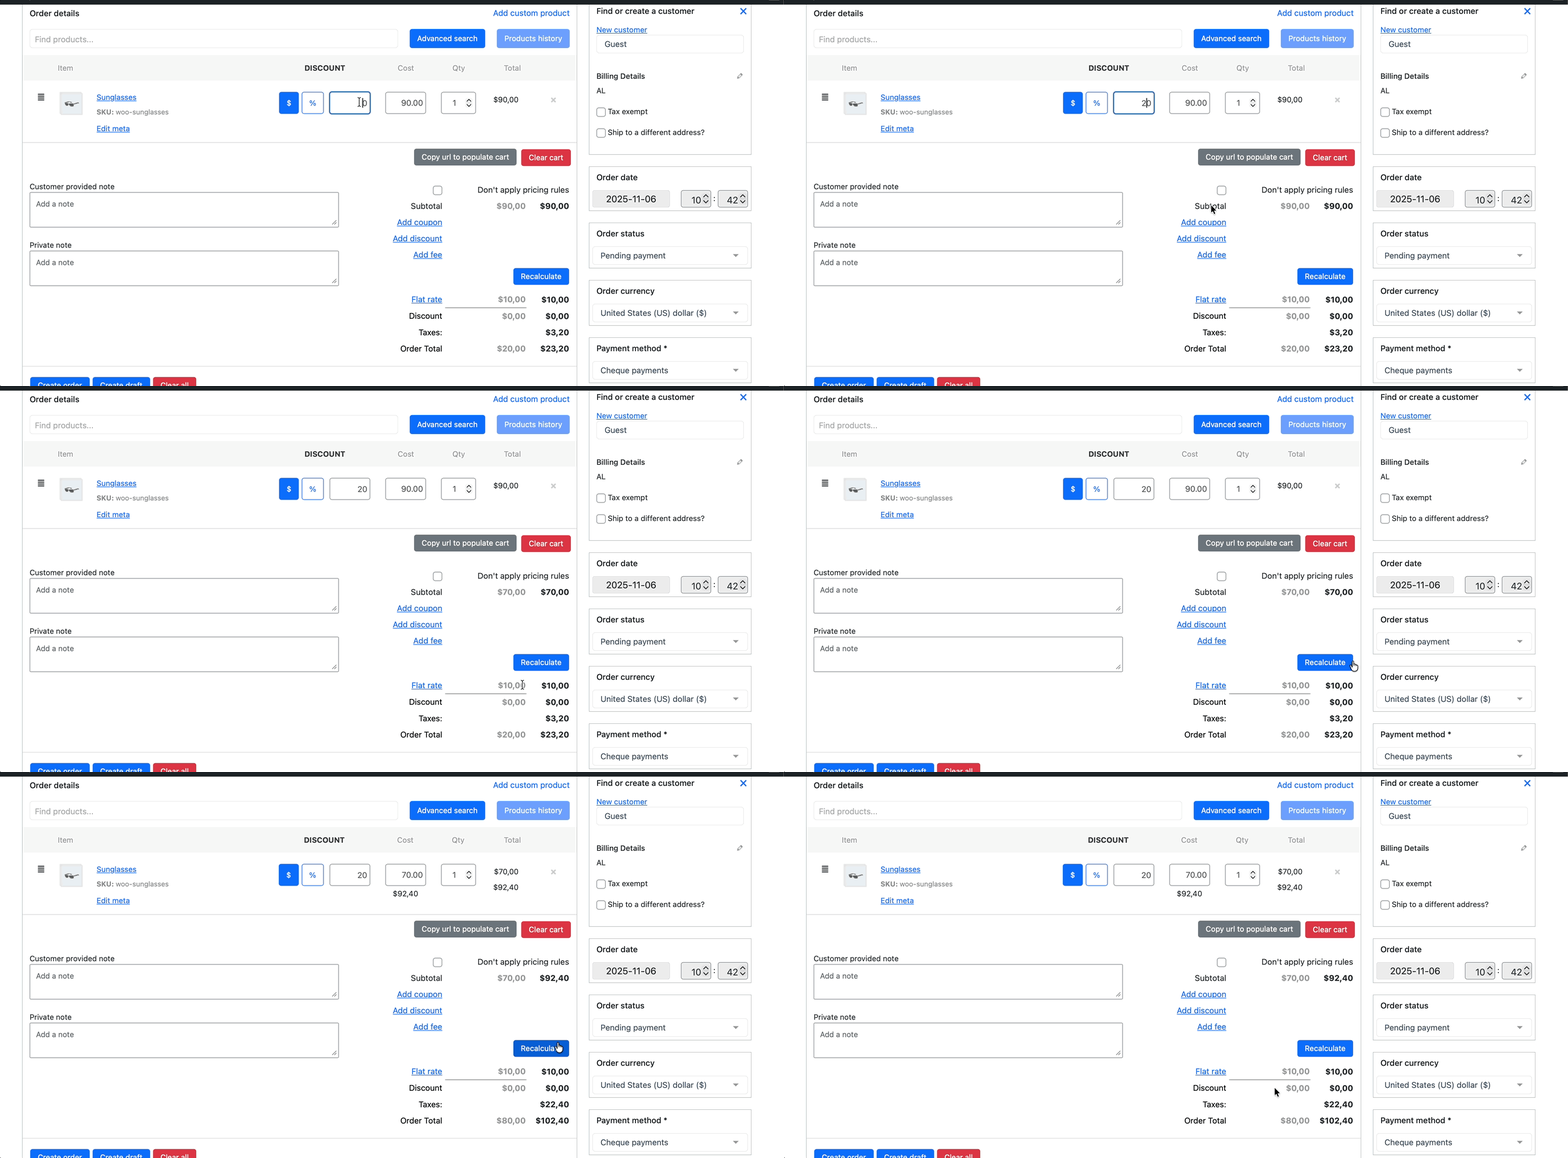
3. Set Payment Method for the Created Order (Pro Version)
What it does:
This option allows you to pre‑select the payment method that will be assigned to orders created through the Phone Orders interface. The payment methods available in the dropdown come from the gateways you have configured in WooCommerce → Settings → Payments.
Why it matters:
If you always use the same payment method for phone orders (for example, “Cash on Delivery” or “Bank Transfer”), setting a default saves the agent from having to select it manually each time. The agent can still change the payment method before finalising the order if needed.
How to configure it:
- In the Common tab, locate the Set payment method for the created order option.
- From the dropdown, select the desired payment gateway (e.g., “Cash on Delivery”, “Bank Transfer”, “Credit Card”).
- Click Save settings.
Note: This feature is part of the Pro version. The free version does not include this option.
4. Allow to Create Orders Without Payments
What it does:
When you enable this checkbox, the plugin allows agents to finalise an order even when no payment method has been selected and the order total is not zero. This is useful for creating “quote” orders or for workflows where payment is collected offline at a later time.
Why it matters:
By default, WooCommerce expects a payment method to be selected before an order can be completed. Enabling this option bypasses that requirement, giving your agents more flexibility.
When to use it:
- Enable this option – You create orders that are not immediately paid (e.g., quotes, lay‑by, or orders that will be invoiced later).
- Disable this option – You require every order to have a payment method selected at the time of creation.
5. Set Status for Created Order
What it does:
This setting determines the default order status that WooCommerce assigns to every order created through the Phone Orders interface. The dropdown includes all standard WooCommerce statuses, such as Pending payment, Processing, On hold, Completed, Cancelled, and Refunded. If you have added custom order statuses (via a plugin or custom code), they also appear in the list.
Why it matters:
Choosing the right default status ensures that new phone orders enter the correct stage of your fulfilment workflow without manual intervention.
Practical examples:
- Pending payment – The customer will pay later (e.g., by bank transfer or cash on delivery). Stock is not reduced.
- Processing – The customer has already provided payment over the phone (e.g., by credit card). Stock is reduced.
- Completed – The order is both paid and fulfilled immediately. Stock is reduced.
- On hold – The order requires manager approval before fulfilment.
How to configure it:
- In the Common tab, locate the Set status for created order dropdown.
- Choose your preferred default order status.
- Click Save settings.
Note: Stock levels are reduced only for orders with the status Processing or Completed. If you set the default to
Pending payment, stock does not change until you manually update the status later.
6. Switch Customer During Cart Calculations
What it does:
This parameter enables the plugin to temporarily switch the user context to the selected customer during cart calculations. Some pricing plugins (such as Advanced Dynamic Pricing for WooCommerce) rely on the current user’s role to determine which discounts apply. When an agent creates a phone order, the plugin normally uses the agent’s own role (e.g., administrator). Enabling this option tells the pricing plugin to calculate prices based on the customer’s role, not the agent’s.
Why it matters:
Without this setting, role‑based discounts (e.g., 10% off for “Wholesale Customer”) would not apply correctly to phone orders. The plugin would see the agent’s role (administrator) and apply the administrator’s pricing instead of the customer’s.
When to use it:
- Enable this option – You use any pricing or discount plugin that applies different prices based on user role or customer group.
- Disable this option – You do not use role‑based pricing, or you want all phone orders to use the standard catalogue prices.
Note: This setting works in conjunction with a second setting inside your pricing plugin. For example, if you use Advanced Dynamic Pricing for WooCommerce, you must also enable “Apply pricing rules to backend orders” in Pricing Rules → Settings → System. Both settings must be turned on for discounts to apply to phone orders.
7. Google Maps API Key
What it does:
This field accepts a Google Maps API key. When you provide a valid key, the phone order interface adds an address autocomplete feature to the billing and shipping address fields. As the agent types an address, Google Maps suggests matching addresses, which speeds up data entry and reduces typos.
Why it matters:
Manual address entry is slow and error‑prone. Address autocomplete accelerates the process and ensures that shipping and billing addresses are accurate, which reduces delivery failures and customer complaints.
Step‑by‑step to obtain and configure a Google Maps API key:
- Go to the Google Cloud Console.
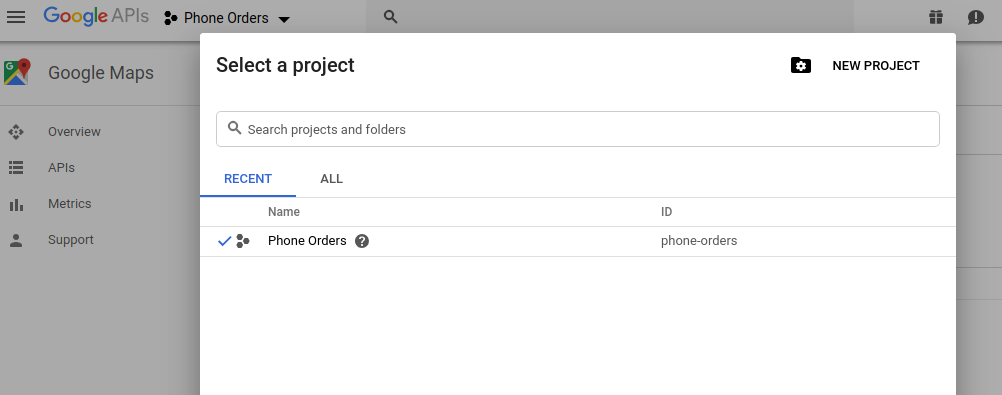
- Create a new project or select an existing one.
- Navigate to APIs & Services → Library.
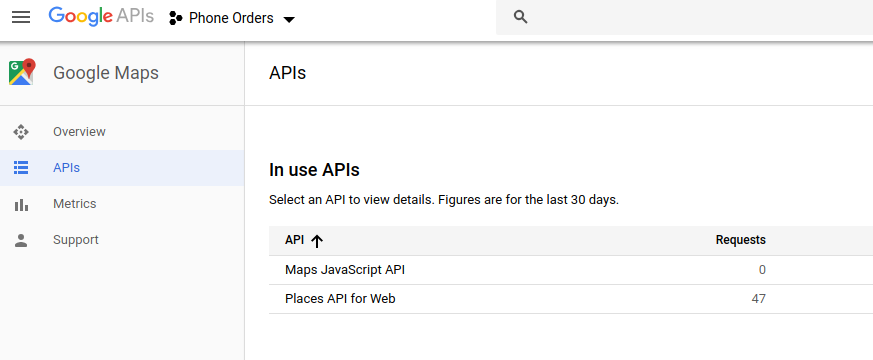
- Enable the following APIs:
- Places API
- Maps JavaScript API
- Go to APIs & Services → Credentials.
- Click Create Credentials → API Key.
- Copy the generated API key.
- Return to WooCommerce → Phone Orders → Settings → Common.
- Paste the key into the Google Maps API Key field.
- Click Save settings.
- Optionally, click Check (if available) to verify that the key works.
Note: Google may require you to enable billing for the API key. The service has a free tier, but high usage may incur charges. Monitor your usage in the Google Cloud Console.

7.1. Sub‑options for Google Maps Autocomplete
The Common tab also contains two sub‑options that refine how the address autocomplete behaves.
7.1.1. Display Autocomplete Results Only for Selected Countries
- What it does: Restricts the address autocomplete dropdown to addresses from specific countries. The plugin only shows results that match the selected country.
- Why it matters: If your store only ships to one or two countries (e.g., the United States and Canada), restricting the autocomplete prevents the agent from seeing irrelevant addresses and makes the dropdown more responsive.
- How to configure it:
- Locate the Display autocomplete results only for selected countries option.
- Select one or more countries from the dropdown (hold Ctrl to select multiple).
- Click Save settings.
7.1.2. Hide Results Without House Number
- What it does: When you turn on this checkbox, the autocomplete dropdown hides any address suggestion that does not include a house number or street number. The plugin only shows fully qualified addresses.
- Why it matters: Some address suggestions (e.g., “New York, NY” or “London, UK”) are city‑level or region‑level results. For shipping purposes, you need a specific street address. Enabling this filter removes incomplete suggestions, forcing the agent to select a more precise address.
- When to use it:
- Enable this option – You require a complete street address for every order.
- Disable this option – You are comfortable with city‑level or region‑level suggestions.
8. Address Validation Service API Key (USPS Username)
What it does:
This field accepts a USPS Web Tools username. When you provide a valid username, the plugin can validate addresses using the United States Postal Service (USPS) address validation service. The USPS API checks whether a given address exists and corrects any errors (e.g., wrong zip code, misspelled street name).
Why it matters:
Invalid shipping addresses cause delivery failures, returns, and customer frustration. Address validation prevents these problems by catching errors before the order is submitted.
Step‑by‑step to obtain a USPS Web Tools username:
- Visit the USPS Web Tools registration page.
- Click Sign Up or Register for an Account.
- Complete the registration form. You will receive a User ID (your API username) by email.
- Return to WooCommerce → Phone Orders → Settings → Common.
- Paste the username into the Address Validation Service API Key (USPS Username) field.
- Click Save settings.
Note: The USPS address validation service is intended for US addresses only. For other countries, you may need a different address validation provider.
9. Don’t Send Order Emails
What it does:
When you enable this checkbox, the plugin prevents WooCommerce from sending automatic email notifications (such as new order confirmations) to the site administrator when an order is created through the Phone Orders interface.
Why it matters:
In busy call centres, the administrator may receive hundreds of “new order” emails every day, which can clutter the inbox and make it difficult to spot real issues. Disabling these emails reduces noise. Note that this setting does not affect emails sent to the customer (e.g., order confirmation emails). Those emails are controlled separately by WooCommerce.
When to use it:
- Enable this option – You want to reduce admin email noise in a high‑volume phone order environment.
- Disable this option – You rely on admin email notifications to track new orders.
Best Practices for Common Settings
- Enable automatic recalculation for most stores. This saves agents from having to remember an extra click and reduces errors.
- Set a realistic default order status. Choose Pending payment if you collect payment later, or Processing if you take payment over the phone.
- Always enable Switch customer during cart calculations if you use any role‑based pricing.Without this, discounts will not apply correctly.
- Protect your Google Maps API key. In the Google Cloud Console, restrict the key to your domain to prevent unauthorised use.
- Test address autocomplete and validation before going live. Create a few test orders with different addresses to confirm that both features work as expected.
- Document your settings. If multiple administrators manage the plugin, keep a note of which payment method and order status you have selected as defaults.
Summary of Common Settings
| Setting | Purpose | Recommended State |
|---|---|---|
| Automatically update Shipping/Taxes/Totals | Controls whether totals recalculate automatically or require a manual Recalculate click. | ✅ Enable for most stores. |
| Set payment method for the created order (Pro) | Default payment method for new phone orders. | ⚠️ Set to your most common payment gateway. |
| Allow to create orders without payments | Permits order finalisation without a selected payment method. | ✅ Enable for quote or invoice workflows; ❌ disable otherwise. |
| Set status for created order | Default order status for new phone orders. | ✅ Set to Processing if you take payment by phone; ❌ set to Pending payment otherwise. |
| Switch customer during cart calculations | Enables role‑based discounts for phone orders. | ✅ Enable if you use any role‑based pricing plugin. |
| Google Maps API Key | Enables address autocomplete. | ✅ Always configure to speed up address entry. |
| Display autocomplete results only for selected countries | Restricts autocomplete suggestions to specific countries. | ✅ Set to your shipping countries. |
| Hide results without house number | Hides incomplete address suggestions. | ✅ Enable for precise street‑level addresses. |
| Address Validation Service API Key (USPS Username) | Enables USPS address validation. | ✅ Enable if you ship to US addresses. |
| Don’t send order emails | Suppresses admin new order emails. | ✅ Enable for high‑volume phone order environments. |