Common Information
Taking orders over the phone is a vital part of many WooCommerce stores, from local businesses and B2B wholesalers to customer support teams managing high-ticket purchases. The default WooCommerce system, while functional, is built around a customer self-checkout flow and often feels clunky and slow when used for manual order entry by staff.
Phone Orders for WooCommerce by AlgolPlus transforms this experience. It replaces the standard “Add Order” page with a clean, keyboard-optimised interface that is custom-built for speed. Agents can find customers, search for products, apply discounts, and finalise an order in a fraction of the time it would take using the native process. Whether it is a once-off manual order or a high-volume call centre setup, this plugin is designed to streamline the workflow.
What You Will Learn in This Guide:
- The key difference between the Free and Pro versions, and which one is right for your store.
- How to use the main Order Details block for rapid product selection and cart manipulation.
- How to manage customers via the Find or create a customer block, including advanced Pro features.
- How to finalise an order, use the post-creation toolbar, and leverage powerful Pro features like duplicating orders and editing existing ones.
1. Overview: The Structure of the “Add Order” Tab
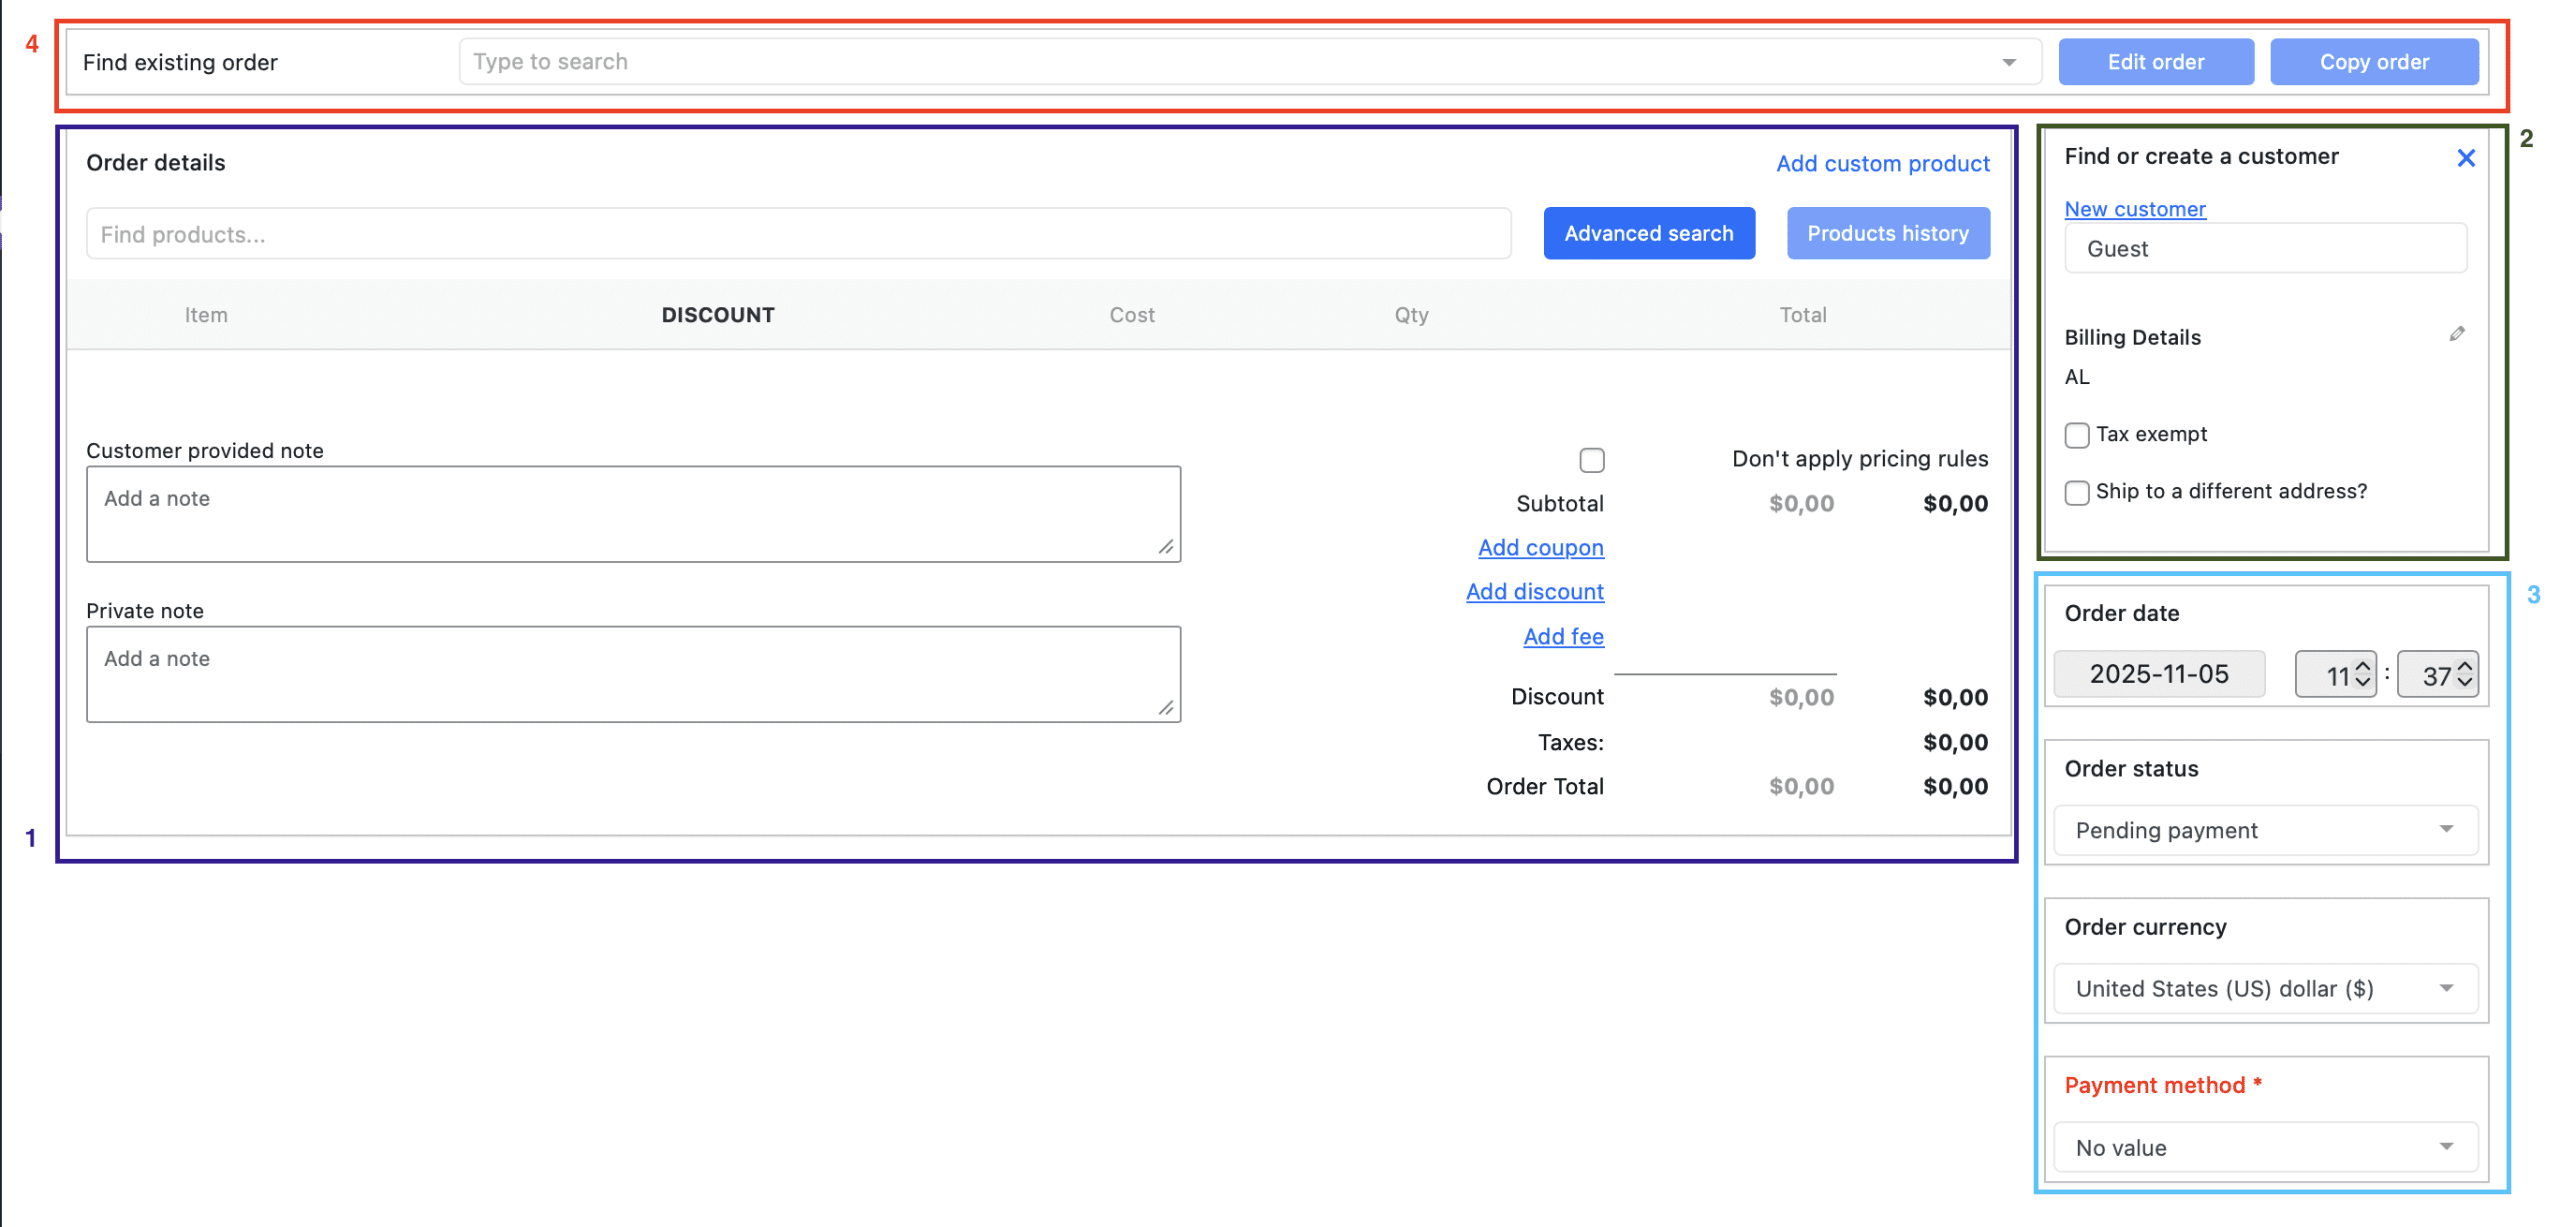
After installing and activating the plugin, you can access it by navigating to WooCommerce → Phone Orders. The interface is logically divided into several key sections, each designed for a specific task.
| Section | Function |
|---|---|
| Find or create a customer | Search for existing customers by name, email, phone, or username. Create new customer profiles directly within the order. Manage billing and shipping addresses, and apply tax exemption (Pro). |
| Order Details | The main engine for adding products, applying coupons, manually adjusting pricing, adding fees, and creating custom line items. |
| Additional Sections (Layout Blocks) | Optional Pro areas that can be enabled to control order date, status, payment method, and currency directly from the same page. |
| Search for Existing Orders | A powerful Pro feature that allows agents to instantly locate any existing order, then edit or duplicate it. |
2. Free vs. Pro: Which Version Do You Need?
The plugin comes in two versions. The Free version provides a solid foundation for basic order entry, while the Pro version adds a layer of powerful automation and time-saving tools suitable for any busy store.
Here is a detailed breakdown of the differences to help you choose the right path.
Free Version Core Features
- Optimised Interface: The fast, streamlined “Add Order” page for creating manual orders.
- Product Search: Add products by typing the name or SKU.
- Customer Management: Search for existing customers or create new ones.
- Basic Cart Tools: Apply coupons, change quantities, and override product prices.
- Order Creation: Finalise and save the order with a single click.
- View & Send Invoice: Essential post-order buttons.
Pro Version Exclusive Features
The following advanced features are available in the Pro version to supercharge the workflow.
| Feature | Description |
|---|---|
| Order Search & Edit | Locate any existing order from the same interface and open it for editing or duplication. This is a significant time-saver for managing returns or repeat orders. |
| “Pay order as customer” | After creating an order, process the payment yourself on behalf of the customer. |
| “Duplicate Order” Button | Perfect for regular customers. One click creates a new order with all the same products, quantities, and details from a previous one. |
| “Checkout Link” | Generate a unique, secure URL for the customer so they can review, adjust, and pay for the order on their own device. |
| “Full Refund” Button | Issue a complete refund for an order directly from the toolbar, using the original payment gateway. |
| Keyboard Shortcuts | Enhance agent speed by enabling keyboard navigation for key actions. |
| Customisable Layout | Enable or disable the “Order date/time”, “Order status”, and “Order payment method” blocks in the interface. |
If your phone order volume is low, the free version may be sufficient. For any store where agents are creating multiple orders per hour, the Pro version quickly pays for itself in time saved. For a complete list of all Pro version features and a detailed comparison, please refer to the Phone Orders for WooCommerce: Free vs Pro article in our documentation.
3. The “Find or create a customer” Block (Step-by-Step)
This block is the essential first step. You cannot proceed with an order without a customer being assigned.
1: Search for an existing customer.
- Type the customer’s first name, last name, email address, phone number, or username into the search field.
- The system will instantly return matching results.
- Select the correct customer. Their fields will be populated automatically.
2: Create a new customer (if not found).
- Click the New customer button next to the search bar.
- A pop-up window will appear. Fill in the customer’s basic details (name, email, phone, etc.).
- Click Save customer. The new profile is now assigned to the order and saved for future use.
3: Manage billing and shipping addresses.
- To edit the billing address, click the pencil icon in the Billing Details section.
- Edit the address fields as needed.
- Click the Ship to a different address? checkbox to reveal the shipping address section. Enter the recipient’s details here.
- Click Done to save any changes.
4: Pro Feature – Apply Tax Exemption.
- If an order is tax-exempt (e.g., for a wholesale customer), tick the Tax exempt checkbox.
- When this is enabled, no tax will be calculated on the order at all. This is a Pro version exclusive feature.
4. The “Order Details” Block: The Main Workspace
Once a customer is assigned, you can start building the order. The “Order Details” block is the primary engine.
a. Adding Products and Applying Coupons
How to Add Products Quickly:
- Type the product name or SKU into the product search field.
- Select the desired product from the dropdown list. It will be added to the cart with a quantity of
1. - For variable products (e.g., sizes, colours), select the required attributes from the dropdown menus that appear.
How to Apply a Coupon:
- Locate the smart coupon field within the “Order Details” block.
- Enter the coupon code.
- Click the Apply Coupon button.
- The discount will be calculated and applied immediately.
b. The Cart Table and “Recalculate” Button
The cart table shows every product line item. From here, you can make precise adjustments.
- Adjusting Quantities / Overriding Prices: Simply click on the relevant field in the table and enter the new number. If the ‘Allow price overrides for products’ setting is enabled, you can enter any custom price, even a negative one for a product-level discount.
- Using the “Recalculate” Button: This is your most important tool. After you have changed any quantity or price, or applied any coupon, shipping cost, or fee, you must click the Recalculatebutton. This forces the system to refresh all subtotals, taxes, and the final order total. Failing to do so could result in an incorrect final amount.
- Managing Shipping and Fees: Use the dedicated sections below the cart to add manual shipping costs (e.g., “Flat Rate, 10.00”) or extra fees (e.g., “Gift wrapping, 5.00”) with their own names and amounts.
- Adding Internal Notes: Use the Order notes field for private instructions to the store. Use the Customer note field for any message that should appear on the customer’s order confirmation email.
For a comprehensive guide to every feature in this block, including creating custom products and editing product details, please see the separate Order Details guide.
5. Enabling Additional Layout Blocks (Pro Version)
By default, only the core customer and order details are visible. The Pro version allows you to unlock powerful additional controls.
How to enable them:
- Navigate to WooCommerce → Phone Order → Settings.
- Click the Layout tab.
- Tick the checkboxes for the sections you wish to display.
- Click Save settings.
These sections will now appear inside the “Order Details” area.
| Feature | Description |
|---|---|
| Order date/time | Edit the order’s creation date and time. Useful for backdating orders or adjusting for different time zones. |
| Order status | Pre-select the order status when the order is created (e.g., Pending payment, Processing, Completed). |
| Order payment method | Choose how the customer will pay (e.g., Bank Transfer, Cash on Delivery, Credit Card). |
| Currency | If you have a multi-currency store, you can select the currency for this specific order. |
6. The “Search for Existing Orders” Block (Pro Version)
This is a game-changer for order management. Instead of leaving the Phone Orders interface, you can instantly locate any previous order.
How to use it:
- Type the customer name, email, order number, or any product name into the search bar at the top of the page.
- The search will return a list of matching orders.
- Choose an order and decide what to do with it:
- Edit: The order will be loaded into the current interface with all details pre-filled. You can then change a product, adjust a quantity, or add a new item before saving it again.
- Copy (Duplicate): The system will create an exact copy of the selected order. This is ideal for a regular customer calling to place the same order again.
This feature eliminates the need to navigate to the standard WordPress order list, saving agents significant time.
7. Finalising the Order and Using the Toolbar (Step-by-Step)
After all adjustments are complete, finalise the order.
Step-by-Step Order Creation:
- Perform a final check of the order details and click Recalculate.
- Click the Create order button.
The order will be saved in WooCommerce, stock levels will be reduced, and the post-creation toolbar will appear.
The toolbar displays a series of action buttons:
- View order: (Free & Pro) Opens the standard order admin page.
- Send invoice: (Free & Pro) Emails a PDF invoice to the customer.
- Create new order: (Free & Pro) Clears the current form to start a fresh call.
- Create draft: (Free & Pro) Saves the order as a draft without finalising.
- Clear all: (Free & Pro) Resets the form completely.
- Checkout link: (Pro) Generates a secure URL for the customer to complete checkout themselves.
- Pay order as the customer: (Pro) Opens a secure payment page to process payment.
- Duplicate order: (Pro) Instantly creates a copy of the order.
- Full refund: (Pro) Issues a full refund through the payment gateway.
You can enable or disable which toolbar buttons are displayed on the Settings → Layout tab (Pro version). The free version shows a fixed set of essential buttons.
More information about each section read in the next articles.