Express Creation of a Phone Order
Creating a manual order during a live phone call should be fast, intuitive, and free of friction. The Phone Orders for WooCommerce plugin organises the entire process into four logical steps, so your agents can keep the conversation flowing and build an accurate order in seconds. This guide walks you through each step, from product selection to final invoice delivery, and highlights the most useful Pro version enhancements along the way.
Step 1: Select Which Products You Want to Sell
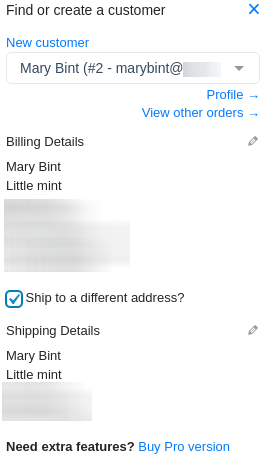
Before you can add any item, you need a customer assigned to the order. The Find or create a customer block at the top of the Add order tab is your starting point.
1.1. Find or create the customer
- Search for an existing customer – Start typing the customer’s first name, last name, email address, phone number, or WordPress username. Matching results appear instantly. Select the correct record, and the billing information is automatically filled.
- Create a new customer – If the caller is not yet in your database, click the New customer button, complete the pop‑up form (name, email, phone, etc.), and save it. The new profile is ready for use immediately.
1.2. Add products to the order
Once a customer is selected, move to the product search field. The plugin is designed to find items with minimal typing.
- Standard product search – Type the product name or SKU. The first few letters are enough; the plugin returns matches in real time. Click the desired product to add it to the cart with a default quantity of 1.
- Advanced search (batch addition) – When a customer orders several products with similar names, click the Advanced search button. In the pop‑up window, type part of the product name, tick the checkboxes of all required items, and click Add to cart.
- Create a custom product on the fly – For one‑off services or personalised items that are not in your catalogue, click Create custom product. Enter a line item name, the price per unit, and the quantity. The custom product is added to the order without creating a permanent WooCommerce product.
- Use Product History – For repeat customers, click the Product History button. You will see a list of all items the customer has previously ordered. Select any products that the caller wants again, and they are added to the cart instantly.
Pro tip: The product search result shows the product image, stock status, regular price, sale price (if applicable), and SKU – all the information a phone agent needs to confirm the correct item with the customer.

Step 2: Select Customer and Set the Shipping Address
Before you finalise the order, you may need to verify or adjust the customer’s address.
2.1. Review the billing address
- The Billing Details block displays the customer’s stored billing address.
- If any detail has changed (for example, the customer has moved or their phone number is different), click the pencil icon next to Billing Details, edit the relevant fields, and click Done. In the Pro version, enabling Automatically update customer’s profile on order creation in Settings → Customers will save these changes to the customer’s permanent record.
2.2. Add a separate shipping address (if required)
- Tick the Ship to a different address? checkbox.
- Click the pencil icon that appears, enter the recipient’s address, and click Save address. This address will be used only for the current order.
2.3. Apply tax exemption (Pro version)
- If the order is tax‑exempt (e.g., a wholesale customer), tick the Tax exempt checkbox. The order total will be calculated without any taxes.
2.4. Adjust order attributes (Pro version – layout blocks)
You can enable additional layout blocks in Settings → Layout to control other order properties directly from the Order Details section:
- Order date/time – Change the order’s creation date and time, useful for backdating orders.
- Order status – Select the initial order status (Pending payment, Processing, Completed, etc.) before creation.
- Order payment method – Record the payment method the customer intends to use.
Step 3: Set the Number of Product Units and Recalculate the Order
Once the customer and products are in place, you need to ensure the quantities, prices, and totals are correct.
3.1. Adjust product quantities and prices
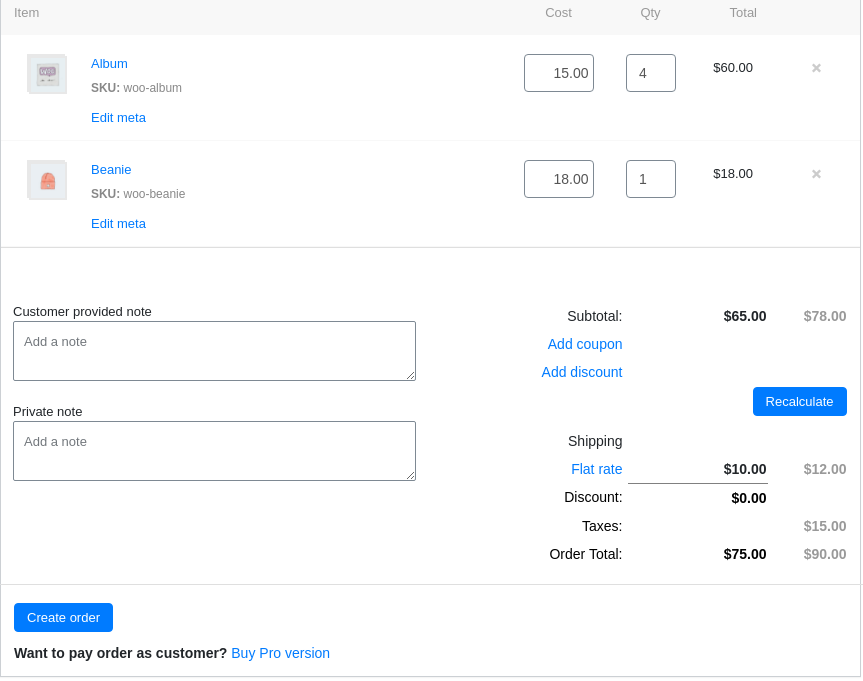
- In the Order Details cart table, click the quantity field and type the new number.
- To override the standard price (e.g., for a special discount), click the price field and enter the custom amount. Price overrides must be enabled in Settings → General (Pro version).
- To remove a product, click the trash icon at the end of its row.
3.2. Apply coupons and discounts
- Add a coupon – Click the Add coupon button. In the pop‑up window, enter the coupon code and click Apply. The discount will be calculated and displayed after you click Recalculate.
- Add a discount – Click Add discount, select whether the discount is a fixed amount or a percentage, enter the value, and click Apply. Then click Recalculate to refresh the totals.
3.3. Add shipping costs and extra fees
- Shipping – Click the selected shipping method. In the pop‑up, choose the correct method and click Save. If the shipping method does not appear, go to WooCommerce → Settings → Shippingto configure it.
- Extra fees – Click Add fee, give the fee a name (e.g., “Gift wrapping”), enter the amount, and click Apply. Positive amounts increase the order total; negative amounts (e.g.,
-5.00) apply a credit.
3.4. Add notes
- Customer note – Enter a message that will appear on the customer’s order confirmation email and in their My Account → Orders area.
- Order notes (private) – Enter internal instructions for your store staff. These notes are visible only in the WordPress admin.
3.5. Click the Recalculate button
After every change – quantity, price, coupon, discount, shipping, or fee – you must click the Recalculate button. This refreshes the subtotal, tax, and final order total, ensuring the amounts are accurate before you finalise the order.
Step 4: Create the Order and Send the Invoice
When all details are correct, you are ready to save the order and complete the call.
4.1. Create the order
- Click the Create order button.
- The order is saved to WooCommerce with the status you selected (or Pending payment by default). Stock levels are reduced automatically if the order status triggers stock reduction (Processing, Completed, or On hold).
4.2. Use the post‑creation toolbar
Immediately after order creation, the toolbar appears with several action buttons:
- View order – Opens the standard WooCommerce order admin page.
- Send invoice – Emails a professionally formatted PDF invoice to the customer’s address.
- Create new order – Clears the current form and starts a fresh order for the next caller.
- Create draft – Saves the current order as a draft without finalising it, useful for orders that need later approval.
- Clear all – Resets the entire form to a blank state.
Pro version exclusive buttons include:
- Checkout link – Generates a secure URL so the customer can complete payment on their own device.
- Edit created order – Loads the order back into the Phone Orders interface for immediate corrections.
- Pay order as the customer – Opens a secure payment page to process payment on behalf of the caller.
- View invoice – Displays the invoice in the browser for printing or download.
- Duplicate order – Creates an exact copy of the order for repeat customers (must be enabled in Settings → Layout).
- Full refund – Issues a full refund through the original payment gateway.
Pro tip: To quickly locate an existing order for editing or duplication, use the Find existing ordersearch bar (Pro version). Type the customer’s name, email, order number, or any product name, then select Edit or Copy from the results.
4.3. Send the invoice (free and Pro)
Even if you do not need any Pro toolbar buttons, the Send invoice button is available in the free version. Click it to deliver an invoice to the customer’s email address immediately – a professional final touch that confirms the order and builds trust.